
This post may contain affiliate links. Please read our disclosure policy.
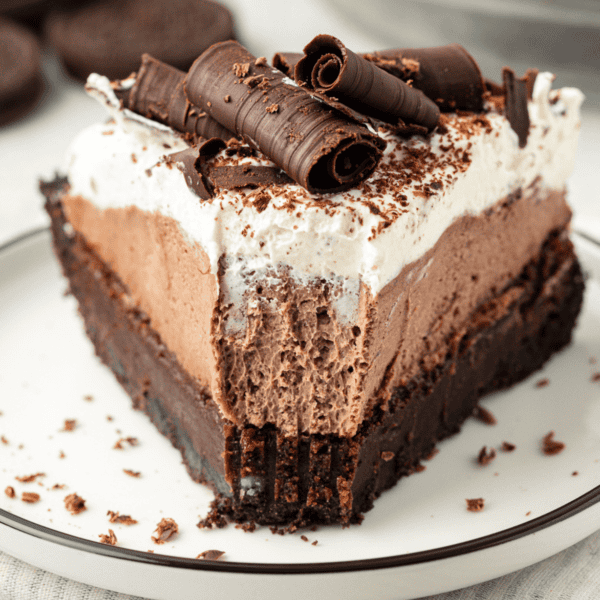
The biggest risk with a homemade chocolate pie is pulling the filling off the stove too soon. I’ll show you exactly what a fully cooked filling looks like, not just how long to cook it. You only need 10 basic ingredients and 20 minutes of hands on prep. Then it chills overnight into clean, silky slices.

This was SUCH a hit at Thanksgiving. It was gone before desserts had even started being served. I received so many compliments for it, and my family requested that I make 2 for Christmas!
-Kaitlyn
What Makes or Breaks This Chocolate Cream Pie
The biggest risk with this pie is undercooking the filling after the yolks go in. Looking thick isn’t enough. You want steady, slow bubbles across the whole surface, not just around the edges. That’s when the cornstarch has done its job.
But don’t overdo it once it’s thick. Hard whisking or a long boil after it sets can break down the starch and thin the filling back out. Whisk in the chocolate chips off the heat, then switch to a spatula once they’re mostly melted. Stir gently from there.
Then give it time. It needs at least 6 hours in the fridge, and overnight is safer. Slice it early and it slumps, even if you cooked it perfectly.
Use whole milk. Lower fat milk gives you a looser, less rich set, so this isn’t the pie to lighten up.

Old Fashioned Chocolate Pie Ingredients
You only need a pie crust and a short list of pantry staples for the filling. Weigh the sugar, cornstarch and chocolate chips if you can. The grams are in the recipe card.
- Pie crust: My homemade pie crust is my pick, but store bought works too. Either way it gets blind baked and cooled completely before the filling goes in.
- Whipped cream: I top this pie with homemade whipped cream. Store bought works too.
Pie Filling
- Granulated sugar: Sweetens the filling.
- Cornstarch: This is what thickens the filling. It needs the full 1 to 2 minute boil to do its job.
- Salt: A little balances the chocolate.
- Egg yolks: Yolks only. They get whisked into the milk before anything hits the heat.
- Whole milk: The base of the filling. Don’t swap in lower fat milk. It gives you a looser, less rich set.
- Semi-sweet chocolate chips: Whisked in off the heat, along with the butter and vanilla.
- Unsalted butter: Stirred in at the end for a smooth, silky filling.
- Vanilla extract: Goes in last with the chocolate and butter.

How to Make the Best Chocolate Pie Recipe
This chocolate pie filling recipe happens entirely on the stovetop. Sugar, cornstarch, salt, egg yolks and whole milk cook together, then the chocolate chips, butter and vanilla go in off the heat. No pie experience needed. If this is your first homemade chocolate pie recipe, start here.
Pie Crust
- Make or prep pie crust. Follow our Homemade Pie Crust instructions to make a homemade crust. Once the crust is assembled and fluted in the pie pan, place it in the refrigerator to chill for 30 minutes.
- Prep oven. Preheat the oven to 400ºF. Rearrange the baking racks so you can put the pie on the bottom rack.
- Prep crust. Use a fork to dock the bottom of the pie crust.
- Weigh down crust. Line the crust with a large piece of parchment paper. Then use a few layers of aluminum foil to create a bowl shape that fits within the pie pan. Fill the foil with dried beans, rice or granulated sugar. This is to help weigh down the pie crust, preventing bubbles or shrinking.
- Pre-bake crust. Place the pie crust on the bottom rack and bake for 20 minutes. After 20 minutes, remove the pie crust from the oven and carefully remove the dried beans, rice or granulated sugar along with the foil and parchment paper. Return to the oven and bake for 5-20 minutes longer or until the crust is golden. A homemade pie crust seems to take longer, while a store bought pie crust seems to only take 5 more minutes.
- Cool pie crust. Allow the crust to cool completely before adding the filling. I usually like to blind bake the pie crust in advance.
Pie Filling


- Combine sugar, cornstarch and salt. In a medium pot, stir together the granulated sugar, cornstarch and salt. Set aside.
- Combine wet ingredients. In a separate bowl, whisk together the egg yolks and whole milk. Gradually whisk the milk mixture into the dry ingredients in the pot.


- Boil mixture. Set the heat to medium and whisk the mixture frequently until it comes to a full boil with large bubbles across the surface, about 6 to 7 minutes. Once boiling, keep whisking and let it boil for a full 1 to 2 minutes more. This extra time is what fully activates the cornstarch, so don’t skip it even if the mixture already looks thick. The filling is ready when it coats the back of a spoon and holds a line when you run your finger through it. Remove the pot from the heat.


- Add remaining ingredients. Whisk in the chocolate chips, butter and vanilla extract. Use a spatula to scrape the bottom and sides of the pot, fully incorporating everything. Allow the mixture to cool for 10 minutes.


- Add filling to crust. Pour the pie filling into a blind baked pie crust. Allow it to cool on the counter for 30 minutes. Cover the top of the pie filling with plastic wrap to prevent the pudding from developing a skin. Refrigerate the pie overnight, or at least 6 hours. Before serving, top with whipped cream and chocolate shavings.
Old Fashioned Chocolate Pie Recipe Variations
- Gluten free chocolate pie: Use my gluten free pie crust.
- Try a different crust: I like this pie best in a buttery pie crust. A graham cracker crust or Oreo pie crust works too.
- Want a no bake version? My chocolate pudding pie skips the stove entirely.

Easy Chocolate Pie Tips
- Stir often. Whisk frequently while the filling cooks so it stays smooth.
- Boil for the full time, not just until bubbling starts. Keep as is.
- Slice clean. Run your knife under warm water and wipe it with a wet paper towel between slices.

How to Serve Old Fashioned Chocolate Pie
My favorite way to serve this pie is with fresh whipped cream and chocolate shavings.
Here are some more topping ideas:
- Crushed graham cracker crumbs
- Mini chocolate chips
- Crushed Oreo cookies
- Meringue
- Fresh berries
- Chopped Nuts
- Caramel Sauce
- Citrus zest
- Dusting of cocoa powder

How to Store Homemade Chocolate Pie
Keep this pie covered in the fridge for up to 3 days. It has milk and egg yolks in the filling, so it can’t sit out.
Can You Freeze Chocolate Pie?
Yes. Wrap the pie tightly in plastic wrap, then aluminum foil, and label it with the date. Freeze it for up to 2 months. Thaw it in the fridge for 4 to 6 hours or overnight. Don’t thaw it on the counter or the texture suffers.


Easy Chocolate Pie Recipe FAQs
Cornstarch, egg yolks and chocolate chips do the thickening. Bring the filling to a full boil (about 6 to 7 minutes), then keep it at a steady boil for a full 1 to 2 minutes before it comes off the heat.
Boil the filling the full 1 to 2 minutes, use whole milk, and chill the pie at least 6 hours. Overnight is safer. Cutting in early is the easiest way to end up with a runny slice.
Most of the time, it came off the heat too soon. Cornstarch needs a full, steady boil, not just the first bubbles. Let it boil for a full 1 to 2 minutes once it starts bubbling, whisking the whole time. It should coat the back of a spoon and hold a line when you run your finger through it.
More Chocolate Recipes
More Thanksgiving Pies

Tap stars to rate!
Old Fashioned Chocolate Cream Pie
Ingredients
- Homemade Pie Crust
- or store bought pie crust
- Whipped Cream
Pie Filling
- ⅔ cup (133g) granulated sugar
- ⅓ cup (37g) cornstarch
- ½ tsp salt
- 4 egg yolks
- 3 cups (747g) whole milk
- 1 ¾ cups (298g) semi-sweet chocolate chips
- 2 Tbsp (29g) unsalted butter
- 2 tsp vanilla extract
Instructions
Pie Crust
- Follow our Homemade Pie Crust instructions to make a homemade crust. Once the crust is assembled and fluted in the pie pan, place it in the refrigerator to chill for 30 minutes.Homemade Pie Crust, or store bought pie crust
- Preheat the oven to 400ºF. Rearrange the baking racks so you can put the pie on the bottom rack.
- Use a fork to dock the bottom of the pie crust.
- Line the crust with a large piece of parchment paper. Then use a few layers of aluminum foil to create a bowl shape that fits within the pie pan. Fill the foil with dried beans, rice or granulated sugar. This is to help weigh down the pie crust, preventing bubbles or shrinking.
- Place the pie crust on the bottom rack and bake for 20 minutes. After 20 minutes, remove the pie crust from the oven and carefully remove the dried beans, rice or granulated sugar along with the foil and parchment paper. Return to the oven and bake for 5-20 minutes longer or until the crust is golden. A homemade pie crust seems to take longer, while a store bought pie crust seems to only take 5 more minutes.
- Allow the crust to cool completely before adding the filling. I usually like to blind bake the pie crust in advance,
Pie Filling
- In a medium pot, stir together the granulated sugar, cornstarch and salt. Set aside.⅔ cup (133g) granulated sugar, ⅓ cup (37g) cornstarch, ½ tsp salt
- In a separate bowl, whisk together the egg yolks and whole milk. Gradually whisk the milk mixture into the dry ingredients in the pot.4 egg yolks, 3 cups (747g) whole milk
- Set the heat to medium, and whisk the mixture frequently, until it comes to a full boil with large bubbles across the surface, about 6-7 minutes. Once boiling, keep whisking and let it boil for a full 1-2 minutes more. This extra minute is what fully activates the cornstarch, so don't skip it even if the mixture already looks thick. The filling is ready when it coats the back of a spoon and holds a line when you run your finger through it. Remove the pot from the heat.
- Whisk in the chocolate chips, butter and vanilla extract. Once the chips are mostly melted, switch to a spatula and stir gently to scrape the bottom and sides of the pot, fully incorporating everything. Allow the mixture to cool for 10 minutes.1 ¾ cups (298g) semi-sweet chocolate chips, 2 Tbsp (29g) unsalted butter, 2 tsp vanilla extract
- Pour the pie filling into a blind baked pie crust. Allow it to cool on the counter for 30 minutes. Cover the top of the pie filling with plastic wrap to prevent the pudding from developing a skin. Refrigerate the pie overnight, or at least 6 hours. Before serving, top with whipped cream and chocolate shavings.Whipped Cream
Last Step: I’d love to hear what you think. Leave a rating and comment here.









Hi Beth…😘….how r u? I have a quick question!!! Do u happen to have a chocolate cream pie that’s No Bake? If u do can I please have the recipe for it? I don’t want a chocolate cream pie that my caregiver has to do any baking with I’d appreciate it very much my dear friend!!
Your Friend,
LaDonna N
.
Hi LaDonna! My chocolate pudding pie is no bake: https://thefirstyearblog.com/chocolate-pudding-pie/
This looks delicious and can’t wait to make it but I have a question. The serving size says 12 and yet most pie dishes serve only 8. What size pan is recommended for this pie?
This was SUCH a hit at Thanksgiving. It was gone before desserts had even started being served. I received so many compliments for it, and my family requested that I make 2 for Christmas!
This is such a yummy, rich, chocolatey filling. My husband said the flavor reminded him of a fancy hot chocolate. I sprinkled mini semisweet chocolate chips over the top to add a little crunch/texture and I was happy with the results.
Thank you for this recipe! It has made me very popular with the family, and it was fairly easy to prepare. Win win!
I followed your instructions to the letter. My mixture never formed, but it did get thick. After cooling on the counter for 30 minutes, it liquefied, the consistency of chocolate milk. I poured it into the pie crust, and now it’s chilling in the fridge. I will cry if it doesn’t set up again. What did I do wrong??
The taste was great but my pie wasn’t firm as the photo.
How long did you let it set for?
This was very good! I’ll save the recipe for next time