
This post may contain affiliate links. Please read our disclosure policy.
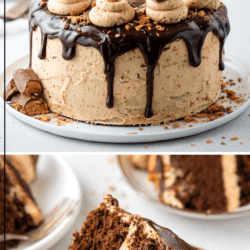
This Butterfinger cake uses my popular chocolate cake recipe as a base, which I spent 3 weeks tweaking until it was outstanding. Then I set out on a mission to incorporate Butterfingers to make a delicious and stunning cake, and the result is addictive!

I wanted melted chocolate in the batter of the cake so the chocolate flavor would shine through, and with some tweaking I finally nailed that part. Then, I paired the cake with peanut butter cream cheese frosting, loads of Butterfinger bits and a rich chocolate ganache topping that takes it to the next level!
Don’t be intimidated by the impressive presentation, I spent extra time laying out easy-to-follow instructions, with all my best tips and tricks, so you can’t make this cake successfully the first time.
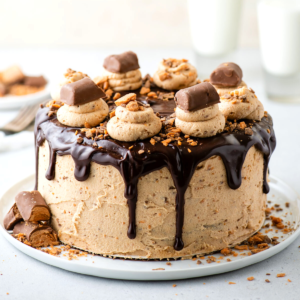
Most people immediately think of Reese’s peanut butter cups when it comes to chocolate and peanut butter candy combos, leaving Butterfinger bars overlooked and often ignored. Well, in this Butterfinger cake, the crunchy peanut butter-y candy bar takes center stage!
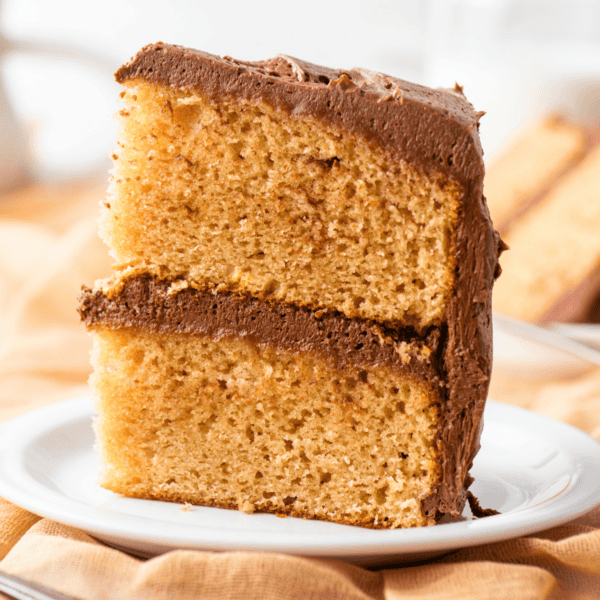
The cake starts with a simple buttermilk chocolate cake recipe. Buttermilk adds a slight tang to the batter, but more importantly, it yields a cake with a tender, moist crumb. Because the cake is made with cocoa powder and melted chocolate, it has a depth of flavor you just can’t get from using one or the other.
Then, there’s the frosting—instead of a one-note peanut butter buttercream, I added cream cheese too, which balances all the sweetness in this recipe and makes for a lovely, fluffy texture. The frosting is flecked with crunchy little bits of Butterfinger bar, and once you’ve frosted the cake, it’s drizzled with homemade ganache to really take things up a notch.
This Butterfinger cake is perfect for any occasion, because peanut butter and chocolate are one of those flavor combinations that never goes out of style. It’s also the kind of cake you might be tempted to whip up on a rainy weekend afternoon—it’s not all that difficult or time-consuming, and many of the ingredients are things you likely have on hand. Just run out to get some Butterfingers and other odds-and-ends!
If you love desserts inspired by your favorite candies, try my Rolo Stuffed Brownies, Reese’s Cup Cookies, or No Bake M&M Pie next. And if you’re a Butterfinger fan, I also have a Butterfinger Pie recipe!

Butterfinger Cake Recipe Ingredients
Scroll down to the recipe card below this post for ingredient quantities and full instructions.
Chocolate Cake:
- All-purpose flour
- Natural unsweetened cocoa powder – I’ve developed this recipe with natural cocoa powder, so I don’t recommend substituting Dutch process cocoa.
- Baking soda
- Baking powder
- Salt
- Unsalted butter – Let this come to room temperature.
- Granulated sugar
- Bittersweet chocolate baking bar – Melt this, then let it cool a little bit so it doesn’t cook the eggs.
- Eggs
- Buttermilk – You can make your own buttermilk by putting 1 tablespoon of vinegar or lemon juice in a liquid measuring cup, then filling it to the 1 cup mark with whole milk. Whisk and let the mixture sit for 5 minutes, or until it thickens.
- Hot tap water
Peanut Butter Cream Cheese Frosting:
- Cream cheese – Let this come to room temperature, too.
- Unsalted butter – Also at room temperature.
- Creamy peanut butter – Use regular peanut butter; the natural kind that needs to be stirred before you use it can be unpredictable when used in a recipe like this because the oil content can vary.
- Powdered sugar
- Vanilla extract
- Salt
- Butterfingers
Chocolate Ganache:
- Heavy whipping cream
- Chocolate chips – I used semi-sweet.
Chopping the Butterfinger Bars
I recommend placing a piece of parchment paper on a cutting board and using a chef’s knife to chop the Butterfingers into pieces. You don’t need to use the parchment, but I like doing that because I can lift the paper and fold it so it can be used to funnel all the Butterfinger bits directly into a bowl.
You could use a food processor if you like, but I’ve found that candy bars are best chopped by hand. Then you don’t have to worry about them sticking to the blades or having the chocolate melt.
How to Make a Butterfinger Cake
As with most layer cakes, this is a recipe that can be made in stages and assembled later. You can even freeze the chocolate cake if you want to get a head start.
Step 1: Make the Chocolate Cake
Prepare. Preheat the oven to 350ºF. Grease two 8-inch springform pans with butter, then line each pan with a parchment paper circle.
Melt the chocolate. Roughly chop the bittersweet chocolate into smaller pieces. Place them in a microwave-safe bowl and heat for 2 minutes on 50% power. Stir and repeat until melted.

Mix the dry ingredients. Combine the all-purpose flour, cocoa powder, baking soda, baking powder, and salt in a mixing bowl.
Mix the wet ingredients. In a separate mixing bowl, use an electric mixer to beat the butter and granulated sugar for 2 minutes, or until pale and fluffy. Beat in the eggs and cooled chocolate for about 30 seconds.
Finish the batter. Beat in half of the buttermilk for about 20 seconds, then add half of the dry ingredients and beat to incorporate. Pour in the remaining buttermilk and the hot water; beat just until the liquid is incorporated. Add the remaining dry ingredients and beat on low speed until combined.

Bake. Divide the batter between the 2 pans, with about 2 1/2 cups of batter in each pan. Set both pans on the same rack in the center of the oven and bake for 33 to 39 minutes, or until a toothpick inserted in the middle comes out clean.
Cool. Let the cakes cool for 20 to 30 minutes in the pans, then carefully remove them from the pans and let them finish cooling on wire racks.
Step 2: Make the Peanut Butter Cream Cheese Frosting
Start the frosting. Beat the cream cheese, butter, and peanut butter in a mixing bowl for 2 to 3 minutes, using an electric mixer on high speed.
Add the remaining ingredients. Reduce the mixer speed to low and beat in 2 cups of powdered sugar until the frosting is thick and the sugar is fully incorporated. Beat in the remaining powdered sugar, vanilla extract, and salt, followed by a cup of the chopped Butterfingers.
Adjust the consistency. If the frosting is too thick, you can beat in an additional tablespoon of heavy cream or milk.
Step 3: Make the Chocolate Ganache
Melt the chocolate. Place the chocolate chips and heavy cream in a microwave-safe bowl. Microwave for 20 to 30 seconds, or until the heavy cream starts to bubble.
Finish. Let the mixture to sit for 1 minute, then stir to combine. The ganache should be at room temperature before you add it to the cake.
Step 4: Assemble
Prepare. If needed, level the cooled cakes by removing the domes using a cake leverer or serrated knife. Spread a small amount of frosting onto the bottom of a cake plate or stand to hold the cake in place.
Layer and frost the cake. Place the first cake layer onto the plate. Spread 3/4 to 1 cup of frosting on top of the first layer. Place the second cake layer onto the first and spread the remaining frosting around the sides and the top. Reserve about 1/2 cup of frosting for piping onto the top of the cake, if desired.
Add the ganache. Use a spoon or squeeze bottle to drizzle the ganache around the sides of the cake, allowing it to drip down the edges. Fill in the middle of the cake with ganache and spread it evenly with the back of the spoon. Refrigerate the cake for 10 minutes to set the ganache.
Finish decorating. Using a piping bag fit with a large round piping tip, pipe the remaining frosting around the edge of the cake. Top the frosting swirls with Butterfinger pieces, as pictured.

Should I Refrigerate Cake Before Frosting?
While some recipes do call for the cake layers to be chilled in the refrigerator before you frost them, you don’t need to do that for this Butterfinger cake. Make sure the cake is room temperature before you frost it to keep it from crumbling, but there’s no need to refrigerate it.
Butterfinger Cake Recipe Tips
Here are some simple tips for a perfect Butterfinger cake:
- Room temperature ingredients are best. They mix together much better than cold ingredients, and room temperature eggs yield a fluffier cake texture. Allow your eggs, butter and buttermilk to come to room temperature before beginning this recipe.
- Don’t over-mix the cake batter. Mix just until the ingredients are combined, otherwise your cake will be tough.
- Use Bake-Even cake strips. Attach these to the outside of the pans before you place them in the oven and your batter will cook more evenly, with a level top and fewer cracks or over-done edges.
Time Required
- 15 minutes to prep the batter
- 35-37 minutes to bake
- 1+ hour to cool the cake completely
- 5 minutes to make the frosting
- 10-20 minutes to assemble and frost the cake

How to Store Chocolate Butterfinger Cake
Butterfinger cake can be stored at room temperature, covered tightly, for up to 3 days.
Can This Recipe Be Frozen?
Yes, this Butterfinger cake can be frozen for up to 3 months. If you want the frosting to be perfect, freeze the cake on a parchment-lined baking sheet, then once the frosting is frozen through, wrap the cake in plastic or place it in an airtight container or freezer bag.
If you’re freezing leftovers and less concerned about keeping the frosting unblemished, you can simply place the cake directly into an airtight container or freezer bag without freezing it first.
Either way, thaw the cake overnight in the fridge before serving.

More Easy Cake Recipes
Tap stars to rate!
Butterfinger Cake Recipe
Ingredients
Chocolate Cake
- 2 ½ cups (300g) all purpose flour
- ⅓ cup (28g) natural unsweetened cocoa powder
- ½ tsp baking soda
- 1 tsp baking powder
- 1 tsp salt
- ½ cup (113g) unsalted butter, 1 stick, room temperature
- 1 ½ cups (297g) granulated sugar
- 3 oz bittersweet chocolate baking bar, melted & cooled
- 2 large eggs
- 1 cup (236ml) buttermilk
- ½ cup (118ml) hot tap water
Peanut Butter Cream Cheese Frosting
- 8 oz (226g) cream cheese, room temperature
- 1 cup (226g) unsalted butter, 2 sticks, room temperature
- 1 cup (270g) creamy peanut butter
- 4 cups (454g) powdered sugar
- 1 tsp vanilla extract
- ½ tsp salt
- 1 ½ cups finely chopped butterfingers, divided
Chocolate Ganache
- ⅓ cup (79ml) heavy whipping cream
- ¾ cup (129g) chocolate chips, I used semi-sweet
Video
Instructions
Chocolate Cake
- Preheat the oven to 350º F. Grease two 8 inch springform pans with butter (butter the sides and bottom) and line each pan with a parchment paper circle for easy cake removal. Set aside.
- Rough chop the bittersweet chocolate baking bar into smaller pieces, place in a microwave safe bowl and microwave for 2 minutes on 50% power. Stir and repeat until melted. Set aside to cool.
- In a mixing bowl combine the all purpose flour, unsweetened natural cocoa powder, baking soda, baking powder and salt. Set aside.2 ½ cups (300g) all purpose flour, ⅓ cup (28g) natural unsweetened cocoa powder, ½ tsp baking soda, 1 tsp baking powder, 1 tsp salt
- In a separate mixing bowl beat the butter and granulated sugar with an electric mixer for 2 minutes, until pale and fluffy. Add in the eggs and cooled chocolate, beat again, 30 seconds.½ cup (113g) unsalted butter, 1 ½ cups (297g) granulated sugar, 2 large eggs, 3 oz bittersweet chocolate baking bar
- Add in half of the buttermilk, beat for about 20 seconds. Add in half of the dry ingredients, beat. Add the remaining buttermilk plus the hot water, beat just until the liquid is mixed in then add the remaining dry ingredients and beat on low speed until combined.1 cup (236ml) buttermilk, ½ cup (118ml) hot tap water
- Evenly divide the batter between the 2 pans, with 2 & 1/2 cups of batter in each pan. If using bake even cake strips, secure them around the outside of the pans.
- Bake both pans on the same rack in the center of the oven for 33-39 minutes or until a toothpick inserted in the center comes out clean. Baking times will vary depending on your oven and size of pan you’re using.
- Allow the cakes to cool for 20-30 minutes in the pans before removing them and allowing them to cool completely on a cooling rack.
Peanut Butter Cream Cheese Frosting
- In a mixing bowl, beat the cream cheese, butter, and peanut butter on high for 2-3 minutes.8 oz (226g) cream cheese, 1 cup (226g) unsalted butter, 1 cup (270g) creamy peanut butter
- Add in 2 cups of powdered sugar. Beat the frosting on low speed until combined and thick.4 cups (454g) powdered sugar
- Add in the remaining powdered sugar, vanilla extract and salt, mix on low.1 tsp vanilla extract, 1/2 tsp salt
- Mix in 1 cup of the finely chopped butterfingers (reserve 1/2 cup for decorating the cake). Mix on low until combined. If the frosting is too thick, beat in an additional tablespoon of heavy cream or milk.1 1/2 cups finely chopped butterfingers
Chocolate Ganache
- Place the chocolate chips and heavy cream in a microwave safe bowl. Microwave for 20-30 seconds, or until the heavy cream begins to bubble. Allow the mixture to stand for 1 minute. Use a spatula to stir the mixture until smooth. Allow the ganache to come to room temperature before adding it to the cake. If the chocolate ganache is too warm when added to the cake, it will run off the cake and become very thin.1/3 cup (79ml) heavy whipping cream, 3/4 cup (129g) chocolate chips
Assemble
- If needed, level the cooled cakes using a cake levered or serrated knife.
- Spread a small amount of frosting on the bottom of your cake plate / stand, this acts as “glue” to prevent the cake from moving. Place one cake layer over the frosting. Measure 3/4 to 1 cup of frosting and evenly spread that on top of the first layer. Top with the second cake layer and spread the remaining frosting around the sides and top of the cake. Reserve about 1/2 cup of frosting for piping frosting on top of the cake if desired.
- Once the ganache is room temperature, use a spoon or squeeze bottle to drizzle the ganache around the sides of the cake, allowing it to drip down the sides. Fill in the middle of the cake with ganache and spread evenly with the back of the spoon. Place the cake in the fridge for 10 minutes to allow the ganache to set before piping with frosting.
- Using a piping bag fit with a large round piping tip, pipe the remaining frosting around the edge of the cake. Top the frosting swirls with butterfinger pieces.
- Slice and serve. Cover leftover cake tightly with plastic wrap and store on the counter for up to 3 days.
Notes


Can I make in a 9×13 pan?
Would you have a butter cream frosting
Yes!
VANILLA FROSTING
3 sticks unsalted butter, room temperature (1 & 1/2 cups)
1 tsp vanilla extract
2-3 cups powdered sugar
Dash milk or heavy cream if frosting becomes too thick
In a mixing bowl, combine the butter and vanilla extract, beat using an electric mixer until fluffy, 1-2 minutes. Gradually add the powdered sugar, mixing on low until combined. If you want to add food coloring, do so now. Taste as needed to determine if you want more powdered sugar. If the frosting becomes too thick, add a dash of milk or heavy cream. If you want an extra fluffy frosting, add in 1/4 cup heavy whipping cream when adding the last bit of powdered sugar. Whip for 3-4 minutes. Frost the cake as described in the recipe!
This looks amazing! I’m going to use the chocolate cake recipe for a wedding cake I’m making. Typically a 2 inch tall 8 inch round Wilton cake pan calls for 4 cups of batter per pan. Does this cake rise pretty tall with only 2 1/2 cups of batter per pan?
If you are wanting tall cake layers, you will probably want to stick with 4 cups of batter per pan. With 2 & 1/2 cups of batter in the pan, the result is cake layers that are about 2-2.5 inches tall.
Thank you for getting back to me so quickly, Beth! The 2-2.5 inch layers are exactly the height I’m needing so I can split and stack them and have 4 layers of cake with 3 layers of filling. I’m excited to try your recipe! It looks very moist and delicious.
@@beth_thefirstyear This cake looks AMAZINGLY delicious. I asked this question on your Instagram page. But I’m also going to ask you here as well. Can this cake be made in a 13×9 baking pan? Instead of a 2 layer cake? TIA. Thanks for sharing.
Can I make this as cupcakes? It is just my husband and myself. It looks wonderful. Can’t wait to try.