
This post may contain affiliate links. Please read our disclosure policy.
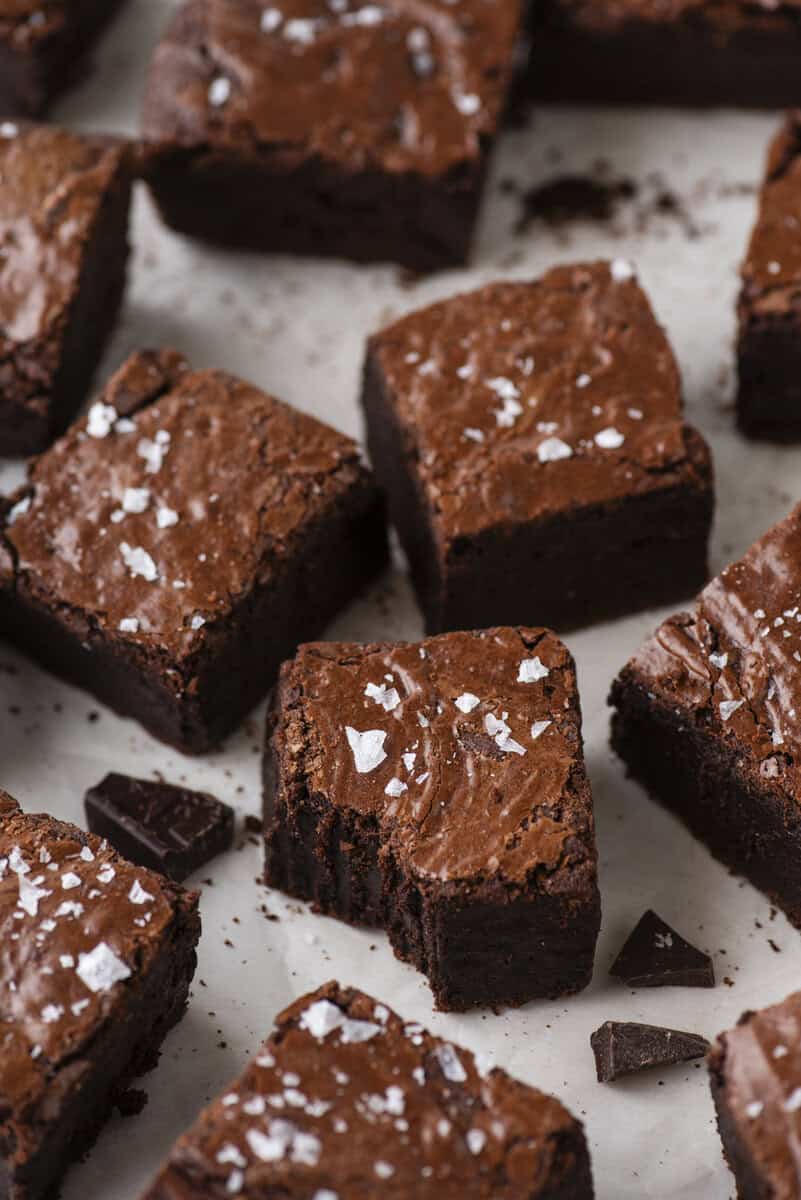
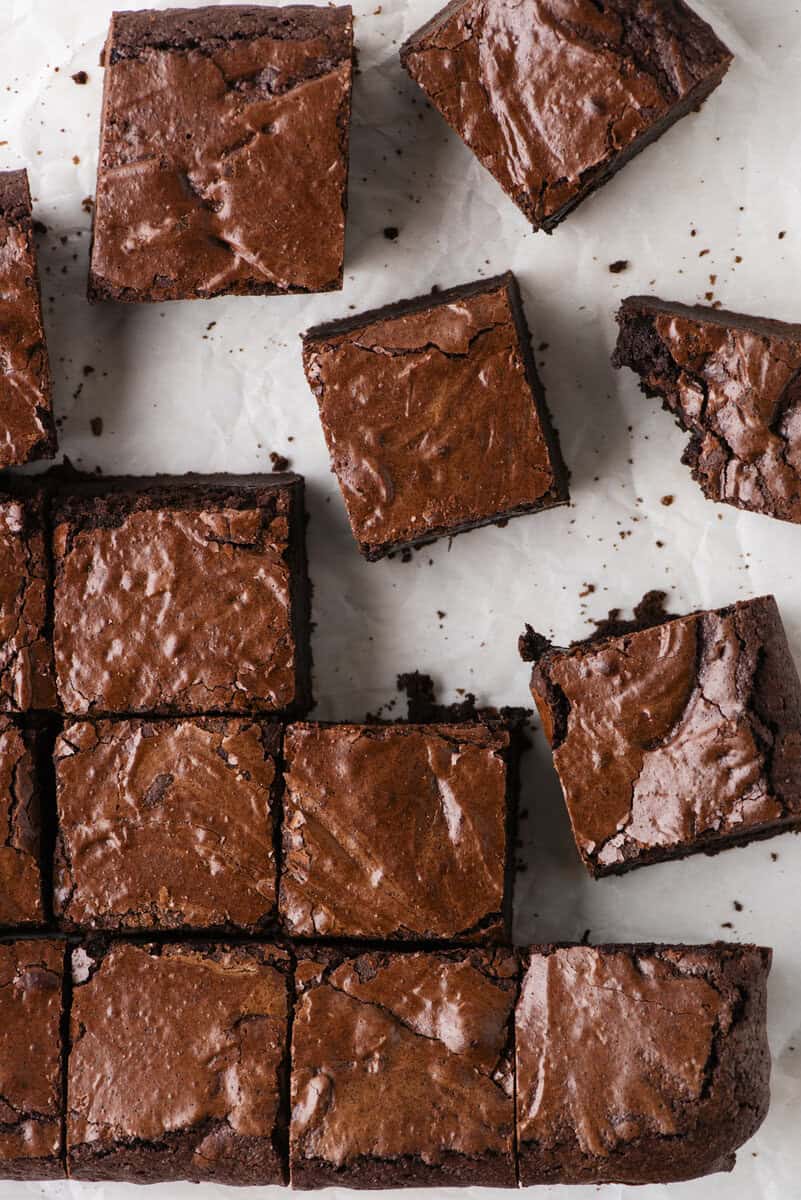
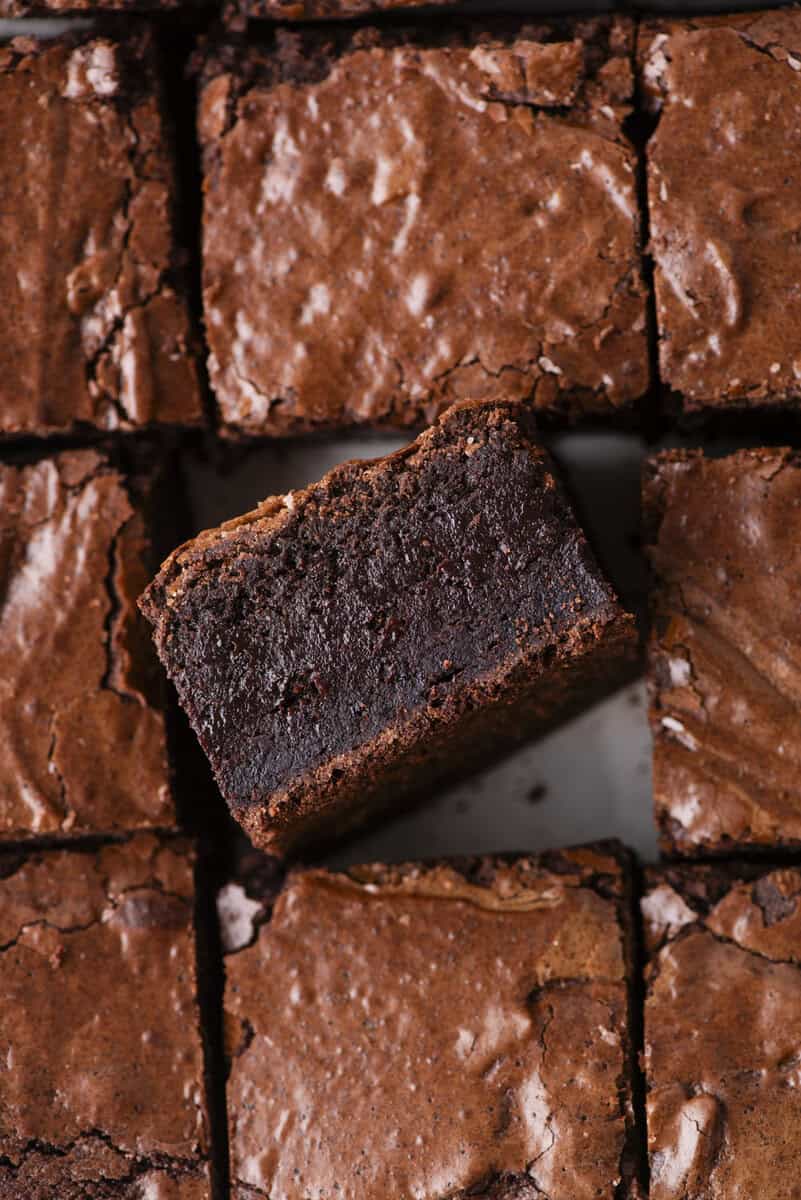
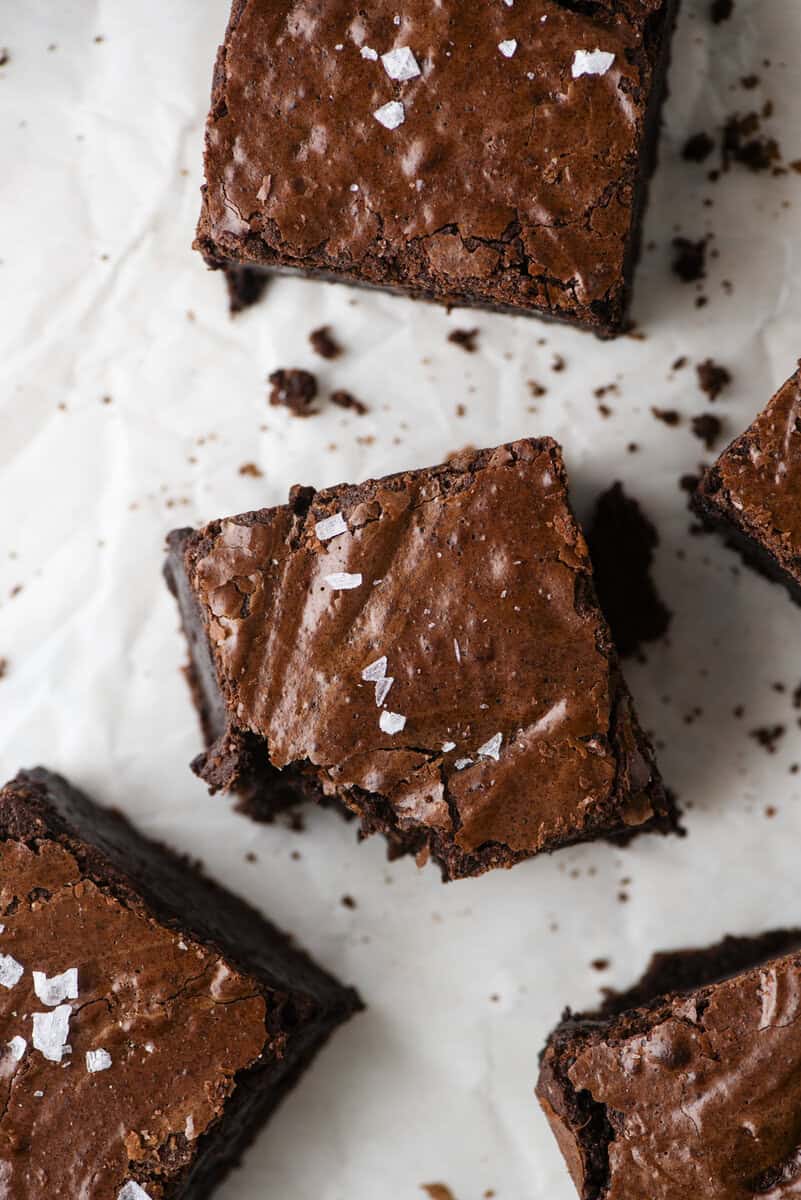
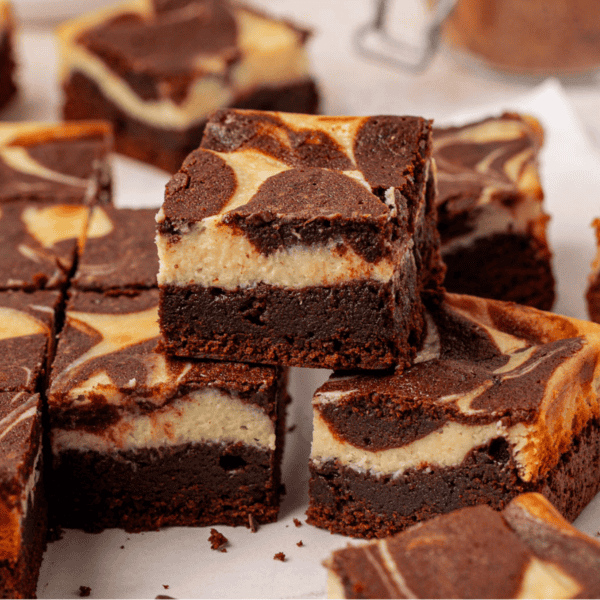
These brownies are thick, rich, and unapologetically fudgy. The shiny crackly top comes from a specific mixing method that actually works. Once you make these, regular brownies just won’t hit the same.
Why These Brownies Are Different
I didn’t set out to make just another brownie recipe. I wanted bakery style brownies that were thick, deeply fudgy, and had that shiny crackly top that makes you stop mid-scroll. So I went back to my original homemade brownie recipe and started testing.
I tested multiple batches side by side, changing one thing at a time. Switched to dutch proceeded cocoa and more of it for a deeper chocolate flavor. More eggs and sugar for structure and that glossy top. Different mixing methods to see what actually creates that signature crackle.
One of the biggest shifts came when I stopped treating brownies like a quick mix recipe. Whipping the eggs and sugar properly made all the difference. That step is what creates the shiny top and gives the brownies structure without making them cakey.
I also tested bake times, pan sizes, and ratios to get that extra height without ending up with raw centers or dry edges. One batch was too gooey. Another puffed in the middle. Another lacked that crackly top. Each round got me closer.
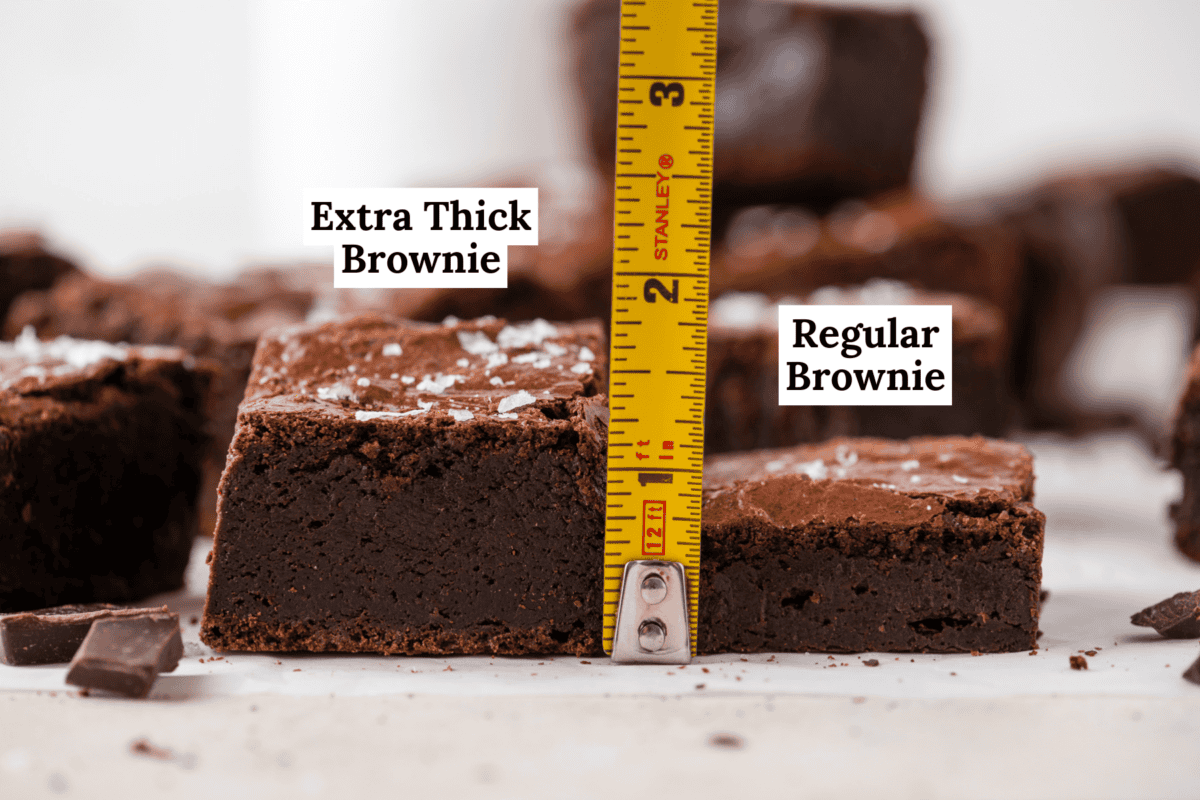
This final version is exactly what I was after. Thick brownies with a dense, fudgy center and a shiny crackly top that forms naturally when the batter is mixed the right way. They bake up tall in a 9×9 pan, with edges and centers that match in texture.
If you’ve ever pulled brownies out of the oven and thought they were just fine, this recipe is going to change that. These are the kind of brownies people ask about after one bite.
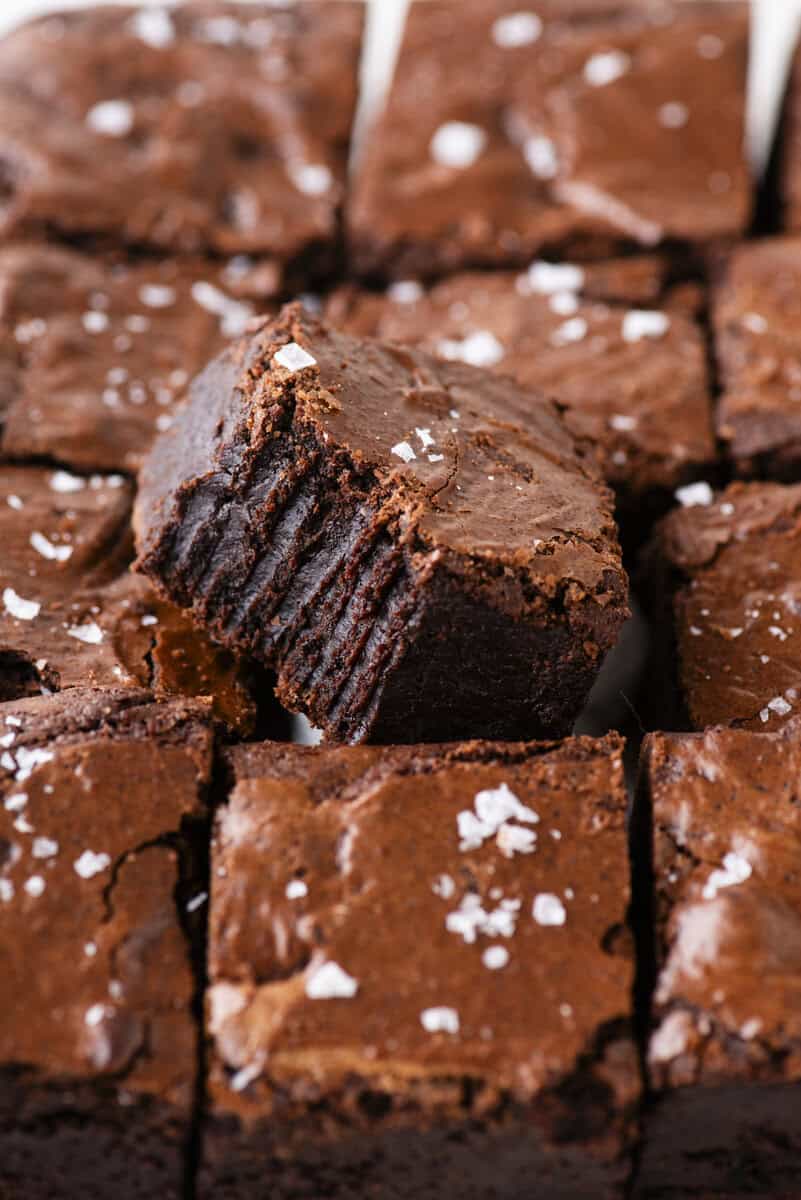
What Makes Brownies Fudgy Instead of Cakey
Fudgy brownies come down to ratio. More fat, less flour, and enough eggs to create structure without turning the batter light.
In this recipe, you’re getting richness from both butter and oil. The butter brings flavor, while the oil keeps the brownies soft even after they cool. The extra egg yolks add density and give that smooth, almost truffle like texture.
Flour is kept in check. Just enough to hold everything together, but not enough to make the brownies feel dry or cakey.

The Key to That Shiny Crackly Top
That shiny top is not luck. It’s the result of how the sugar and eggs are handled, and what happens to them in the oven.
Sugar plays a bigger role here than most people realize. When part of the sugar is melted into the warm chocolate and butter, it begins dissolving. That matters because dissolved sugar behaves differently than dry sugar crystals. It blends more smoothly into the batter and helps create a glossy finish instead of a dull one.
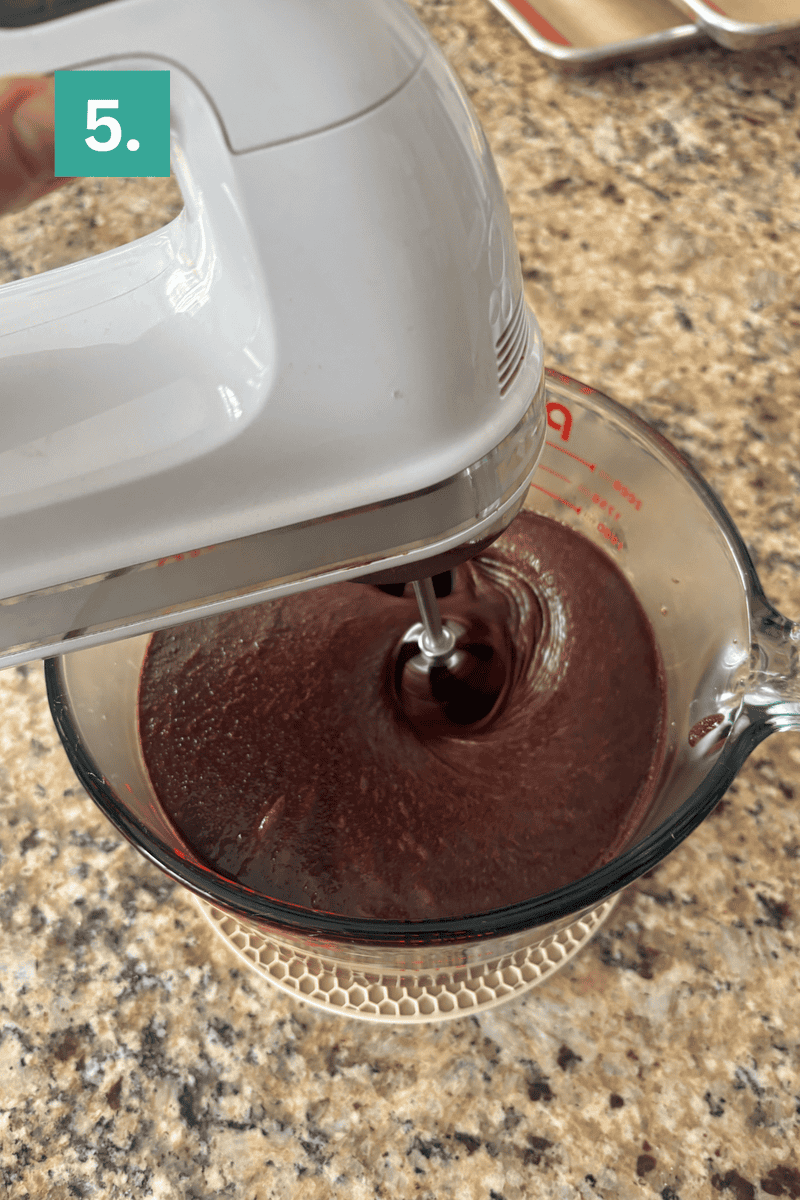
Then comes the mixing step. When you beat the remaining sugar with the eggs and warm chocolate, you’re doing two things at once. You’re dissolving more of the sugar, and you’re incorporating air into the eggs. After about 3 minutes, the mixture becomes thicker, lighter in color, and slightly ribbony. That’s your signal that it’s ready.
As the brownies bake, that well mixed sugar and egg mixture rises to the surface. The heat causes the sugars to form a thin, delicate layer on top. At the same time, the proteins in the eggs set and trap that structure in place. That’s what creates the shiny, crackly crust.
If the sugar isn’t dissolved enough or the eggs aren’t whipped long enough, that layer never forms properly. Instead of rising and setting into a crackly top, the surface stays soft and matte.
This is why that mixing step is not optional. It’s not just combining ingredients. It’s building the structure for the top of the brownies before they even go into the oven.
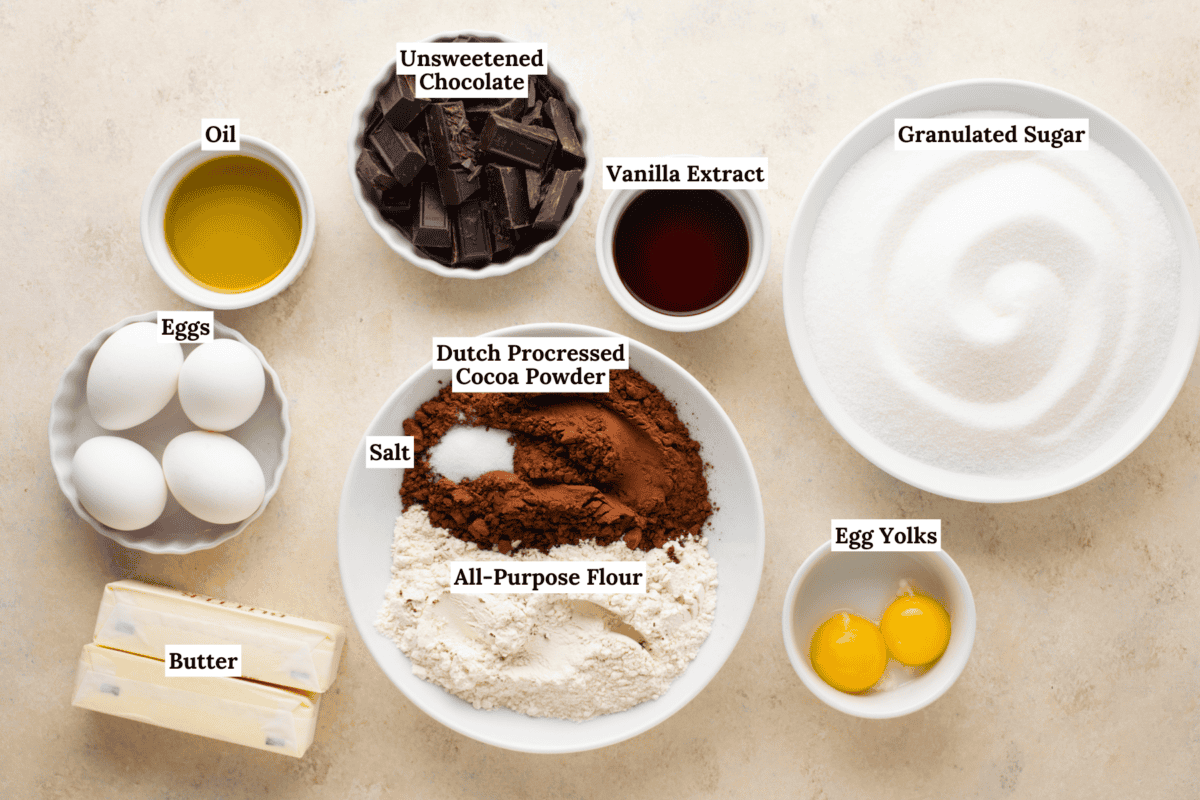
Important Ingredients & Their Purpose
Here is an overview of the key ingredients in this recipe. Jump to the recipe card below for the full list of ingredients and instructions.
- Unsweetened Chocolate: adds depth and richness that cocoa powder alone can’t give. It’s what makes these brownies taste intense and chocolate forward, similar to my homemade chocolate cake.
- Dutch Processed Cocoa Powder: gives the brownies a darker color and smoother flavor.
- Granulated Sugar: when properly mixed with the eggs, it creates that signature shiny crackly top.
- Eggs + Egg Yolks: extra yolks add richness and help create a dense, fudgy center instead of a cakey texture.
- Butter + Oil: butter adds flavor, oil keeps the brownies soft and fudgy even after cooling.
- Flour: just enough to hold everything together without making the brownies thick in a dry or cakey way.
How to Make Fudgy Brownies
Follow these easy steps for successful brownies with zero guesswork. You can also jump to the recipe card below for the full recipe, storage suggestions and more.
Prep oven and pan: Preheat the oven to 350°F (180ºC). Prepare a metal 9×9-inch pan with non-stick spray or parchment paper.
Combine dry ingredients: In a medium bowl, whisk together the flour, salt, and cocoa powder.
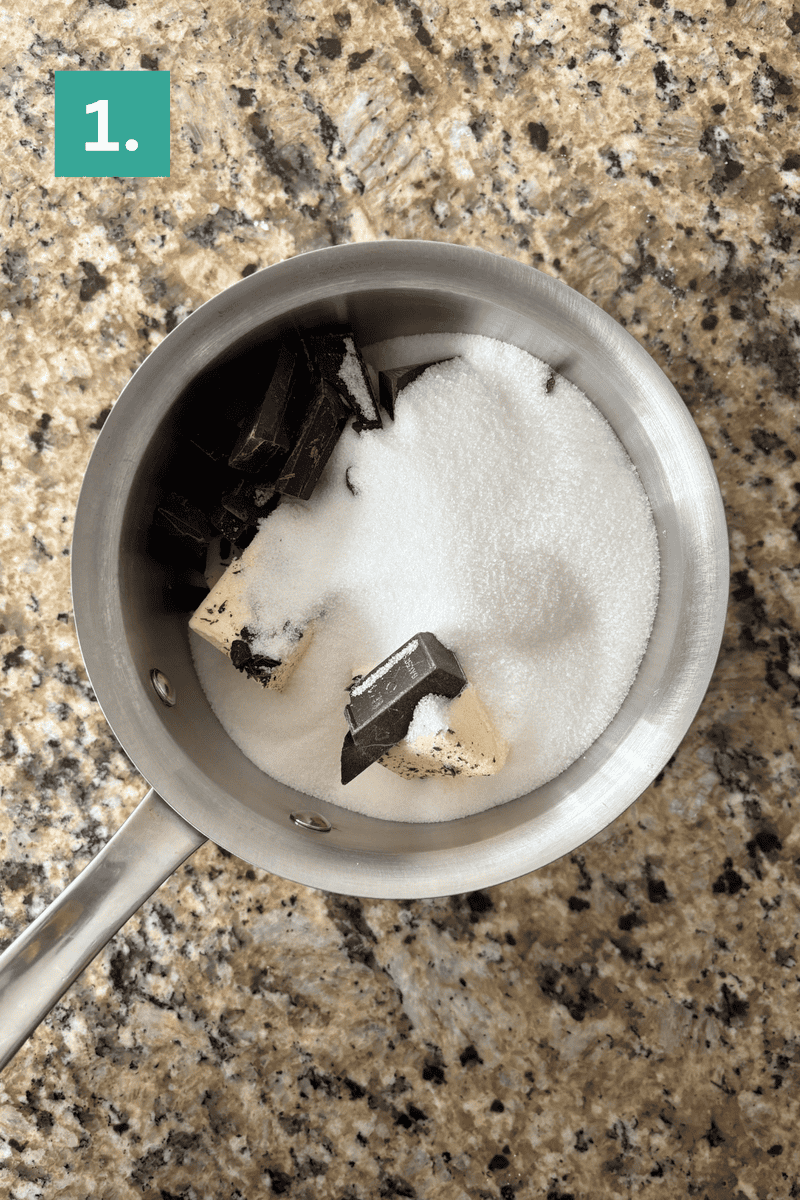
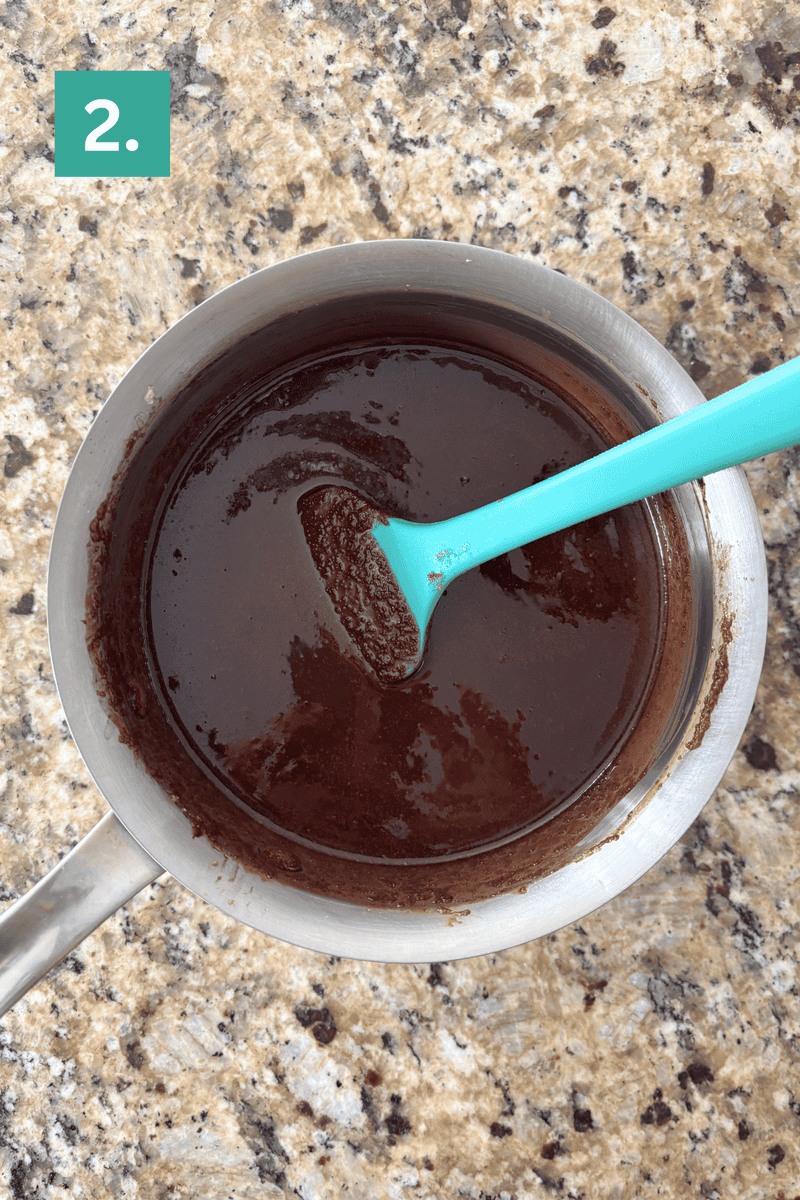
Melt and mix chocolate mixture: In a small saucepan over low heat, melt the chopped unsweetened chocolate, cubed butter, and 1 ½ cups granulated sugar, stirring occasionally for about 5 minutes until fully melted. Some of the granulated sugar will dissolve, but the mixture will still look grainy.
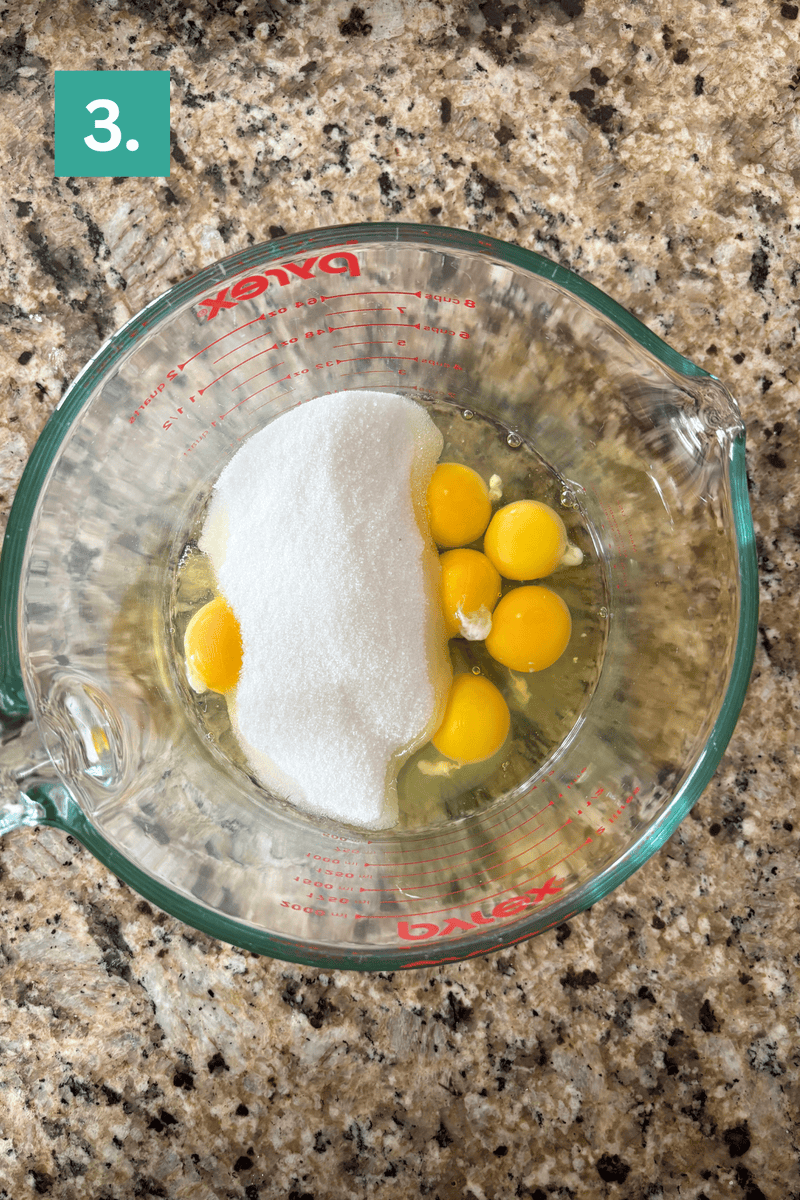
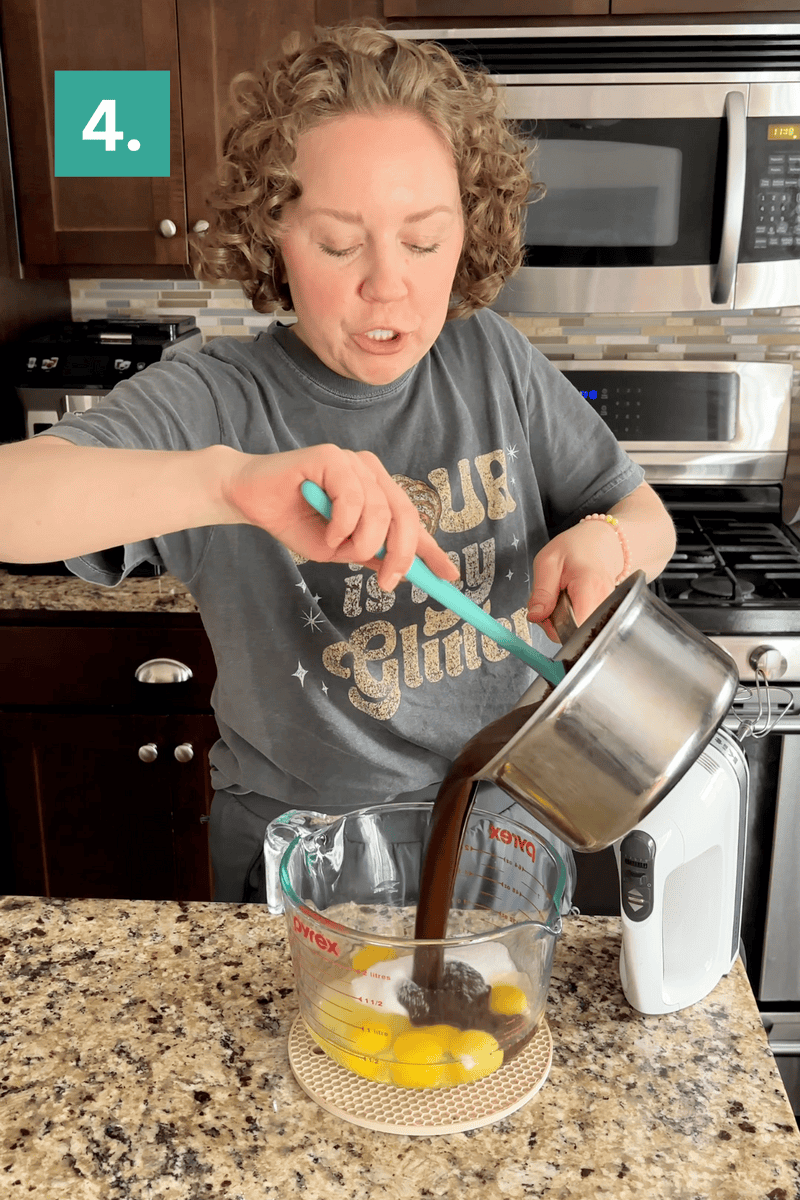
Mix chocolate, eggs, and sugar: In a stand mixer or with a hand mixer, beat the remaining 1 ½ cups granulated sugar, eggs, egg yolks, and melted chocolate mixture for a full 3 minutes until doubled in volume. Do not skimp this step, set a timer for 3 minutes.
Continue mixing in ingredients: Add the vegetable oil and vanilla extract, continuing to mix on low.
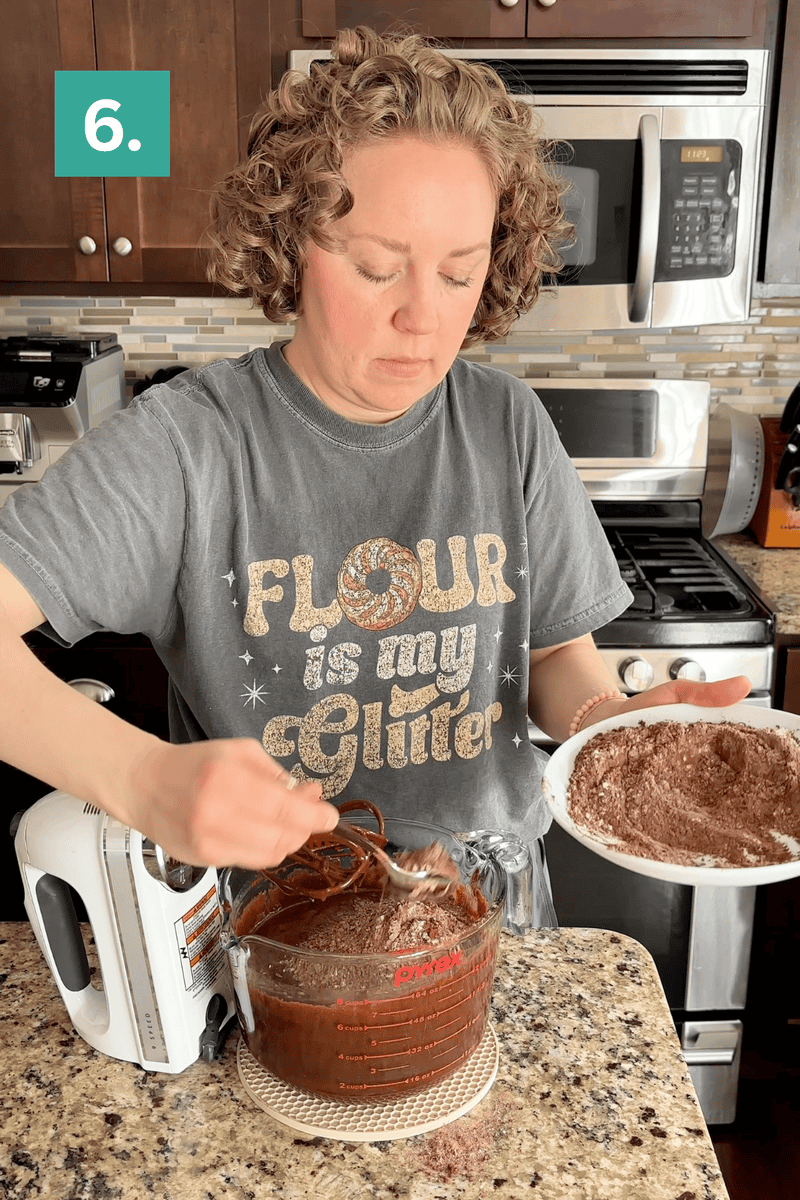
Finish batter: Slowly add the dry ingredients, mixing on low until fully combined. The batter will be thick.
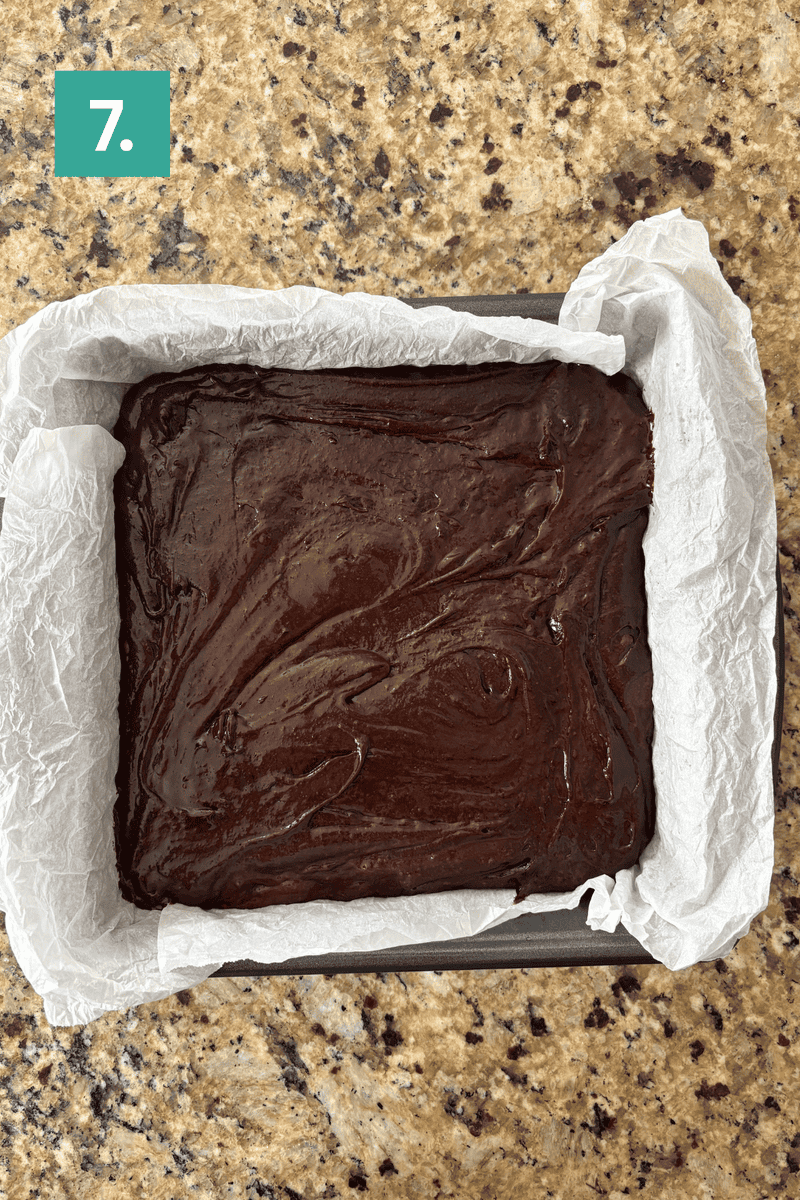
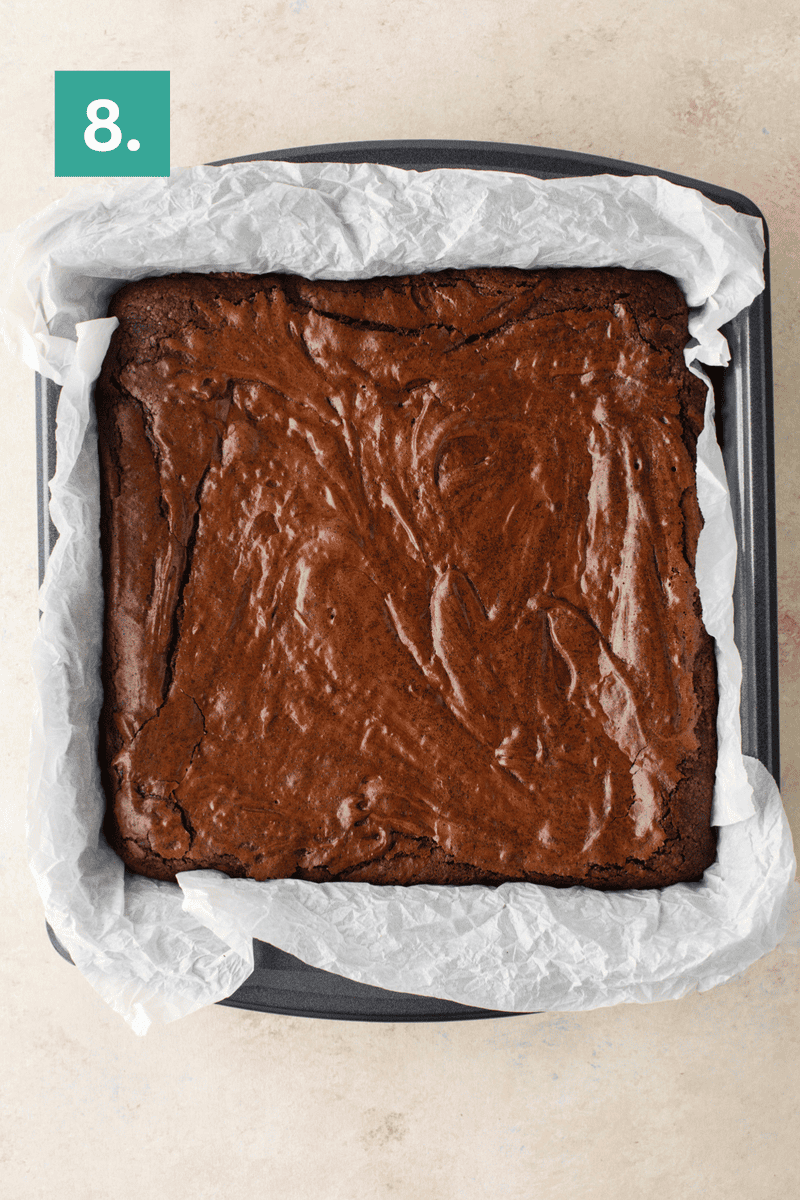
Transfer and bake: Pour the batter into the prepared pan. Bake for 38-45 minutes.
Rest: Allow the brownies to set for at least 4 hours before cutting, but I prefer overnight.
How to Know When Brownies Are Done
For all of my brownies and bars, look at the edges first. They should be set, slightly puffy and a little firm to the touch.
The center should still look soft, kind of jiggly, but not raw. When you insert a toothpick, you want moist crumbs, not a clean stick. Clean means overbaked.
The brownies will continue to set as they cool, so it’s better to pull them slightly early than too late.
Let Brownies Set Before Cutting
This is where a lot of people rush and it shows.
Fudgy brownies need time to set. As they cool, the structure firms up and the texture becomes dense and sliceable.
Let them cool completely in the pan, then give them additional time to set – I recommend at least 4 hours, but usually do overnight.
Fudgy Brownies FAQs
This usually comes down to too much flour or overbaking. Fudgy brownies need a higher fat to flour ratio, so even a little extra flour can change the texture. If your toothpick comes out completely clean, they’re likely overbaked. You want moist crumbs, not a dry center.
The shiny top comes from properly mixing the eggs and sugar. If you don’t beat them long enough, that thin crackly layer won’t form. Melting part of the sugar into the warm chocolate also helps. Skipping either step can lead to a dull top.
You can, but the flavor and color will be different. Natural cocoa is more acidic and lighter in color, which can make the brownies taste slightly sharper. Dutch processed cocoa gives a deeper chocolate flavor and darker finish, which is what I prefer here.
If they seem underdone even after cooling, they likely needed more bake time. Because these brownies are thick, the center takes longer to set. The edges should be firm and the center should have moist crumbs when tested. If it looks completely raw in the middle, they need a few more minutes.
This can happen if the brownies are underbaked or if the oven temperature is too high at the start. A high initial temperature can cause the edges to rise faster than the center, which then falls as it cools. Baking at a consistent temperature helps create an even structure.
Let them cool completely first. Use a sharp knife and wipe it clean between cuts. This helps you get those clean, defined edges instead of dragging through the center. I use this similar method for my lemon bars and cream cheese brownies.
Yes, and they actually get better as they sit. The texture becomes more set and fudgy after a few hours. You can make them a day in advance and keep them covered at room temperature or in the fridge.
Keep them in an airtight container at room temperature for up to 3 days. For a firmer texture, store them in the fridge. They will stay soft and fudgy either way thanks to the fat in the recipe.
Yes. Let them cool and set completely, then cut into squares. Wrap tightly and store in the freezer for up to 2 months. Thaw at room temperature or warm slightly for that just baked feel.
More Brownie Recipes:
Tap stars to rate!
Extra Thick Fudgy Brownies
Ingredients
- 1 ⅓ cup (160g) all-purpose flour
- 1 tsp salt
- 1 cup (96g) dutch-processed cocoa powder
- 6 oz unsweetened chocolate, chopped
- 1 cup (226g) unsalted butter, cubed
- ⅓ cup (66g) vegetable oil
- 3 cups (594g) granulated sugar, divided in half
- 4 large eggs
- 2 egg yolks
- 2 tsp vanilla extract
Video
Instructions
- Preheat the oven to 350°F (180ºC). Prepare a metal 9×9-inch pan with non-stick spray or parchment paper. This recipe will not fit in an 8×8-inch pan.
- In a medium bowl, whisk together the flour, salt, and cocoa powder.1 ⅓ cup (160g) all-purpose flour, 1 tsp salt, 1 cup (96g) dutch-processed cocoa powder
- In a small saucepan over low heat, melt the chopped unsweetened chocolate, cubed butter, and 1 ½ cups granulated sugar, stirring occasionally for about 5 minutes until fully melted. Some of the granulated sugar will dissolve, but the mixture will still look grainy.6 oz unsweetened chocolate, 1 cup (226g) unsalted butter, 3 cups (594g) granulated sugar
- In a stand mixer or with a hand mixer, beat the remaining 1 ½ cups granulated sugar, eggs, egg yolks, and melted chocolate mixture for a full 3 minutes until doubled in volume. Do not skimp this step, set a timer for 3 minutes.4 large eggs, 2 egg yolks
- Add the vegetable oil and vanilla extract, continuing to mix on low.⅓ cup (66g) vegetable oil, 2 tsp vanilla extract
- Slowly add the dry ingredients, mixing on low until fully combined. The batter will be thick.
- Pour the batter into the prepared pan. Bake for 38-45 minutes.
- Allow the brownies to set for at least 4 hours before cutting, but I prefer overnight.
Notes
- Gluten-Free: Use a 1:1 gluten-free baking flour blend in place of all-purpose flour. I used King Arthur’s Measure for Measure Gluten Free Flour with great results.
- To Store: Keep them in an airtight container at room temperature for up to 3 days. For a firmer texture, store them in the fridge. They will stay fudgy either way thanks to the fat in the recipe.
- To Make Ahead: They actually get better as they sit. You can make them a day or two in advance and keep them covered at room temperature or in the fridge.
- To Freeze: Let them cool and set completely, then cut into squares. Wrap tightly and store in the freezer for up to 2 months. Thaw at room temperature or warm slightly for that just baked feel.


Hi Beth these look yummy I have not made them yet I trust your recipes…. I already have one of your cook books!!!
Can I make these chewy brownies in a
9X13 pan
Hi Carol! A 9×13 will give you a thinner brownie — roughly half the height since you’re nearly doubling the surface area. The bake time drops significantly, probably closer to 22–28 minutes. Start checking at 20 minutes. The edges will set faster, so you’ll want to watch them closely. Everything else in the recipe stays the same.
I need to make brownies/cookies with margarine.
Do I need to do anything different.
Love this recipe! Truly fudgy with that perfect crackly top. I will make again for Mother’s Day!
The best brownies I’ve EVER had!!! Can you bloom the cocoa in hot coffee & if so how much?
Hi Julie! I personally haven’t tested it, but I would try blooming the cocoa powder in 2-3 Tbsp of hot coffee! It will be like a thick paste.
My brownie loving husband gave these a 10/10! I used an 8×8 metal pan (all I had) and they were tall but so fudgey, the perfect consistency, and better as the days went on. Will refuse to use any other recipe- delicious with some raspberries and vanilla yogurt!
Samantha….how long did you cook them? I only have an 8×8. Thanks!
What unsweetened chocolate do you use?
I tend to use Baker’s Unsweetened Chocolate. It’s readily available in most grocery stores.