
This post may contain affiliate links. Please read our disclosure policy.
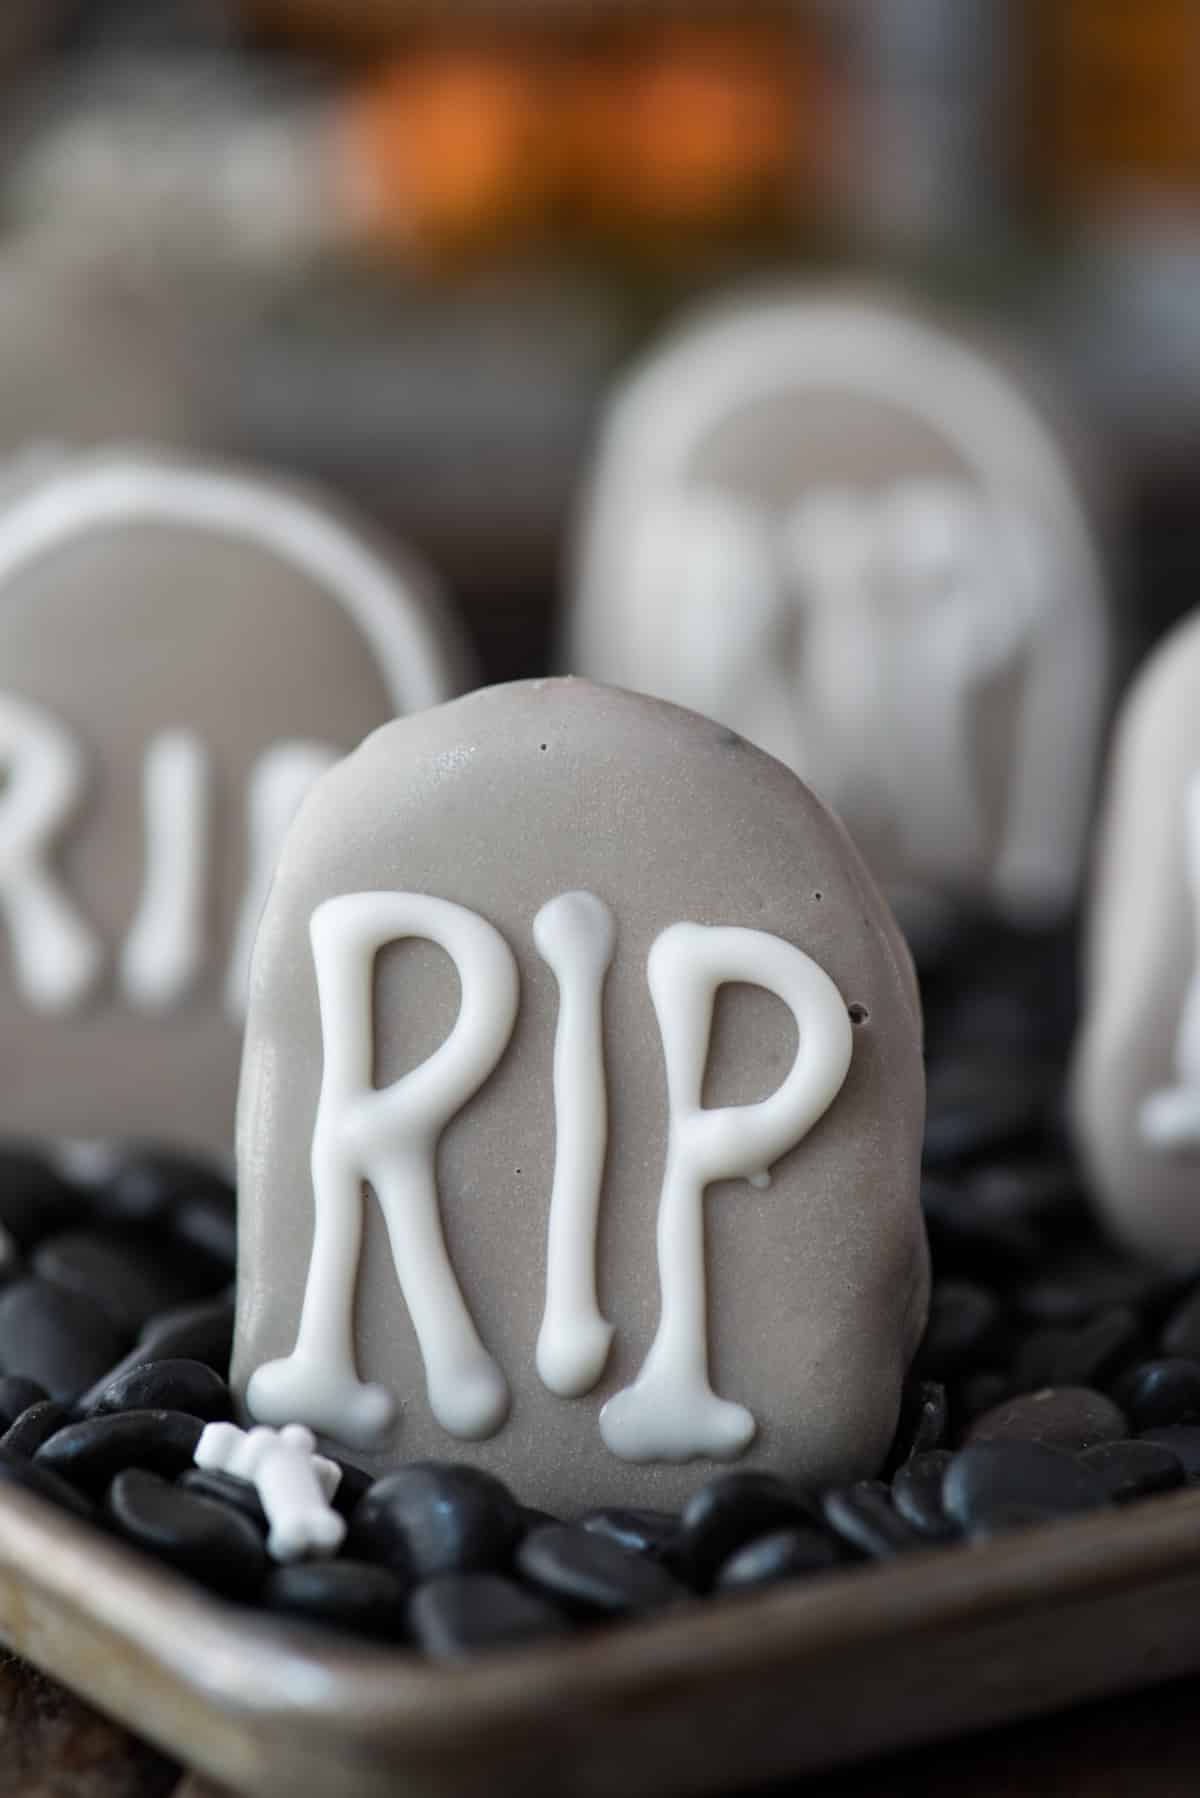
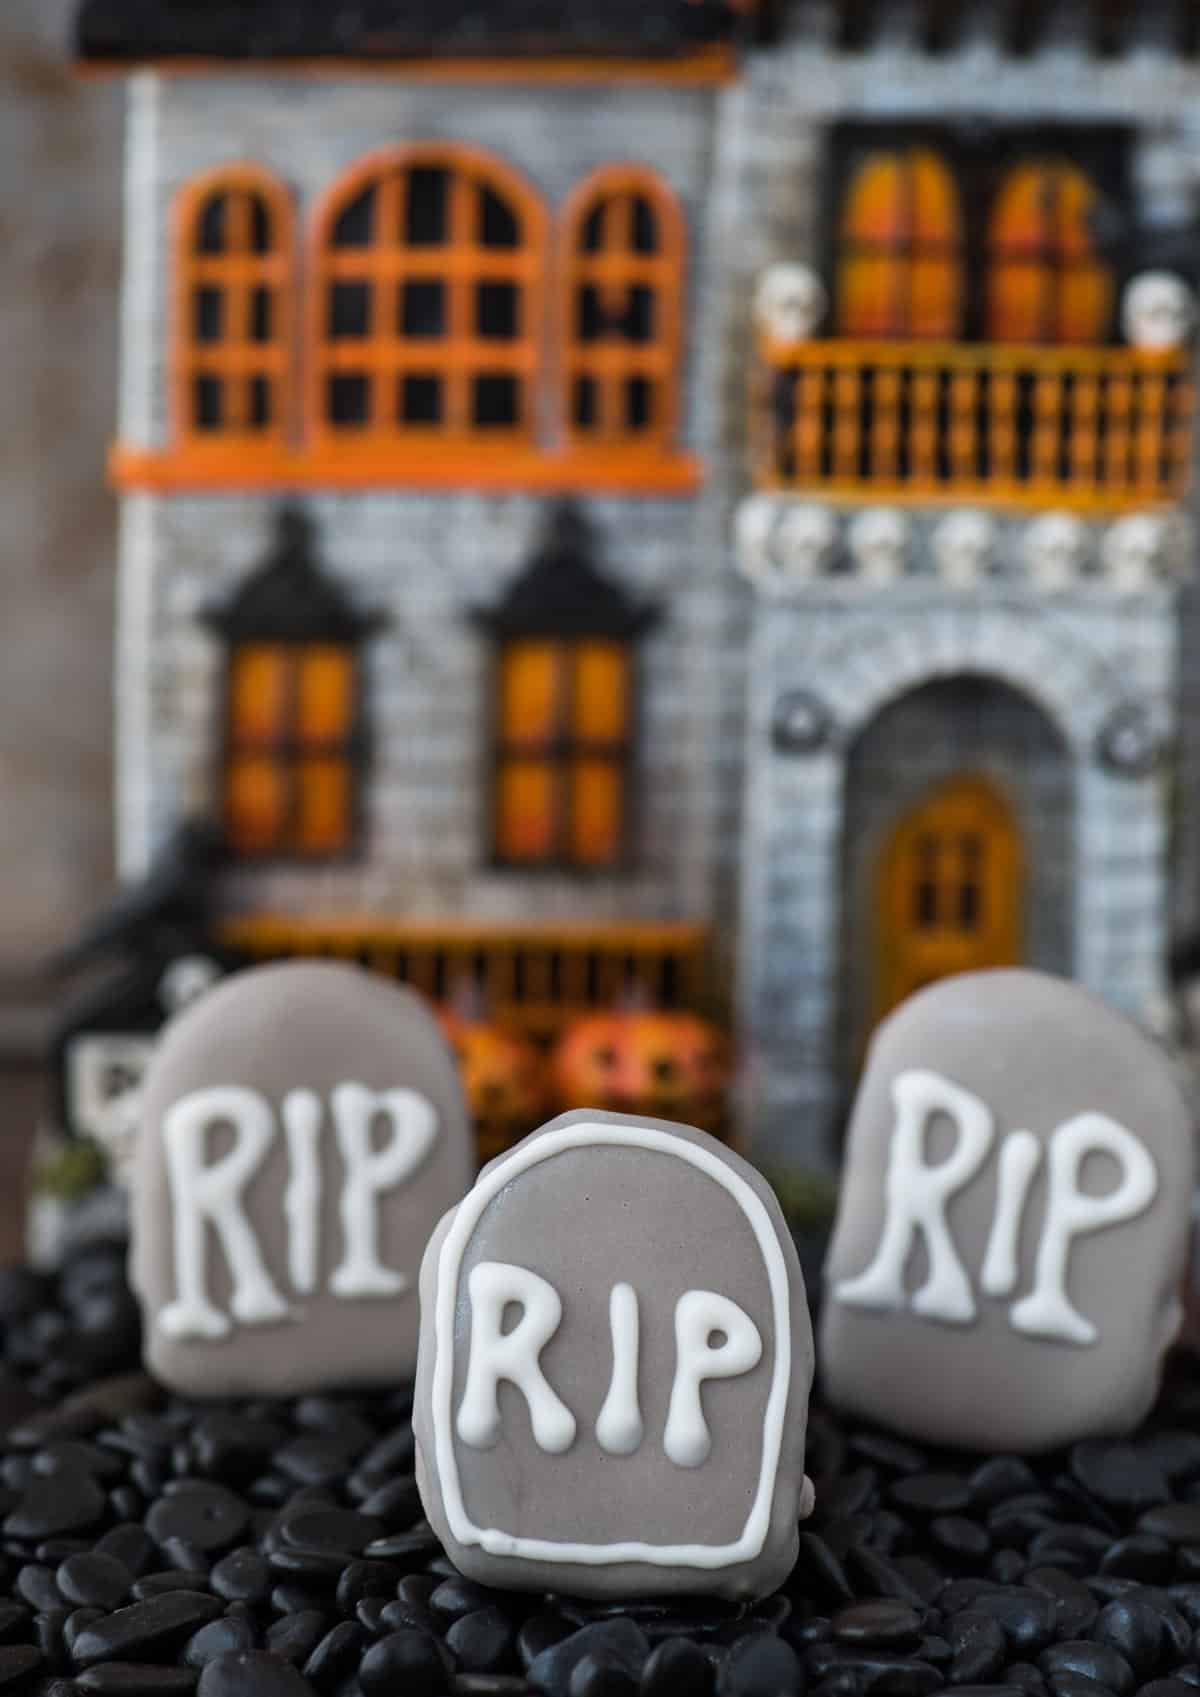
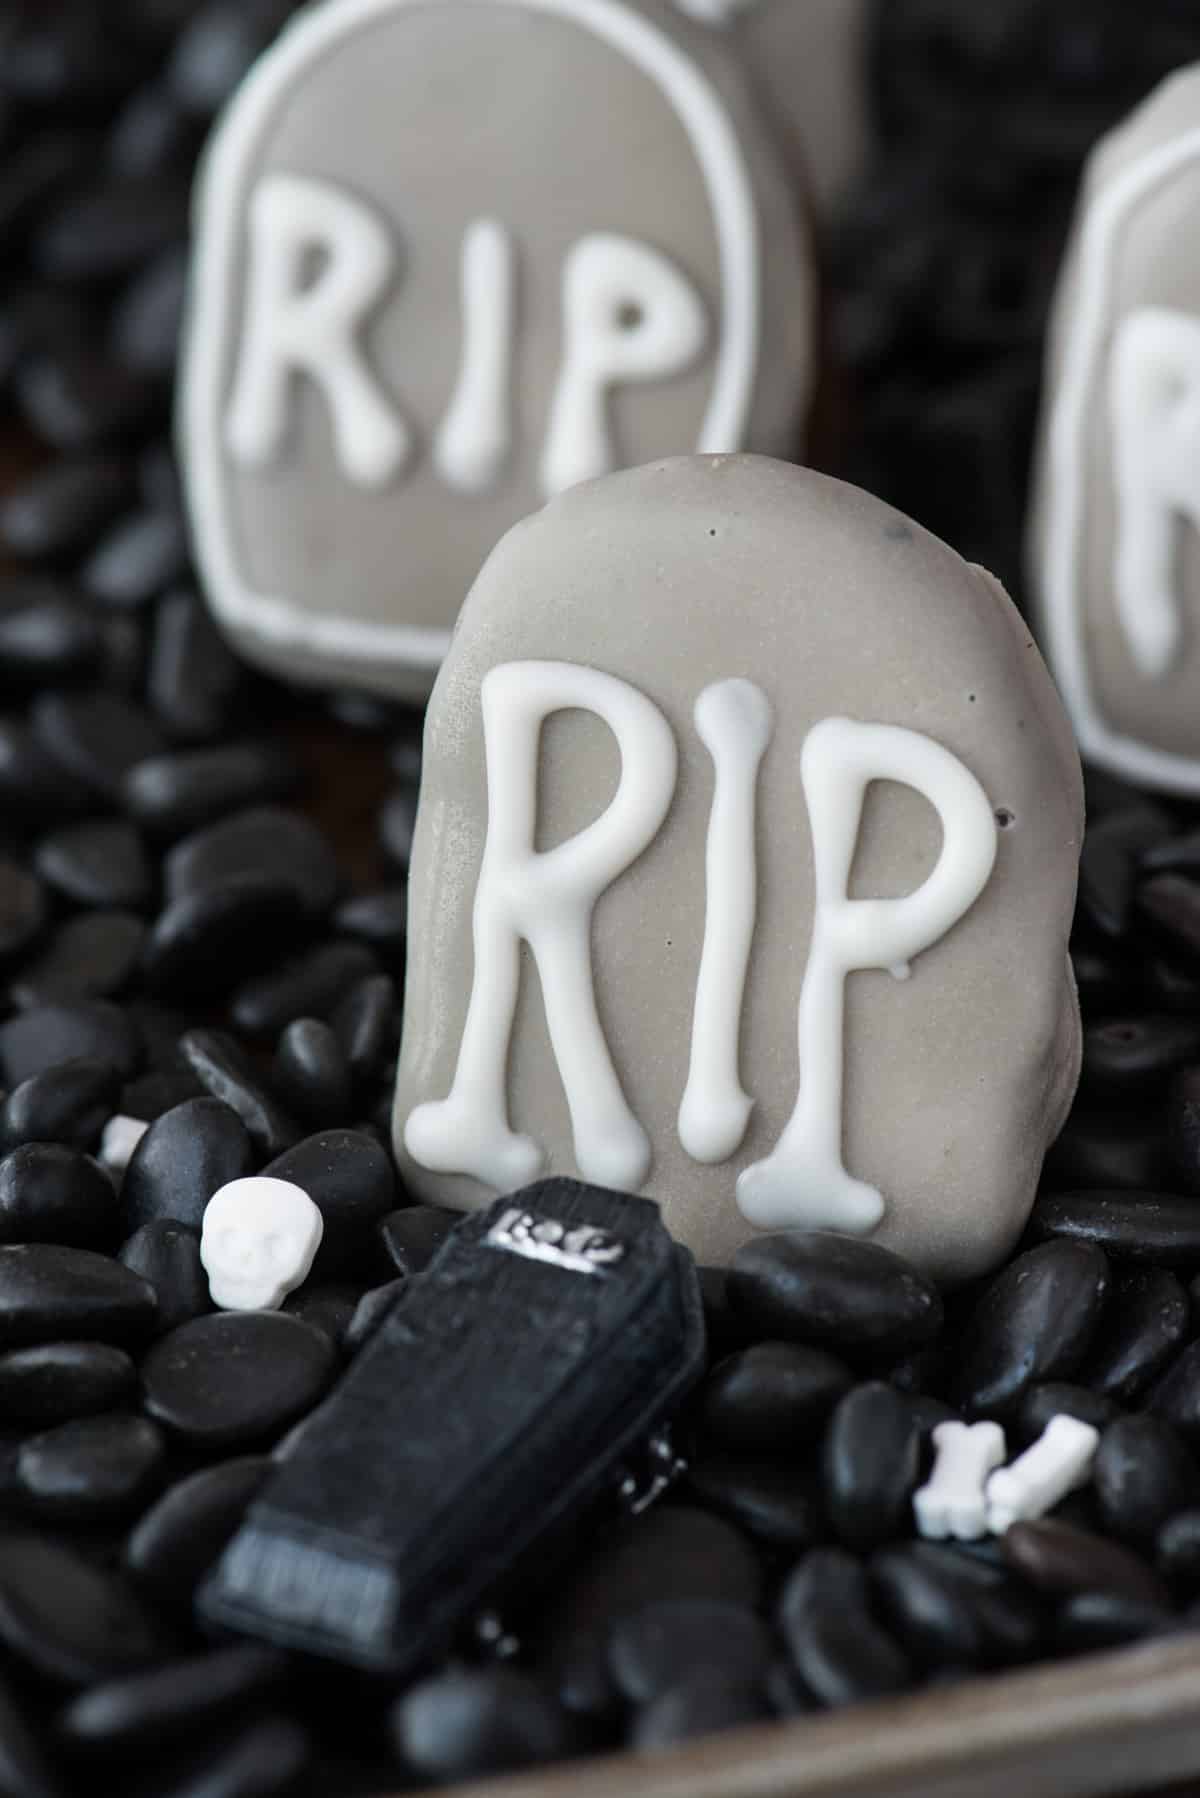
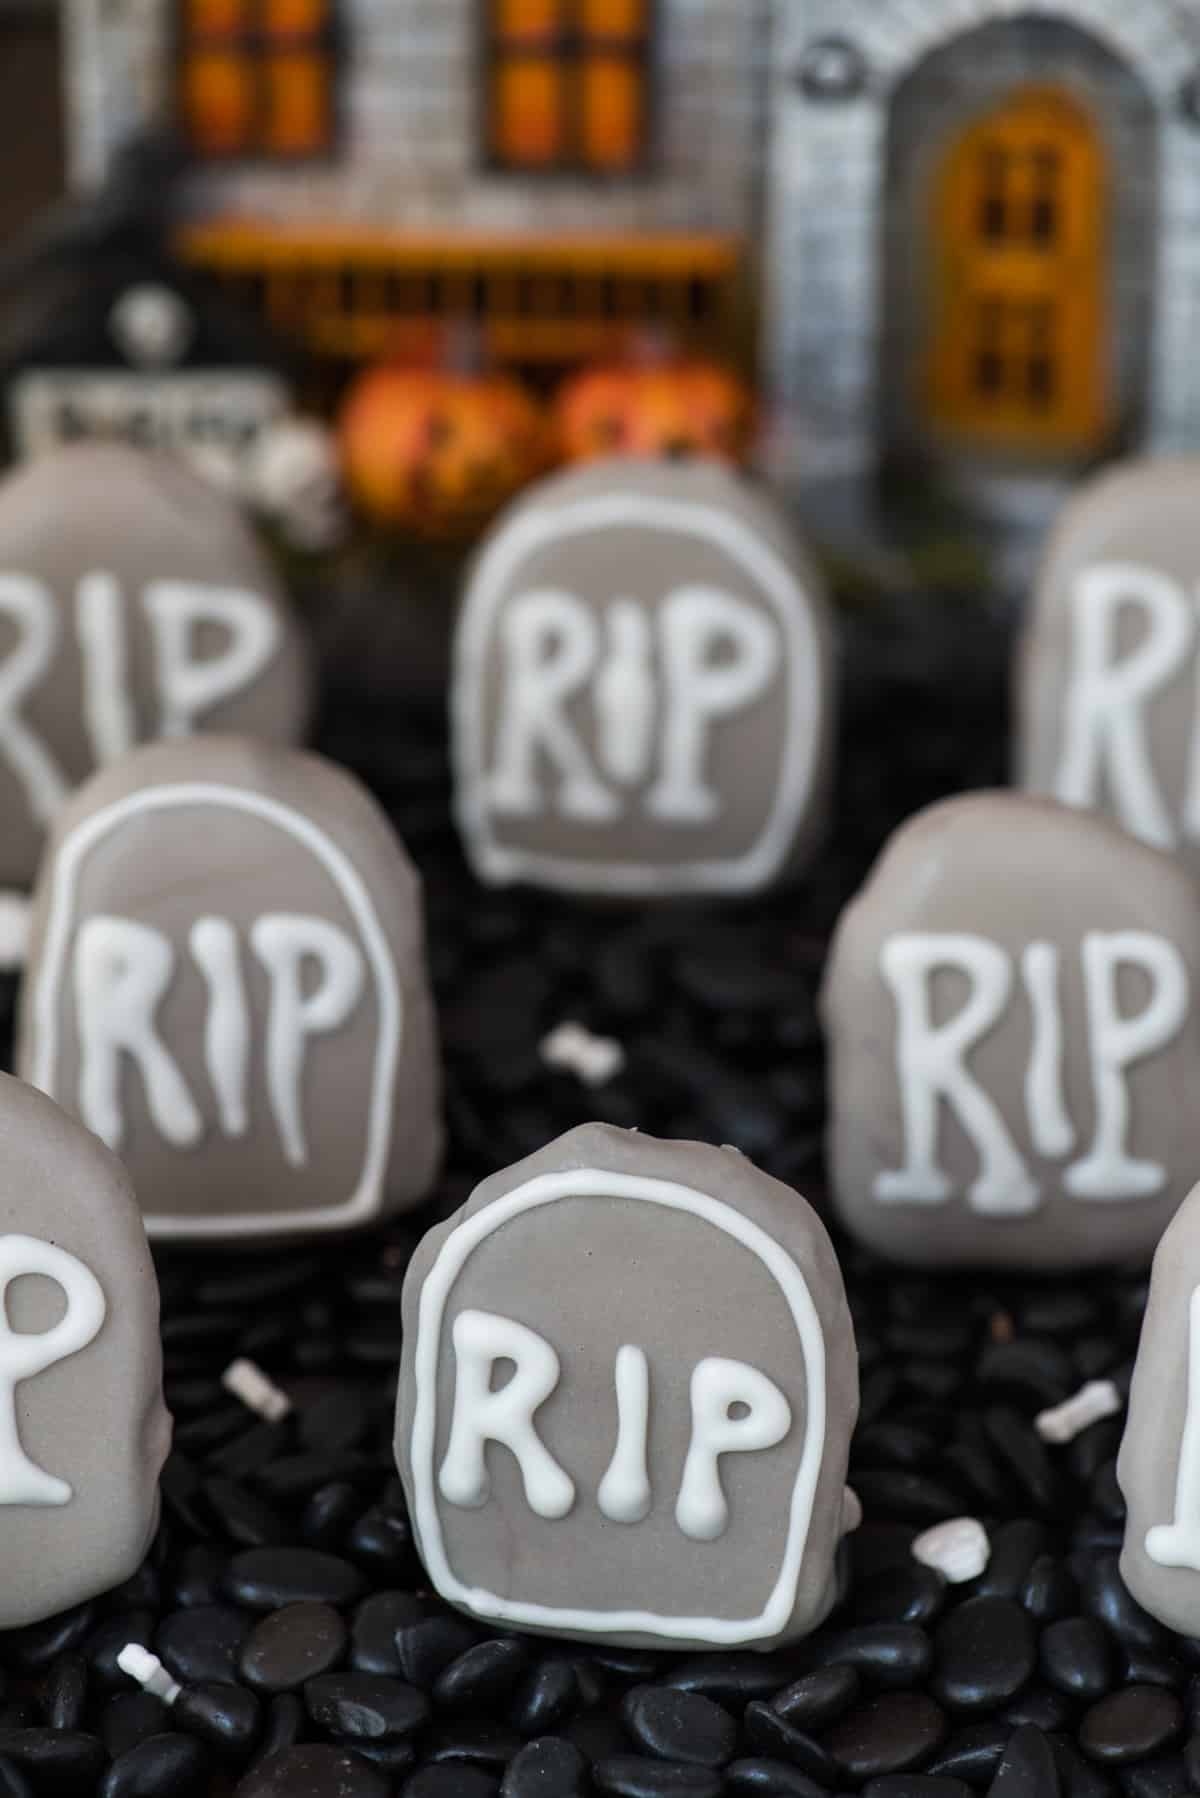
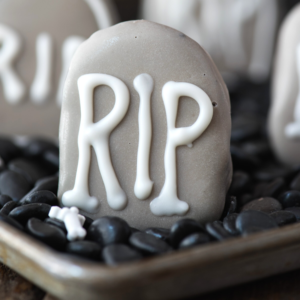
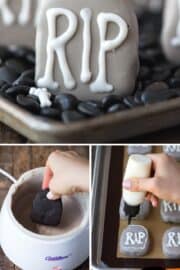
Make these spooky tombstone oreo balls to celebrate Halloween! These halloween oreo balls are only 5 ingredients, plus display them in a chocolate chip or rock graveyard to really bring the halloween spirit!
I brought an assortment of halloween oreo balls to the office and everyone loved them! I love getting creative with oreo balls!
-Liz
I LOVE making themed oreo balls.
In our collection, we have caramel apple oreo balls for fall, christmas present oreo balls, candy cane oreo balls, and an awesome turtle oreo ball that is stuffed with a rolo.
If you love oreo truffles and like getting crafty, this is the perfect halloween themed weekend treat to make!
Be sure to read the rest of the post because we’ll cover a lot of popular questions about oreo balls and give you some tips for making oreo balls that look like tombstones!
Helpful tools for making halloween oreo balls
- Silicone baking mat
- Melting pot
- Candy melts – both Michaels and Walmart carry Wilton candy melts
- Squeeze bottles
I love using silicone mats for oreo balls because they are easy to remove. Place your oreo balls on a silicone mat to chill in the fridge before dipping. Then return the balls to the mat after you dipped them. Once the chocolate sets, they are easy to remove!
I like using the wilton melting pot because it keeps the melted chocolate at an even temperature. Plus, it’s portable so I don’t have to stand over my stove to dip the balls.
The squeeze bottles come in handy for adding the letters and the detail work. I also use squeeze bottles when decorating sugar cookies or gingerbread cookies.
How to make halloween oreo balls
- Pulse oreos into crumbs
- Combine oreo crumbs and cream cheese until thick.
- Form the oreo mixture into tombstone like shapes and place on a silicone baking mat in the fridge to chill.
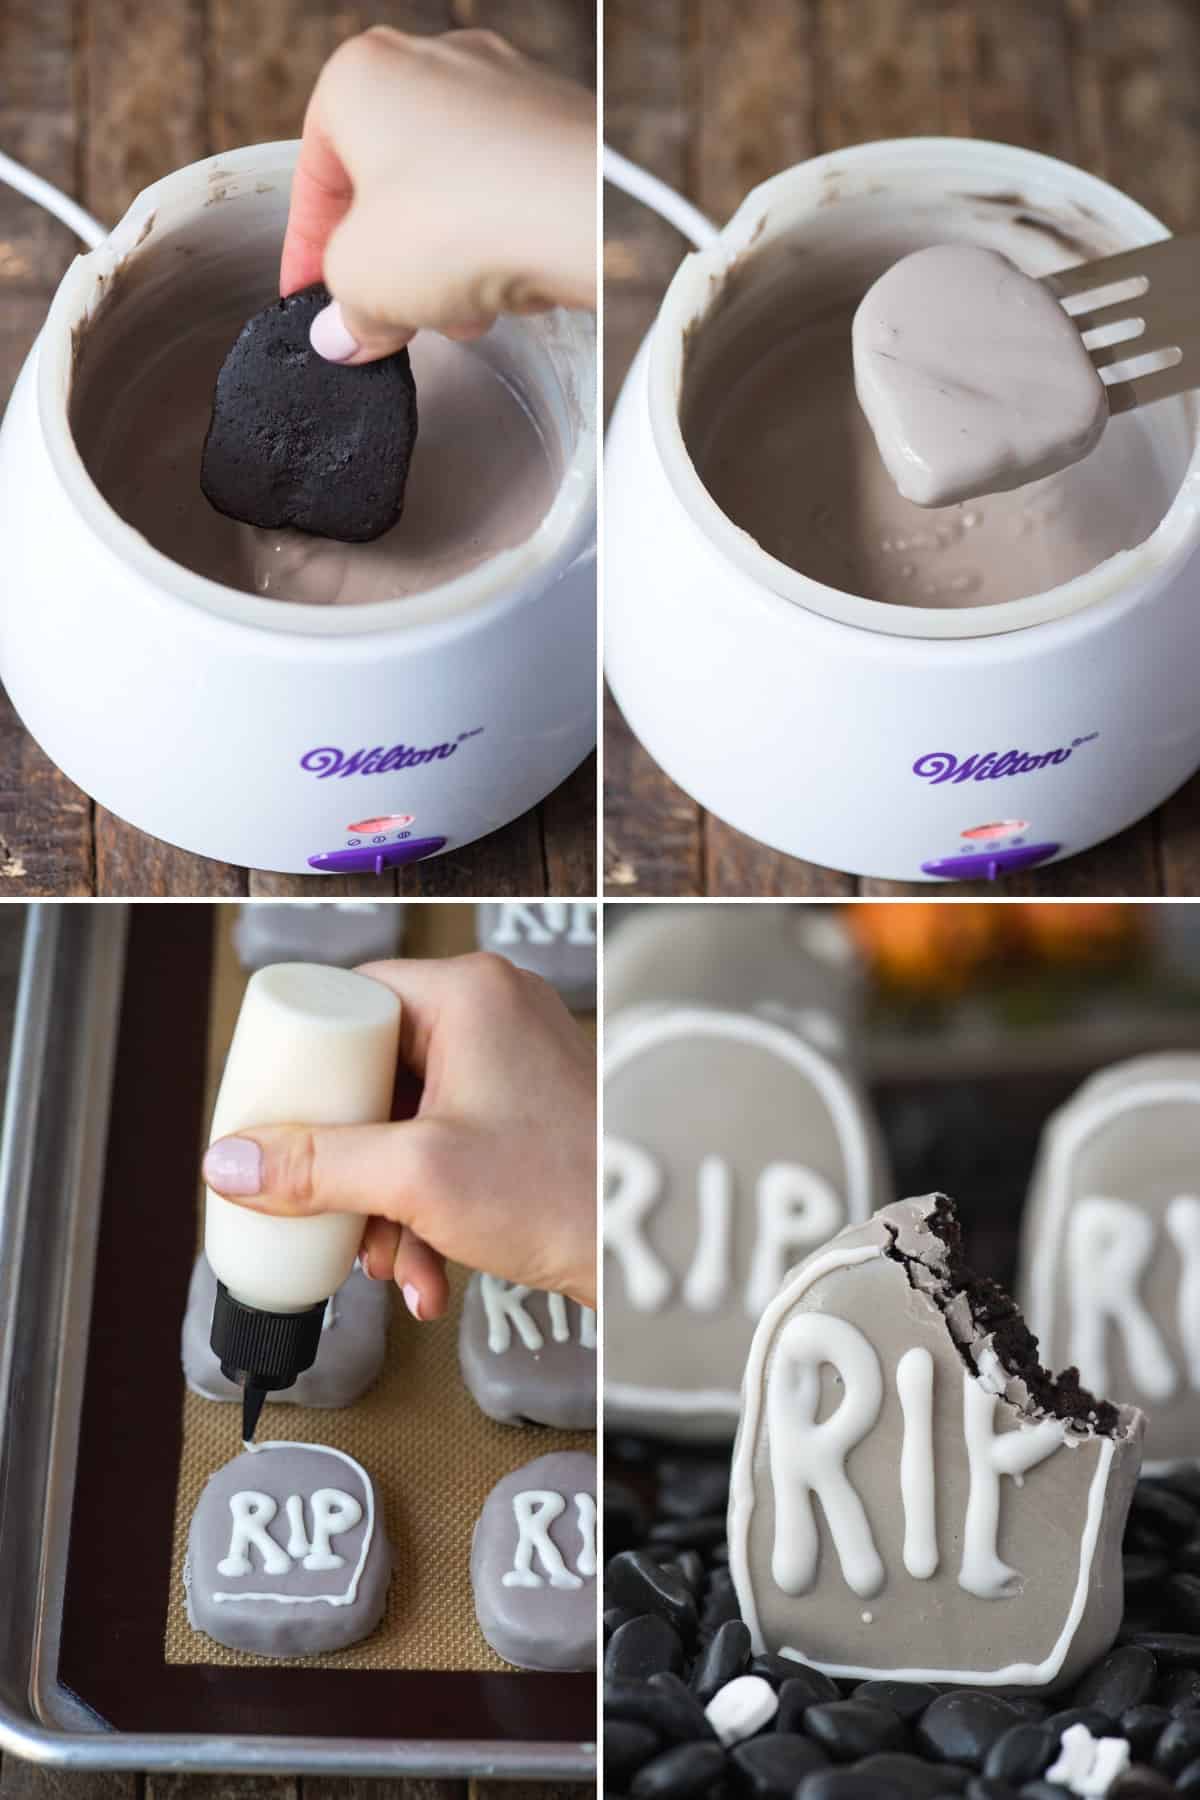
- Melt the candy melts (set aside about 1/4 cup for the letters) and add a small amount of black food coloring to turn the mixture gray.
- Dip one tombstone at a time into the gray chocolate – place on a silicone baking mat to harden.
- Melt the remaining white candy melts, transfer to a squeeze bottle and add the letters and other decorative details to each tombstone if desired.
- Place them on a serving tray with black rocks or chocolate chips and enjoy!
It’s important that your oreo balls aren’t too cold or frozen before you dip them
If you dip oreo balls that are frozen or very cold, the chocolate coating will crack as it sets because of the extreme temperature change. The best way to avoid cracking is to place the oreo balls in the fridge to chill for 20 minutes, then dip them.
How to coat oreo balls
I like to use almond bark or candy melts. If I am doing chocolate covered oreo balls I will use either chocolate or vanilla almond bark. If I want them covered in a specific color, I use Wilton Candy Melts!
For these tombstone oreo balls I used Wilton candy melts in white and added a small amount of black gel food coloring to achieve the gray color. Both Michaels and Walmart have a good selection of Wilton candy melts. I would say that Michaels has a better selection, so check their first!
I like to use vegetable oil or vegetable shortening to help melt the candy melts. Plus it helps to thin out the chocolate so it coats the oreo balls smoothly.
How long will oreo balls keep in the fridge
Place oreo balls in an airtight container for up to 1 week. Need them to last longer? Read the next point about freezing them!
Can oreo balls be frozen?
Yes! Oreo balls freeze well. Here’s my pro tip: Place 5-6 oreo balls in a row, and wrap in plastic wrap then place them in an airtight ziploc bag for up to 3 months.
Note: Be aware that the temperature change from the freeze to fridge (when thawing) may cause some of the chocolate coating to crack.
How to make oreo balls without cream cheese
I’ve heard you can substitute coffee creamer for the cream cheese! Just use enough creamer until the mixture sticks together. Plus, that way you can flavor the oreo balls!
I’ve also heard that you can use sweetened condensed milk in place of the cream cheese. Use just enough until the mixture sticks together.
Can oreo balls be left out / do oreo balls need to be refrigerated?
Oreo balls should be kept in the fridge until you serve them. Plus, most people think oreo balls taste best when cold. However, oreo balls can be left at room temperature. According to the FDA, cream cheese can be left out at room temperature for up to 2 hours.
More Halloween Treats
- Bubbling Witch’s Cauldron Brownies
- Ghost Popcorn Balls
- Frankenstein Pretzels
- Mini Pumpkin Pie Rice Krispie Treats
Tap stars to rate!
Tombstone Oreo Balls
Ingredients
- 1 package oreos, 14.3 oz (this is the standard package)
- 8 oz (226g) cream cheese, room temperature
- 1 bag white candy melts, I used Wilton brand
- Black gel food coloring
- Vegetable oil – for melting candy melts
Instructions
- In a blender or food processor, blend all the oreos until you have fine oreo crumbs.1 package oreos
- Transfer the crumbs to a mixing bowl, add in the softened cream cheese and mix with an electric mixer until well combined. The mixture will stick together when it’s all combined and be thick.8 oz (226g) cream cheese
- Line a cookie sheet with silicone baking mat. Form tombstone like shapes with the oreo mixture – using about 2-3 tablespoon per ball. Once all the tombstones are formed, place the cookie sheet in the fridge to chill for 20 minutes.
- Meanwhile, remove a little less than 1/4 cup of the white candy melts for later for the RIP letters – set aside. Melt the remaining white candy melts along with 1 tablespoon of vegetable oil and melt until smooth. You can do this on the stove top on low heat or in the microwave, melting them on 50% power, stirring them every 30 seconds until melted. Once melted add in a small amount of black food coloring. Stir until you have your desired gray color.1 bag white candy melts, Black gel food coloring, Vegetable oil – for melting candy melts
- Remove the oreo balls from the fridge. Place one tombstone in the melted chocolate at a time, coating it as needed, remove from the chocolate with a fork, tapping the excess chocolate off. Use a toothpick to scoot the tombstone off the fork and return to the silicone lined baking sheet. Repeat until all the tombstones have been dipped. Allow them to harden at room temperature.
- Once the gray chocolate is set, melt the remaining white candy melts with 1/2 tbsp vegetable oil. Transfer the chocolate to a squeeze bottle and add RIP to each tombstone. Add other decorative details as desired. Allow the chocolate to set completely.
- To assemble the graveyard, fill a pan with chocolate chips or decorative black rocks (I got mine at Michaels). Move the chips around to help get the tombstones in place. Sprinkle skeleton bone sprinkles over the graveyard. If serving later, keep the tombstones in the fridge until serving.


I brought an assortment of halloween oreo balls to the office and everyone loved them! I love getting creative with oreo balls!