
This post may contain affiliate links. Please read our disclosure policy.

OMG these are the best cookies ever!
-Jocelyn
St. Patrick’s Day
I’ve realized that St. Patrick’s Day is one of the most difficult holidays to explain to kids.
Here’s how it typically goes:
Adult: “St. Patrick’s Day is coming up!”
Kid: “What’s St. Patrick’s Day?”
Adult: “It’s a day to celebrate being Irish.”
Kid: “What’s Irish mean?”
Adult: “Irish are a group of people who live in Ireland, Ireland is a country like the United States is a country.”
Kid: *weird stare*
Adult: “On St. Patrick’s Day we eat green food and look for leprechauns.”
Kid: “What are leprechauns?”
Adult: “Little Irish guys who like to find gold.”
Kid: “Oh.”
It gets even more confusing for the kid when they find out that they aren’t even Irish and they still celebrate St. Patrick’s Day.

But St. Patrick’s Day is just too fun to not celebrate, so if you have Irish blood or not, I hope March 17th will be extra green and lucky for you.
Who knows, maybe you’ll even find a pot of gold, hint hint :)

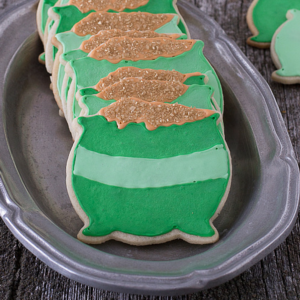
Pot o’ Gold Cookies
What you need to know before you begin: These Pot o’ Gold Cookies take time.
After you make the dough for these Pot o’ Gold Cookies it needs to chill for at least 2 hours in the refrigerate. I’ve kept it in the refrigerator overnight before and that works well too. When making cut out sugar cookies I always use the tried and true method of “roll-chill-cut-chill-bake.”
That means I roll the cookie dough onto a lightly floured silpat or parchment paper then chill in the freezer for 15 minutes, the roll-chill part. Then I use a cookie cutter and cut out my shapes and chill the cut out dough in the freezer on a silpat or parchment paper for 20 minutes, the cut-chill part. Then I bake. This method really ensures that your Pot o’ Gold Cookies won’t spread out or “melt” when baking.

Now you can have your own pot of gold without having to find it at the end of a rainbow! You’re going to love these Pot o’ Gold Cookies!
Tap stars to rate!
Pot o’ Gold Cookies
Equipment
- Rolling Pin
Ingredients
COOKIES
- ¾ cup (339g) unsalted butter, 1 1/2 sticks, room temperature
- ¾ cup (149g) sugar
- 1 large egg
- 2 tsp vanilla
- 2 ¼ cups (270g) all purpose flour
- ½ tsp baking powder
Royal Icing
- 4 cups (454g) powdered sugar
- 2 Tbsp meringue powder
- 5 Tbsp water, or more to get the right consistency
- Green food coloring, I like Wilton Brand
- Gold or copper food coloring
- Gold sprinkles
Instructions
COOKIES
- In a mixing bowl beat the butter until it’s fluffy using an electric mixer. Add in the sugar and beat until it’s combined with the butter, it will be fluffy.3/4 cup (339g) unsalted butter, 3/4 cup (149g) sugar
- Add the egg and vanilla, beat until combined again, 1-2 minutes.1 large egg, 2 tsp vanilla
- Add in the baking powder and about 1/3 of the flour. Mix slowly until the flour is just combined. Continuing adding the flour until it’s all incorporated. If the dough seems too sticky, add 1 Tbsp of flour at a time until the dough isn’t overly sticky to the touch.1/2 tsp baking powder, 2 1/4 cups (270g) all purpose flour
- Divide the dough into 2 equal balls. Flatten them into disks and wrap in plastic wrap. Refrigerate for at least 2 hours or overnight.
- Once the dough is done chilling, begin to roll one disk of dough out. On a lightly floured silicone baking mat or piece of parchment paper roll the dough out to about 1/8 to 1/4 of an inch thick, depending on your preference.
- Place the rolled dough in the freezer for 15 minutes.
- Preheat the oven to 350 F degrees.
- After 15 minutes, remove the dough from the freezer and begin to cut out your shapes using a cookie cutter. Place the cut out cookies on a silicone baking mat or parchment paper and chill in the freezer for 20 minutes.
- Bake the cookies for 9-10 minutes, rotating the pan half way through. The cookies should be light in color and on the edges when you pull them out of the oven.
- Allow the cookies to cool on the baking pan for 10 minutes. Then transfer them to a cooling rack.
- Repeat this process with the remaining dough, including the scraps of the first batch.
Royal Icing
- Combine the powdered sugar, meringue powder, and water in a mixing bowl and mix on low speed until the icing has a matte appearance, about 5-8 minutes.4 cups (454g) powdered sugar, 2 Tbsp meringue powder, 5 Tbsp water
- Evenly divide the icing into 4 small bowls. Begin to add the food coloring, you should have 4 different colors – light green, medium green, and kelly green and then a goldish brown color. Note: Cover up the bowls of icing with a wet cloth when you’re not using them to keep the icing from drying out.Green food coloring, Gold or copper food coloring
- I find that it is easiest to transfer the icing to a small squeeze bottle to decorate. Transfer a small amount of each color green into 3 different squeeze bottles.
- Begin to outline the edge of the cookies. If you choose, you can add various details like stripes or shamrocks as well. Once you are done outlining the cookies, it’s time to flood them.
- In order to do that, you will need to add more water to the icing so the consistency is thinner. Add 1 tsp of water at a time, stirring by hand, until the icing runs off the back of a spoon. Do this for each green color. Continue to keep the goldfish brown color covered up with a wet cloth.
- Using either a squeeze bottle or a spoon, begin to flood the cookies with icing. I like to use a tooth pick to help spread the icing to the edges. You don’t want to add too much icing, as this could cause the icing to overflow beyond the edges. Practice until you know how much icing you need.
- Once the green portion of the cookies are finished, move onto doing the gold tops.
- Transfer some of the the goldish brown icing to a squeeze bottle and outline the top of the cookie where the gold will be.
- One the outlining is done, use the remaining goldish brown icing to flood in the top area.
- In order to do that, you will need to add more water to the icing so the consistency is thinner. Add 1 tsp of water at a time, stirring by hand, until the icing runs off the back of a spoon.
- Flood in the gold portion by either transferring the icing to a squeeze bottle or using a spoon. Again, use a toothpick to help get the icing filled in.
- I like to flood one cookie with the gold icing at a time and then add the sprinkles. Be sure to add the sprinkles to the cookie before the icing sets.Gold sprinkles
- Continue this process until all of the cookies have gold tops and sprinkles.
- Allow the icing to set completely before serving or storing them in an air tight container.


These cookies are too cute Beth, I love those little gold sprinkles!
Emily, thank you!!
I remember wondering why we celebrate the Irish and green things on St. Patrick’s Day too! That and why I got pinched if I didn’t wear green. These cookies are so perfect for celebrating the day!
Hahaa, I forgot about the whole pinching thing!
These cookies are so cute! I love the cookie cutter shape. When I lived in New Orleans, we would celebrate St. Patrick’s Day with parades rolling down the streets. Instead of Mardi Gras beads, the riders would hand out cabbages and potatoes (for Irish stew :) ).
Hahaa, that sounds like a fun parade!
As being a non Irish (where is the Croatian holiday?!), I can’t lie and say that this is my favorite holiday. It has been so hard to plan for! But I don’t mind finding these pot of gold cookies!
Make some healthy green food like peas.. haha just kidding. :)
These are so cute! You’ve reminded me to get planning with some green and great St. Patty’s recipes :)
It is a hard holiday to explain and definitely they don’t get the pinching thing ether! But these are so fun I want to celebrate it now!
Ha! That’s so true! I feel like most holidays are hard to explain to kids. But put cookies in front of them and they totally get it ;)
Exactly!!
Where can I get the pot of gold cookie cutter? I’m 175% Irish (!) and I thought I had every St. Paddy’s cookie cutter out there. St. Patrick’s Day is my kids 2nd favorite holiday…as nothing beets Christmas!
This is the one I used: https://amzn.to/42sMt8M