
This post may contain affiliate links. Please read our disclosure policy.
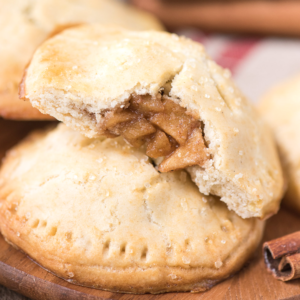
These aren’t just your average homemade apple hand pies. I used my no-fail puff pastry crust (which is so flaky!) and tested the apple filling to find the perfect size for the apple pieces. Combine that with the perfect Fall spices, and you have the best mini apple pies.

These are super cute! I froze some to save for later and they bake wonderfully from frozen!
-Emily
A perfect apple hand pie, in my opinion, needs to have a super flaky crust and a flavorful filling with just the right texture. That’s why I spent time testing different sized apple pieces. They can’t be too big, and they can’t be too small. This is starting to sound like a Goldilocks and the Three Bears book, but it’s true, having the apple pieces cut to just the right size makes a huge difference in the filling.
Keep reading for all my best tips, plus watch the step-by-step video!

When I did the fall recipe call on instagram, a popular suggestion was apple hand pies.
Hand pies aren’t a typical thing I would pick to make, but I’m really glad you guys suggested it because they were a lot of fun to make! And so tasty.
I did a fall recipe call for a few reasons..
1. I can get stuck in my own recipe patterns, meaning I stick to what I’m comfortable with. That means lots of chocolate. But you guys encourage me to go outside my comfort zone!
2. You’re my audience and what better way to see what types of recipes you’d like to see then ask you!
3. Sometimes my creativity runs low and you guys are a great source of inspiration!
So, this recipe is extra special, and just for you my friends!
Homemade Apple Hand Pie Ingredients
- Apples
- Butter
- Brown sugar
- Cinnamon
- Nutmeg
- Cloves
- All-purpose flour
- Powdered sugar
- Baking powder
- Salt
- Eggs
- Milk

How to Make Baked Apple Hand Pies
- Make the apple filling. The filling can be made ahead of time and stored in the fridge.
- Make the dough. Use a 3 or 4 inch circle cookie cutter to cut circles.
- Place pie filling in the center of each circle, then top with another pie crust circle. Pinch the sides together with a fork.
- Refrigerate the mini pies for 30 minutes before baking. This allows the butter to become cold, creating a flaky crust when baking.
- Apply egg wash and bake.

Apple Hand Pie Recipe Tips
- You’ll need a 3 inch circle cookie cutter. Anything smaller than 3 inches may be too small. I didn’t have a circle cookie cutter, so I used the closest thing – a christmas ornament cookie cutter! You could also use a 4 inch circle.
- You do need to pre-cook the apple filling. The apple mixture won’t get soft enough during the baking time, that’s why you need to soften the apples ahead of time.
- You can make the filling ahead of time. I made the apple filling the day before I assembled the rest of the pies. Store it in the fridge for up to 3 days.

Apple Hand Pie Recipe Variations
Apple hand pies are a favorite fall treat that can be easily customized with various flavors and textures. Here are three delicious variations:
- Caramel Apple Hand Pies: Add a drizzle of caramel sauce to the apple mixture before sealing the pies.
- Apple Cinnamon Cream Cheese Hand Pies: Add a dollop of sweetened cream cheese (cream cheese mixed with a little sugar and vanilla) to each pie along with the apple mixture.
- Spiced Apple and Pecan Hand Pies: Add a handful of chopped pecans to the apple mixture for added crunch
Each of these variations adds a unique twist to the classic apple hand pie, making them perfect for different tastes and occasions!
Why Chill Pie Dough?
It’s the same reason people suggest chilling cut out sugar cookie dough before baking – to help the dough maintain its shape and not spread as much while baking. You want the fat (butter) to be firm when it goes into the oven because the quick melting of the butter creates the signature flaky crust.
But instead of chilling the dough in a ball right after making it, I found it best to chill the dough after the little pies are formed. Assemble the pies with filling and crimp the edges, then place them on a silicone lined baking sheet and refrigerate for 30 minutes before baking. When the time is up, pop the whole baking sheet in the oven!
How do I stop my hand pies from leaking?
Preventing hand pies from leaking can be challenging, but with a few key tips, you can keep the filling securely inside:
- Don’t Overfill the Pies
Tip: Use just enough filling to flavor the pie but not so much that it overflows when you try to seal it. Typically, 1-2 tablespoons of filling per pie is sufficient, depending on the size. - Seal the Edges Properly
Tip: After placing the filling, brush the edges of the dough with a little water, egg wash, or milk to help the dough stick together. Press the edges firmly with a fork to crimp them or fold them over slightly and press again for a tighter seal. - Vent the Pies
Tip: Cut small slits or poke holes in the top of each pie to allow steam to escape during baking. This helps to prevent the pies from bursting open. - Chill the Pies Before Baking
Tip: After assembling the pies, place them in the refrigerator for 30 minutes before baking. This helps the dough firm up, reducing the chance of the filling leaking out.

Storing Baked Apple Hand Pies
To store baked apple hand pies, keep them in an airtight container at room temperature for up to 2 days, or refrigerate them for up to 5 days. For longer storage, freeze the cooled pies by wrapping them individually and placing them in a freezer-safe bag for up to 2-3 months. Thaw frozen pies in the refrigerator overnight, then reheat in a 350°F (175°C) oven for 10-15 minutes to restore crispiness. To prevent overcooking when reheating, consider slightly underbaking the pies before freezing.
More Apple Desserts
Tap stars to rate!
Recipe For Apple Hand Pies
Ingredients
APPLE FILLING
- 2 heaping cups finely diced apples
- 2 Tbsp (29g) unsalted butter
- ⅓ cup (71g) packed brown sugar
- 1 ½ tsp cinnamon
- ½ tsp nutmeg
- ¼ tsp cloves
Crust
- 2 cups (240g) all purpose flour, we’ve also used King Arthur’s Gluten Free Flour with awesome success!
- ½ cup (56g) powdered sugar
- 2 tsp baking powder
- ½ tsp salt
- ¾ cup (170g) cold butter, cut into small cubes, 1 and 1/2 sticks
- 2 large egg yolks
- 2 Tbsp cold milk
Video
Instructions
Apple Filling
- Combine the diced apples, butter, brown sugar and all spices in a skillet over medium-low heat on the stove. Stir occasionally while mixture simmers, 5-7 minutes or until the apples are tender. Note: you can make the apple filling up to 3 days ahead of time and store in the fridge until ready to use.2 heaping cups finely diced apples, 2 Tbsp (29g) unsalted butter, 1/3 cup (71g) packed brown sugar, 1 1/2 tsp cinnamon, 1/2 tsp nutmeg, 1/4 tsp cloves
CRUST
- In a large mixing bowl, combine the flour, powdered sugar, baking powder, and salt.2 cups (240g) all purpose flour, 1/2 cup (56g) powdered sugar, 2 tsp baking powder, 1/2 tsp salt
- Using your fingers or pastry cutter, cut in the butter until the mixture is crumbly.3/4 cup (170g) cold butter, cut into small cubes
- Add the egg yolks and milk, mix with spatula until the dough is just combined.2 large egg yolks, 2 Tbsp cold milk
- It may be easier to divide the dough in half while rolling it out – its up to you! On a lightly floured surface, roll out the dough to about 1/8 inch thick. Use a 3 inch (or 4 inch) circle cookie cutter and cut out as many circles as you can. Re-roll the dough and cut more circles as needed.
- Place the bottom crust of the hand pies on a silicone lined baking sheet about 2 inches apart. Add 1 & 1/2 to 2 tablespoons of apple filling to the center of each crust.
- Before adding the top crust, use a butter knife to create air vent holes. The pattern of vent holes is up to you.
- Place the top crust over the filling and use your fingers to crimp the edges, sealing the bottom and top crusts together.
- Use a fork to create the decorative detail on the edges of the pies.
- Place the baking sheet in the fridge for 30 minutes to chill the dough before baking!!
- After 30 minutes, preheat the oven to 350º F.
- Brush each pie with egg wash (1 egg mixed with 1 tbsp of water) and sprinkle with sanding sugar or sugar.
- Bake for 18-22 minutes or until the pies begin to turn golden. Serve warm or cold.
Notes


How long do the hand pies last after baking? Can you store the pre made hand pies in the fridge for up to 3 days before baking?
Yes, I would think that would be fine!
What tempurature and for hoe long?
350ºF for 18-22 minutes
Do you need to cook the apples, or if they’re diced small enough can you skip this step and still have cooked apples at the end? Thank you.
Hi Sharon! Cooking the apples ahead of time ensures that the filling will be soft! The apples may not be softened enough during the baking time.
How many pies does this make?
About 16!
These are super cute! I froze some to save for later and they bake wonderfully from frozen!
Did you freeze them after baking, or before? In either case how long did you then bake them and did you defrost first?
I defrosted them in the fridge first and then baked according to the recipe adding for time as needed!
Have you ever used a pre-made pie crust to make these?
I haven’t, but I believe it would work just fine!
I use premade pie crust but roll it out with a rolling pin until the original thickness has thinned to 1/6-1/8th inch. Also, after baking and cooling, I freeze most of batch in doubled plastic freezer bags. I defrost then on “soften” setting of the microwave.
Really love having them on hand for drop-in company or grandkids. Add a little vanilla ice cream for a special treat.
Great recipe!
Thank you.
Do I use ground cloves or whole cloves?
Ground cloves
Store and reheat suggestions?
Store in an air tight container on the counter for 1-2 days, for longer storage, store in the fridge. Reheat in the microwave.
Hi there!
If I want to use apple pie spice instead of all the spices listed, how much should I use?
I’d use 2 teaspoons of apple pie spice.