
This post may contain affiliate links. Please read our disclosure policy.
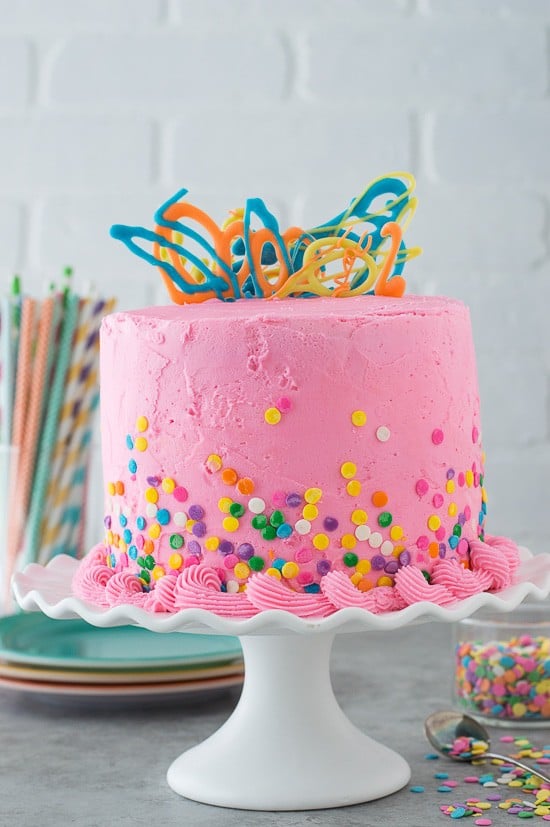
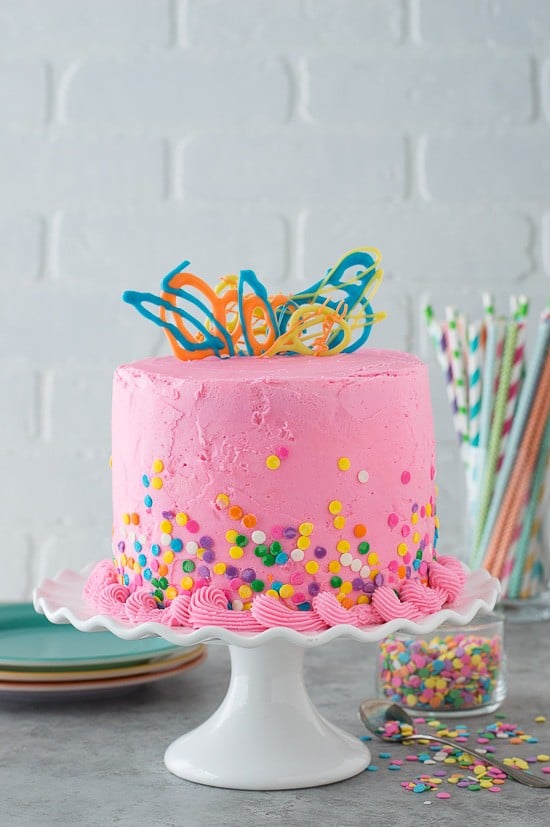 For the longest time I had no idea what to call this cake. It has pink buttercream, confetti sprinkles, and pretty sweet chocolate decorations on top. And that’s all just on the outside of the cake. The inside of the cake is our moist white cake recipe loaded with mini chocolate chips! It’s one giant party.
 First I called it the crazy cake. But that name didn’t really describe any part of it at all. Then I called it the chocolate chip cake. But it’s so much more that just a chocolate chip cake. So I decided I wanted to call it the “cool chocolate chip cake with pink buttercream, confetti sprinkles, and colorful chocolate decorations.”
But that name isn’t really good for SEO. SEO is basically a fancy way to say I want google to be able to recognize my recipe and too many words in a title makes it hard for google to decide what it is.
So we’re going with pink confetti chocolate chip cake. Kind of still long and confusing, but whatever haha.
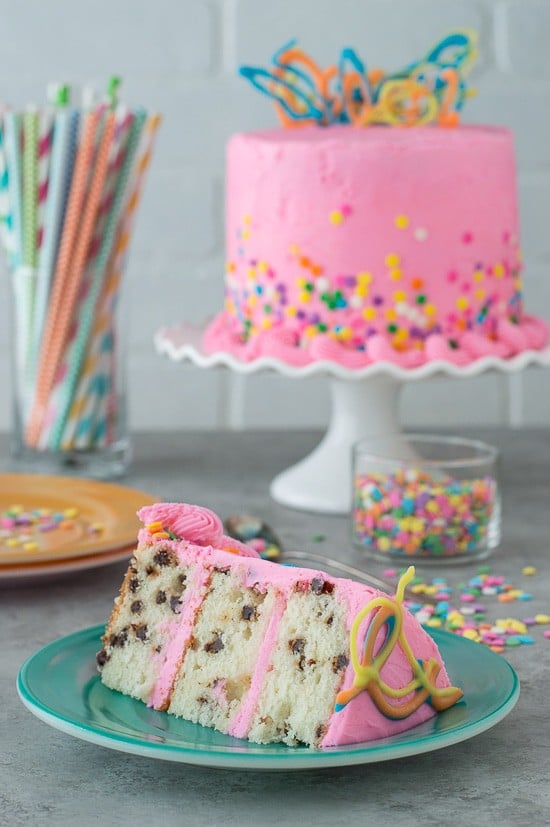 This recipe has a few steps but all of them are manageable. You’ll want to bake the chocolate chip cake layers first. I like to do that even a few days in advance. The chocolate chip cake recipe I’m sharing is for one 6 inch layer cake. That way you can decide how many layers you want to make, simply double or triple the recipe, etc.
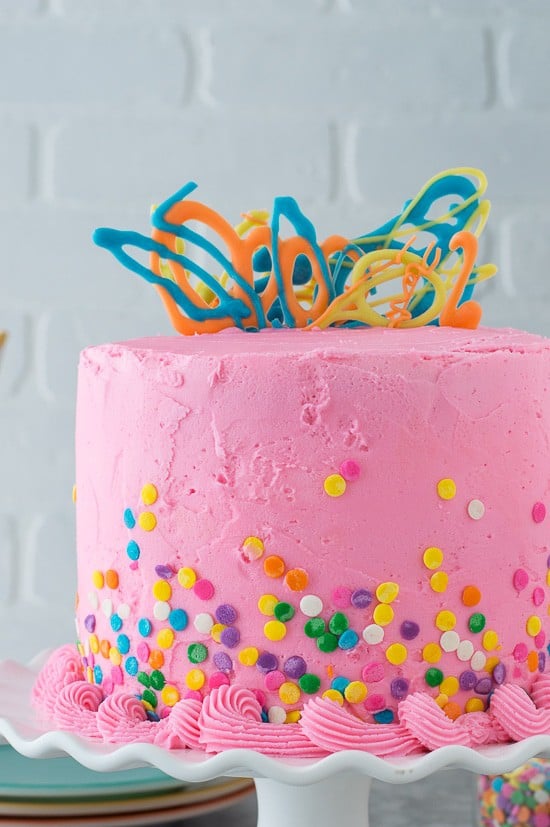
The buttercream is our standard recipe. I use gel food coloring by Wilton, you can find it in any color. You’ll want some sprinkles to decorate the sides of the cake. I used confetti sprinkles, but use any kind you want!
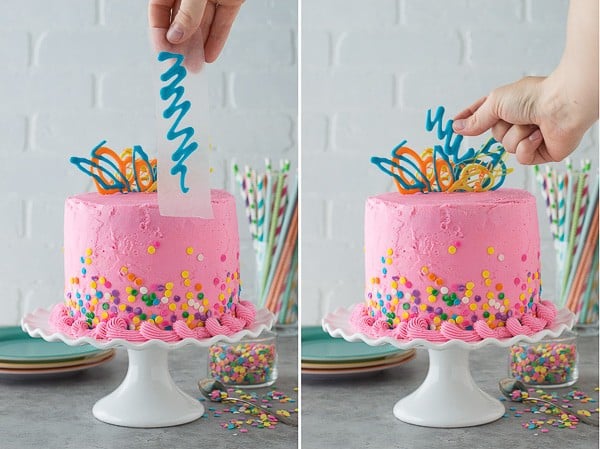
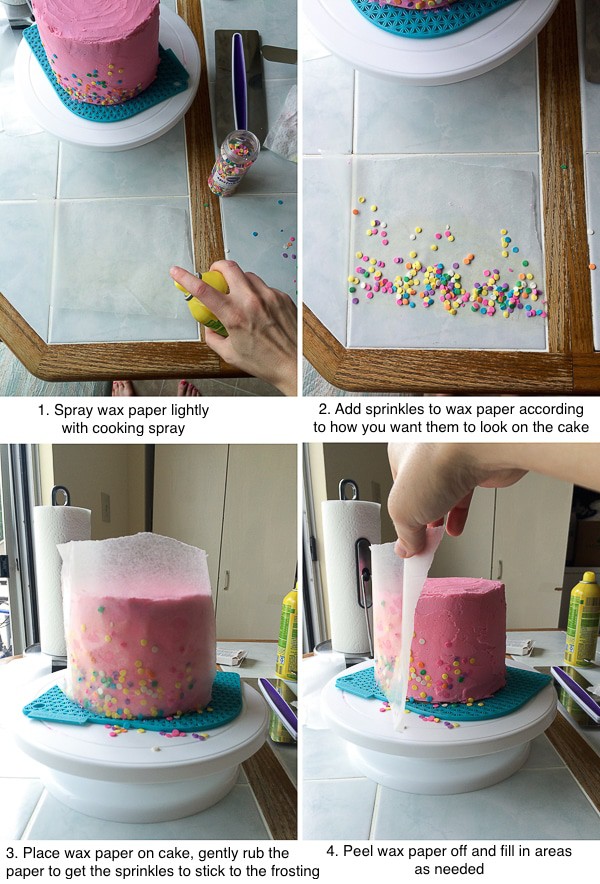 I wanted my sprinkles to be primarily on the bottom half of the cake so I include the above tutorial to show you how I did that. This wax paper trick works pretty well, but you will need to fill in spaces that were missed by hand.
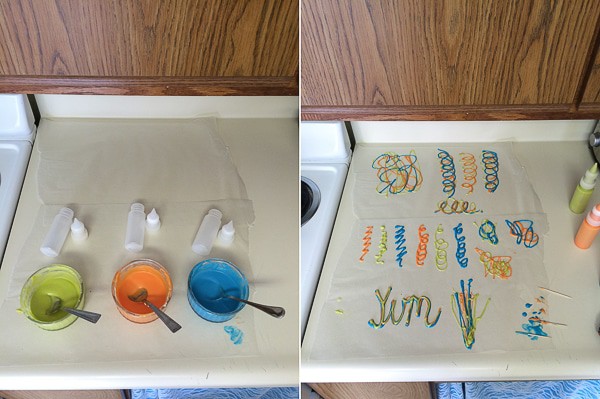 For the chocolate decorations on top of the cake, you’ll want to melt chocolate candy melts in a few different colors with a small amount of vegetable shortening. After the chocolate is melted, I like to transfer them into squeeze bottles. The squeeze bottles allow me to have more control over my designs. Create designs on wax paper, allow them to harden up for about 2 minutes in the fridge before peeling the wax paper off of the designs.
Chocolate decorations are super fun and instantly dress up a cake!
 Instead of doing random designs, you could use the chocolate to write someone’s name, a specific number to celebrate that year’s birthday, or if you’re feeling extra fancy, write happy birthday. I haven’t even done that yet because it seems tricky with all those letters!
Tap stars to rate!
Pink Confetti Chocolate Chip Cake
Ingredients
for one 6 inch layer (repeat this recipe for each layer)
- 3 tbsp butter, softened
- 5 ½ tbsp sugar
- 1 ½ large egg whites
- ¼ cup sour cream
- ½ tsp vanilla extract
- ½ cup + 1 tbsp all purpose flour
- ¾ tsp baking powder
- ¼ tsp salt
- 3 tbsp mini chocolate chips
Buttercream
- 2 sticks butter, softened (1 cup)
- ½ cup vegetable shortening
- 1 tsp vanilla extract
- 6-7 cups powdered sugar
- pink gel food coloring
Others
- Confetti sprinkles
- Chocolate candy melts, in various colors, to make decorations on top of cake
- Vegetable shortening
Instructions
Chocolate Chip Cake
- Preheat the oven to 350º F.
- Using butter, grease the bottom and sides of an 6 inch round cake pan or springform pan and line the bottom with a round piece of parchment paper. To ensure even baking, place a bake even strip around the pan. You can make your own homemade bake even strip by cutting a towel or shirt to fit the size of your pan. Get the fabric really wet, then squeeze out the dripping water but do not squeeze it too dry. Secure the fabric around the pan with a safety pin.
- In a mixing bowl, combine the butter and sugar, beat using an electric mixer until fluffy. Add in the egg whites, beat again.
- Add in the sour cream and vanilla extract, mix until smooth.
- In a smaller bowl, combine the flour, baking powder and salt, gently mix with a spoon. Gradually add half of the flour mixture to the wet ingredients, do not dump it in, rather take spoonfuls of the flour mixture and gently shake it over the wet ingredients, as if you were sifting in the flour. Fold in the mixture until no flour remains. Repeat with the other half of the flour, folding it in and scraping the sides and bottom of the bowl to incorporate everything.
- Add in the mini chocolate chips, and mix to combine.
- Scrape the batter into the prepared cake pan, using a spatula to evenly spread it out.
- Bake for 23-25 minutes, or until a toothpick inserted in the center comes out clean.
- Once the cake is done, allow it to cool in the pan on a cooling rack for 10 minutes. After 10 minutes, carefully remove the cake from the pan. If using a springform pan, remove the sides and bottom. Allow the cake to cool completely on a cooling rack. Once cool, remove the parchment paper round from the bottom of the cake. If you need to level the top of your cake, do so now using either a cake lever or knife. Make sure the cake is completely cooled, then wrap the cake in plastic wrap and place it in the refrigerator. This cake is good for up to one week like this.
- Repeat this recipe until all the cake layers are baked.
Buttercream
- In a mixing large bowl, combine the butter and vegetable shortening, beat using an electric mixer until fluffy, 2 minutes.
- Add in the vanilla extract, beat using electric mixer.
- Begin to add the powdered sugar, about 1-2 cups at a time, mixing by hand first, then with the electric mixer. Continue adding powdered sugar until the frosting tastes good to you.
- Add in your desired amount of gel food coloring. Start with a little and add more to get your desired color. Beat the frosting using the mixer one last time.
To assemble the cake
- Spread a small amount of buttercream on a 6 inch round cardboard cake circle. Place your first layer of cake on top of the cardboard. Put buttercream on top of the first layer and spread it as even as possible with an offset spatula. Decide how much or how little frosting you want in-between each layer.
- Repeat this process for each layer of cake. Once all of the layers are stacked and frosted, it’s time to do a crumb coat. The crumb coat will help seal the crumbs in. Using your offset spatula, spread a thin layer of buttercream around the sides and the top of the cake. It’s easiest to start off with more frosting on the cake and remove some as needed.
- Place the entire cake in the freezer or fridge for 20 minutes to harden the crumb coat.
- Begin to add the second layer of frosting, starting with the top of the cake and working your way down to the sides. Try to get the buttercream as even as possible around the cake.
To decorate the cake
- To add sprinkles to the bottom of the cake, there are 2 options. 1. Put sprinkles in an open hand and gently push them into the frosting, filling in gaps as needed. 2. Lightly spray a piece of wax paper with non-stick cooking spray, place sprinkles on top of the sprayed area, then carefully place the wax paper against the cake (sprinkle side facing the cake) and gently rub your hand on the wax paper to get the sprinkles to stick to the cake. Fill in the gaps as needed.
- To pipe a frosting border, place buttercream in a piping bag fit with a wilton 32 tip. Pipe the border using a continuous looping or corkscrew pattern.
- To make the chocolate decorations for the top of the cake, melt 2 tbsp of colored candy melts with 1/2 tbsp vegetable shortening in a small microwave safe bowl for 30 seconds on 50% power. Stir and check the melts, and microwave longer as needed until they are melted. I would stick with 40-50% power so the candy melts don’t burn.
- Allow the candy melts to cool slightly before transferring them to a squeeze bottle.
- On a baking sheet covered with a piece of wax paper, begin to draw designs. You can use multiple colors and overlap them. Once you are done making them, place the designs in the fridge for about 2 minutes to harden up. Remove them from the fridge and begin to gently peel the wax paper off of the design. Place them on top of the cake.


Oh my gosh, your sprinkle transfer method is genius. My life is forever changed.
Hahaa! A huge time saver!
This cake is so pretty and I love your method for adding sprinkles!
Thanks Tonia! It comes in handy!
What a fun cake! My nieces would love to help make this cake!
Oh gosh, it sounds like it would be fun!!
I can’t get over how incredible this cake looks! I love the colors and addition of the chocolate chips. Sprinkles always make everything better!
They SURE do! :)
Beautiful cake & thank you for the sprinkle tip! I always just throw them aimlessly – this is so much prettier ;)
Sometimes aimless throwing turns out awesome I’m sure!
This cake is absolutely gorgeous! And that sprinkle method is pure genius!
I am totally smitten with this cake! It’s looks gorgeous and I love the pink and the sprinkles! That sprinkle transfer method is genius – yay, no more sprinkles falling everywhere! :)
Haha well they might still fall, but at least more of them get on the cake!
If I make the cake into cupcakes how long would I bake them for?