
This post may contain affiliate links. Please read our disclosure policy.
Chocolate Chocolate Cake – Whewwww! Guys, I’m really glad pumpkin has moved on and other flavors are taking the stage.

Made this today! So delicious!!
-Malena
I love pumpkin and all of it’s goodness, but I’m ready for peppermint, eggnog, gingerbread, and CHOCOLATE!

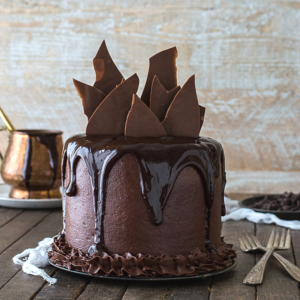
Chocolate Chocolate Cake
Okay.. so chocolate isn’t exactly a new flavor, and it’s definitely not a christmas specific flavor.. but I love chocolate and it will probably be a main ingredients in lots of my holiday baking this year, so what better way to kick off the holiday baking season than with a chocolate chocolate chocolate chocolate cake!!
That’s 4 times the chocolate.
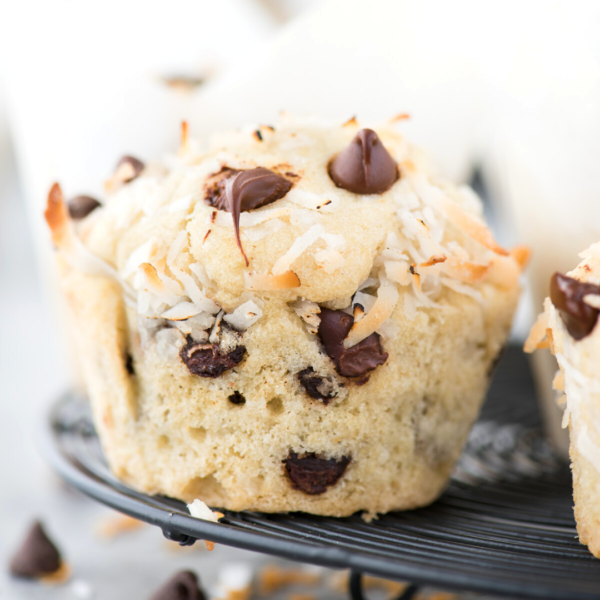
Chocolate cake.
Chocolate buttercream.
Chocolate ganache.
Chocolate shards.
This chocolate chocolate cake is the perfect cake to pair with a glass of milk. Pairing it with a glass of chocolate milk might be too much. I draw the line there.

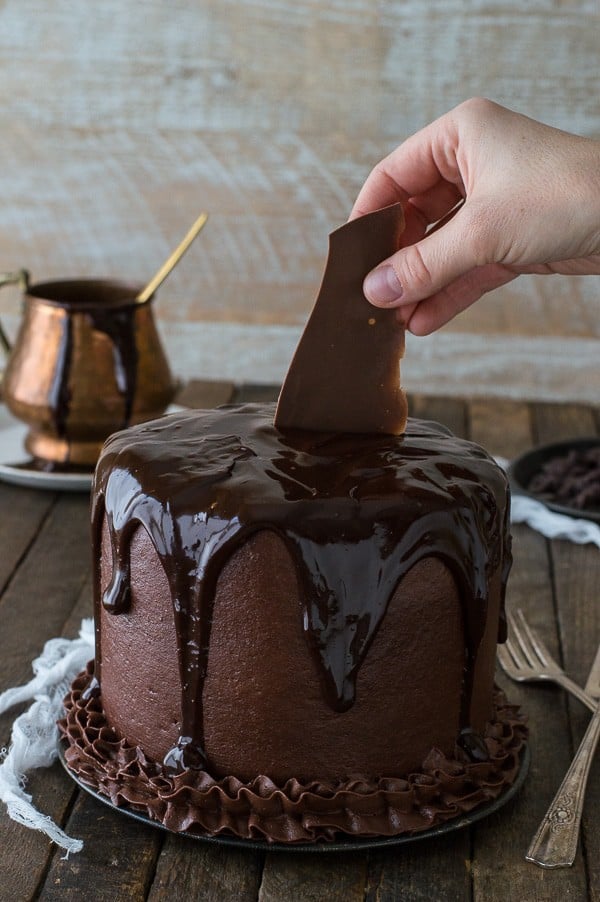
I initially wanted to top this chocolate chocolate cake with fancy homemade chocolate curls. Buttttt I can’t make beautiful chocolate curls. I’ve tried. I think I’m having issues getting the temperature of the chocolate to be right. I’ll have to keep practicing, but in the mean time, I found my new favorite decoration – chocolate shards! They are impossible to mess up (woohoo!!) and they add some nice height to any dessert.

How to Make Chocolate Shards
Here’s a simple walk through of how to make chocolate shards:
1. melt chocolate or chocolate melts. You could also use chocolate candiquik or the various colored wilton candy melts
2. Set a cutting board on the table and place a large piece of wax paper over the cutting board.
3. Gently spread the melted chocolate onto the wax paper, making a nice even layer.
4. Place another large piece of wax paper on top of the melted chocolate, gently smoothing out any air bubbles.
5. Place the whole thing (cutting board too) in the freezer for 10-15 minutes.
6. Remove from the freezer and let the chocolate sit for 2-3 minutes.
7. Begin to break the chocolate into shards, creating any size and shape you want.
8. Store the shards in the freeze until ready to use.

Tap stars to rate!
Chocolate Chocolate Cake
Ingredients
Chocolate Cake (this recipe makes three 6 inch cakes)
- ½ cup (42g) cocoa powder
- 1 ½ cups (180g) all purpose flour
- 1 ½ tsp baking powder
- 1 tsp baking soda
- ½ tsp salt
- ¾ cup (170g) butter, 1 1/2 sticks, room temperature
- 1 cup + 2 Tbsp sugar (223g total)
- 3 large eggs
- 1 ½ tsp vanilla
- ⅔ cup + 1/4 cup sour cream (209g total)
- 3 Tbsp melted chocolate, cooled
Chocolate Buttercream
- 1 ½ cups (339g) butter, 3 sticks, room temperature
- 1 ½ cups (354ml) vegetable shortening
- 1 ½ cups (126g) cocoa powder
- 3-4 cups (339-454g) powdered sugar
Chocolate Shards
- ¾ cup (129g) chocolate chips or candy melts
- ½ Tbsp vegetable oil
Chocolate Ganache
- ½ cup (118ml) heavy cream
- ¾ cup (129g) chocolate chips
Instructions
Chocolate Cake
- Preheat the oven to 350º F.
- Using butter grease the bottom and sides of three 6 inch round cake pans or springform pans and line the bottoms with a round piece of parchment paper. To ensure even baking, place a bake even strip around each pan. You can make your own homemade bake even strip by cutting a towel or shirt to fit the size of your pan. Get the fabric really wet, then squeeze out the dripping water but do not squeeze it too dry. Secure the fabric around the pan with a safety pin.
- In a small mixing bowl, combine the cocoa powder, flour, baking powder, baking soda and salt. Gently mix using a spoon.1/2 cup (42g) cocoa powder, 1 1/2 cups (180g) all purpose flour, 1 1/2 tsp baking powder, 1 tsp baking soda, 1/2 tsp salt
- In a larger mixing bowl, combine the butter and sugar, beat using an electric mixer until fluffy. Add in the eggs and vanilla, lightly beat.3/4 cup (170g) butter, 1 cup + 2 Tbsp sugar (223g total), 3 large eggs, 1 1/2 tsp vanilla
- Add in the sour cream and melted chocolate, mix by hand using a spatula.2/3 cup + 1/4 cup sour cream (209g total), 3 Tbsp melted chocolate
- Add half of the flour mixture to the wet ingredients, do not dump it in, rather take spoonfuls of the flour mixture and gently shake it over the wet ingredients. Fold in the mixture until no flour remains. Repeat with the other half of the flour, folding it in and scraping the sides and bottom of the bowl to incorporate everything.
- Evenly divide the batter between the 3 pans, with about 1 & 1/3 cups to 1 & 1/2 cups in each pan.
- Bake for 22 minutes. Then loosely cover the pans with foil. Continue to bake for 7-10 minutes or until a toothpick inserted in the until a toothpick inserted in the center comes out clean.
- Once the cake is done baking, allow it to cool in the pan on a cooling rack for 10 minutes. After 10 minutes, carefully remove the cake from the pan. If using a springform pan, remove the sides and bottom. Allow the cake to cool completely on a cooling rack. Once cool, remove the parchment paper round from the bottom of the cake. If you need to level the top of your cake, do so now using either a cake lever or knife.
- If you’ll be assembling the cake later, wrap the cake layers really good in plastic wrap and place them in the refrigerator. They will be good for up to 5 days.
Chocolate Buttercream
- In a mixing bowl, combine the butter and vegetable shortening, beat using an electric mixer until fluffy. Add in the cocoa powder, and gently mix by hand with a spatula.1 1/2 cups (339g) butter, 1 1/2 cups (354ml) vegetable shortening, 1 1/2 cups (126g) cocoa powder
- Begin to add the powdered sugar, about 1-2 cups at a time, mixing by hand first, then with the electric mixer. Continue adding powdered sugar until the frosting tastes good to you and is well mixed.3-4 cups (339-454g) powdered sugar
Chocolate Shards
- Melt the chocolate or candy melts with the vegetable oil in a small saucepan over low heat. Stir with a spatula melt smooth and melted.3/4 cup (129g) chocolate chips or candy melts, 1/2 Tbsp vegetable oil
- Place a plastic cutting board or metal baking sheet on the counter. Place a large piece of wax paper on top of the flat surface.
- Pour the melted chocolate on top of the wax paper. Use a spatula to smooth the chocolate into an even layer all around the wax paper.
- Place another piece of wax paper on top of the melted chocolate and gently smooth out any air bubbles.
- Place the cutting board or baking sheet with the wax paper on it in the freezer for 15 minutes.
- After 15 minutes, remove it from the freezer and allow it to warm up for 2-3 minutes.
- Remove the top layer of wax paper, break the chocolate into shards (any size or shape you want) and store them in the freezer on a plate, in a container or in a bag until you’re ready to use them.
Chocolate Ganache
- Place chocolate chips in a medium heat-proof bowl.3/4 cup (129g) chocolate chips
- In a small pot over low heat, heat the heavy cream until boiling.1/2 cup (118ml) heavy cream
- Pour the heavy cream over the chocolate chips. Allow the mixture to stand for 1-2 minutes.
- Use a spatula to stir the mixture until smooth.
- Allow the ganache to come to room temperature before adding it to the cake.
How to assemble the cake
- Spread a small amount of buttercream on a 6 inch round cardboard cake circle. Place your first layer of cake on top of the cardboard. Put buttercream on top of the first layer and spread it as even as possible with an offset spatula. Decide how much or how little frosting you want in-between each layer, you can measure the frosting, I use 1/3 to 1/2 cup in between each layer.
- Repeat this process for each layer of cake. Once all of the layers are stacked and frosted, spread some frosting (the same amount as you did between the layers) on the top of the cake.
- Next, it’s time to do a crumb coat. The crumb coat will help seal the crumbs in. Using your offset spatula, spread a thin layer of buttercream around the sides and the top of the cake. It’s easiest to start off with more frosting on the cake and remove some as needed.
- Place the entire cake in the freezer or fridge for 20 minutes to harden the crumb coat.
- Begin to add the second layer of frosting. Spread an even layer of frosting on the top of the cake. Next either pipe on the frosting or spread on the frosting around the sides of the cake. Use a spatula or icing smoother to smooth out the frosting, scraping off excess as you go. Once the frosting is uniform around the cake, use the smooth side of Viva brand paper towels and a fondant smoother to smooth out any imperfections. Place the paper towel on the cake and gently rub the fondant smoother around. Repeat this process, moving the paper towel all around the cake.
- Transfer the cake to your desired serving plate.
- Using a piping bag and a piping tip (I used a wilton 1M) to pipe a border of buttercream around the bottom of a cake.
- Once the ganache is room temperature, use a spoon to drizzle the ganache around the sides of the cake, allowing it to drip down the sides. Fill in the middle of the cake with ganache and spread evenly with the back of the spoon. Allow the ganache to set for 10 minutes.
- Top the cake with various chocolate shards.
- Slice and serve!


Wonderful! Made it for my hubby’s birthday. Cake was very dense- or did I over mix something?
Hi Megan! The cake is not overly light and airy, but is a rich chocolate cake! Yes, definitely watch your mixing and baking time. When the cake is done, moist crumbs should still be stuck to the toothpick.
Are the sticks of butter 100 g or 200g?? I don’t know whether it means small or big ones.
Hi Kary! They are standard US size sticks.
Hi Beth, this cake looks incredible!! I want to make it for my boyfriends birthday on Thursday but there will be about 24 people at the party! If I use 9″ pans, do you suggest I double or triple the recipe? How should I adjust the baking time? Thanks so much!!
do you have the recipe in gr. instead of cups? pleaseee
What fondant? Recipe says nothing about using fondant??
Hi Chris, a fondant smoother is a type of tool that can be used to help create smooth looking buttercream.
I made this cake the other day for my grandmother in laws 80th birthday and I have to say it was a very chocolatie sucess. It turned out beautiful and was delicious. The chocolate buttercream was one of the best I have tried. Overall I would say this recipe was extremely easy to follow and no adjustments had to be made, it was great. Thank you
So glad you found it easy to follow!
I would like to make 3 eight-inch cakes also how would I alter the recipe
Absolutely stunning!
I’m making a dark chocolate cake for my husband’s birthday and was wondering how sweet the buttercream was? Were not too fond of too sweet frosting, so I was just curious. I’ll be substituting the regular chocolate for dark if that makes sense. Thanks!
I followed the recipe exactly, took cake from the oven when moist crumbs came out on the toothpick, yet this turned out to be the driest cake I’ve ever made?
Hi KB! Hmmmm.. it sounds like you took the cake out at the right time. Did you bake your layers in 6 inch pans?