
This post may contain affiliate links. Please read our disclosure policy.
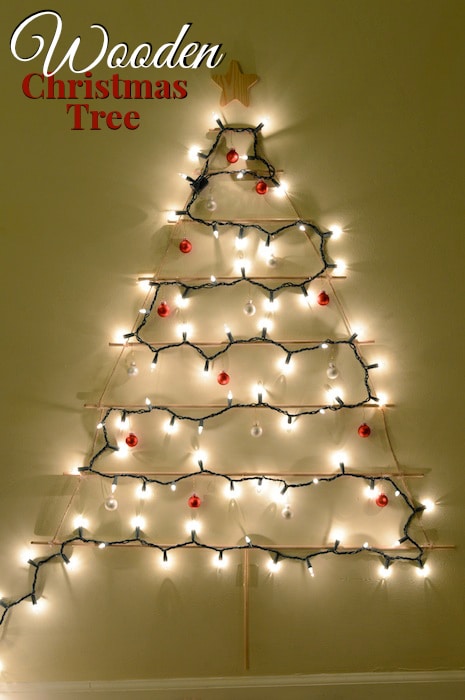
There is always space for a Christmas tree.
We don’t have much floor space in our tiny house, but we have wall space!
It puts a unique twist on the classic christmas tree, and I really like it. Now I want to make one as tall as the wall. Continue reading for our 3.5-4 foot Wooden Christmas Tree Tutorial.
Supplies
Wooden Dowels (found ours at Hobby Lobby, about 1/4 inch in width)
Twine
Hot glue gun
Christmas lights (I used one 100 count pack)
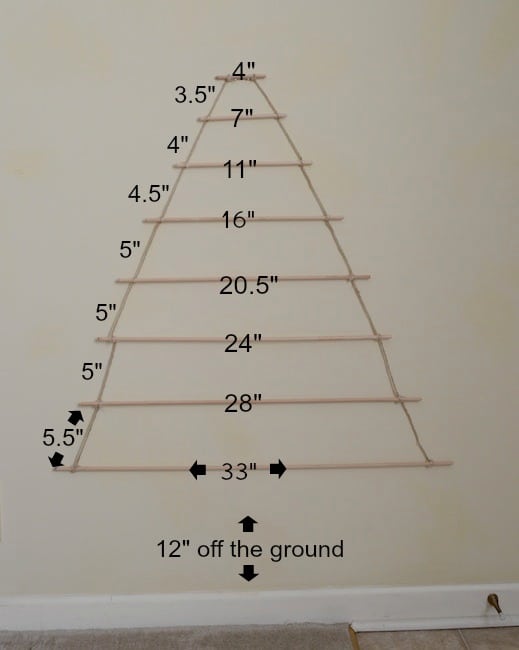
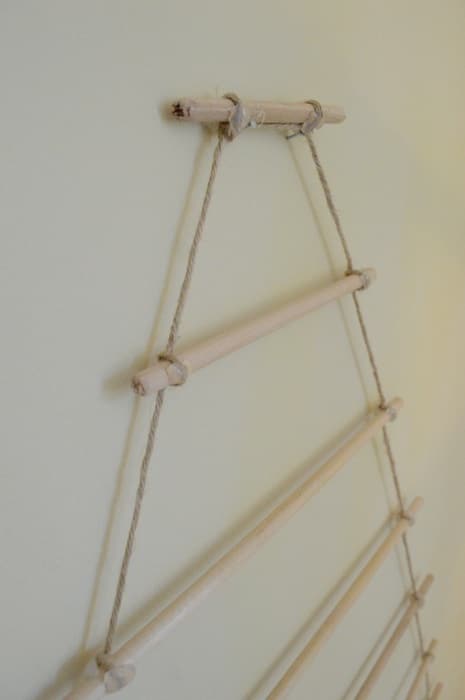
Cut your dowels according to the correct sizes. The text on the left side of the tree indicates how far apart each dowel is spaced.
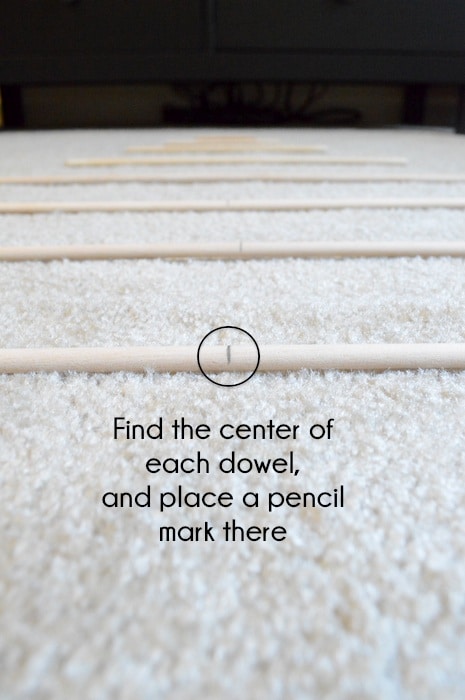
Find the center of each dowel and place a pencil mark there. This will help you center all of the dowels, making the christmas tree shape.
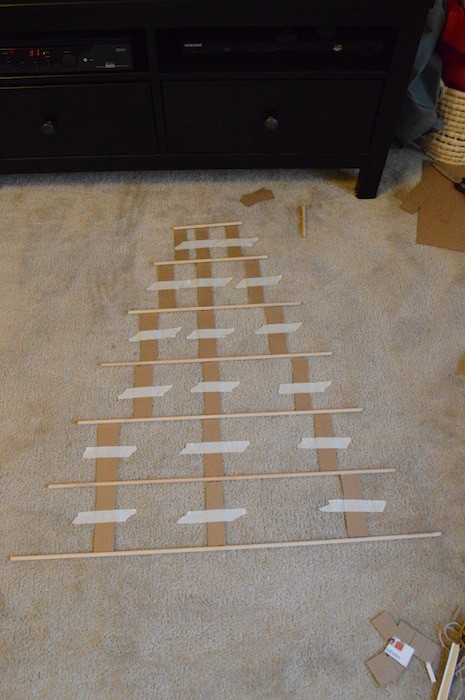
Find a way to keep all of the dowels centered and spaced apart their appropriate distances, while securing the twine with hot glue. I decided to cut out cardboard “spacers” and tape them to the floor, so if my dowels moved, I could easily line them up with my spacers without having to readjust each dowel.
You will want to put something down on your carpet or table so you aren’t getting hot glue all over that while securing the twine.
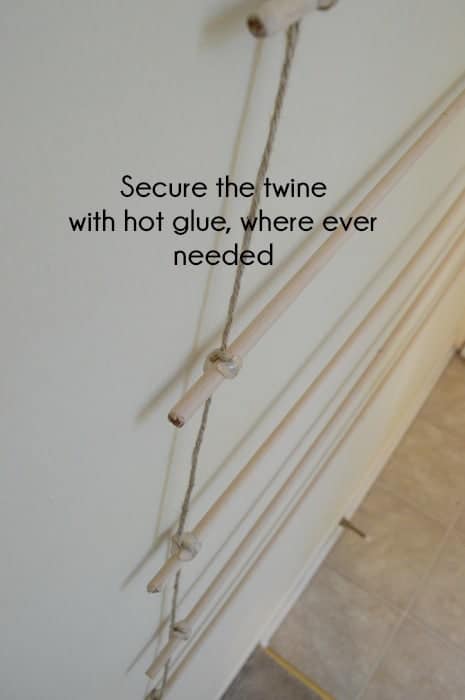
I wrapped the twine around each end of the dowel to ensure that the twine would stay on.
Let the wooden tree dry, and once it’s ready, hang it on the wall with 2 nails.
Add the lights and whatever else you would like. I did use clear tape to secure the lights to the dowels.
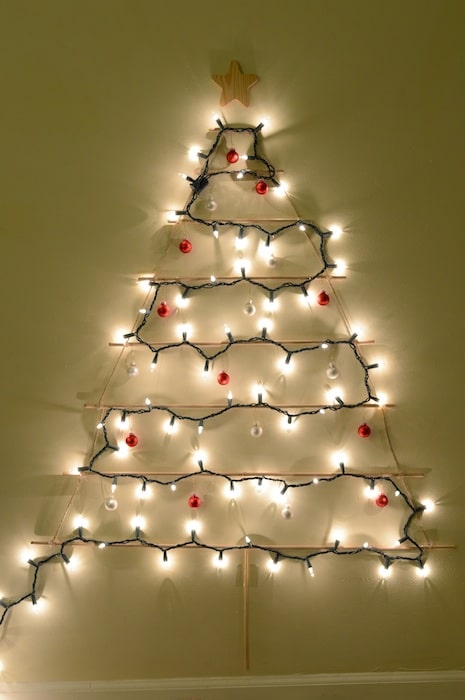
May your holiday season be merry and bright!


That’s really cute Beth. The star tops it off perfectly!
Hi Mom! Thank you!
Such a fun idea, Beth!
I appreciate you coming by Amy! :-)
Love it. Simplicity and beauty. Have pinned to Christmas Crafts and Food Board.
Thank you friend!!
That is too cute, such a great idea with limited space! or even an additional tree….
Oh definitely an additional tree!
That is the cutest idea! What a great idea when you have a small space. Love it. Came over from the DBB. Pinning!
I appreciate you coming by Emily!
This is so cool! I love how it looks! Pinned
Thank you Kaysi!
Love this and will be great for the kids room!! Thanks for sharing. xoxo San
I didn’t even think of using it in a kids room, but thats a great idea!
I love that you used little wood dowels and twine to make the tree! I did something similar with just lights on our front window, but was just using clear packing tape to keep the lights in place… short story the tape keeps slipping on the glass!!! I’m going to have to try this instead, thanks! (325elizabethavenue.blogspot.com)
That would look really cute too in a window using tape, but yeah if it gets too cold the tape comes off!
Super cute and mod too! Pinned:)
I appreciate you pinning this Michele!
This is such a wonderful alternative to a “real” tree. We have a quite small living room with 3 doorways off of it and two big windows so not much wall space. We also have a 1/2 wall between kitchen/ l/r so that decreases the space even more.
We’ve had a small tree on a table and a bigger tree on other years but that involves moving all furniture in living room. We just did that so don’t think we’re up for it again. Just adjusting to how it is, making do.
We have a shutter shelf on one wall centered so I do lot of my decorating on it. Makes it easier than trying to move furniture all the time. I’m using big jars to make little snow scenes in this year in place of a tree I think. It’s just hubs and I so not having to deal with tree is much more convenient for us. I’d love to have a real tree on a table but even those are so ridiculously expensive for 2 old seniors. Love smell in house of real tree.
I’m going to look around, see if we can squeeze one of your style trees on a wall, if not we’ll have to do without this year. There’s always next year. The wall we might have put on is covered by the tv stand now. I’m going to pin this however in case I get a wild hair. Maybe make one for front of porch. Your post is great and a wonderful solver for folks that don’t have room. Happy days and happy creating
Others suggested just using the lights and making a tree shape in a window, that would be fun too!