
This post may contain affiliate links. Please read our disclosure policy.

There is always space for a Christmas tree.
We don’t have much floor space in our tiny house, but we have wall space!
It puts a unique twist on the classic christmas tree, and I really like it. Now I want to make one as tall as the wall. Continue reading for our 3.5-4 foot Wooden Christmas Tree Tutorial.
Supplies
Wooden Dowels (found ours at Hobby Lobby, about 1/4 inch in width)
Twine
Hot glue gun
Christmas lights (I used one 100 count pack)
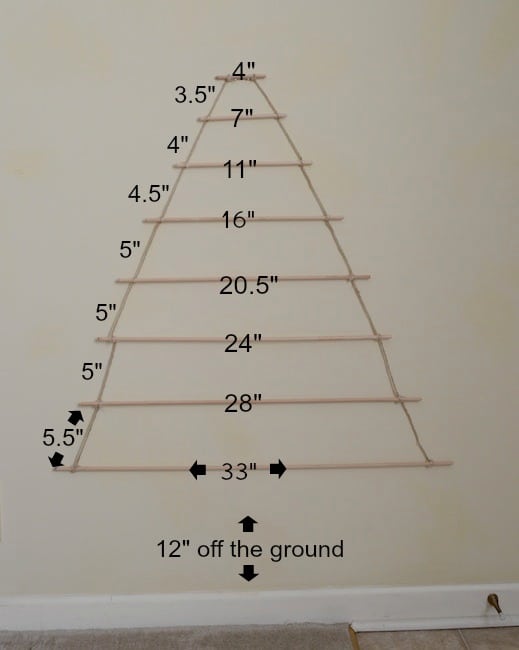
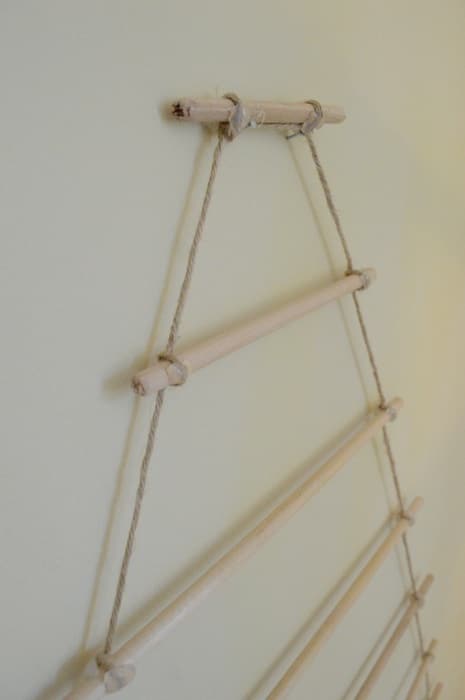
Cut your dowels according to the correct sizes. The text on the left side of the tree indicates how far apart each dowel is spaced.
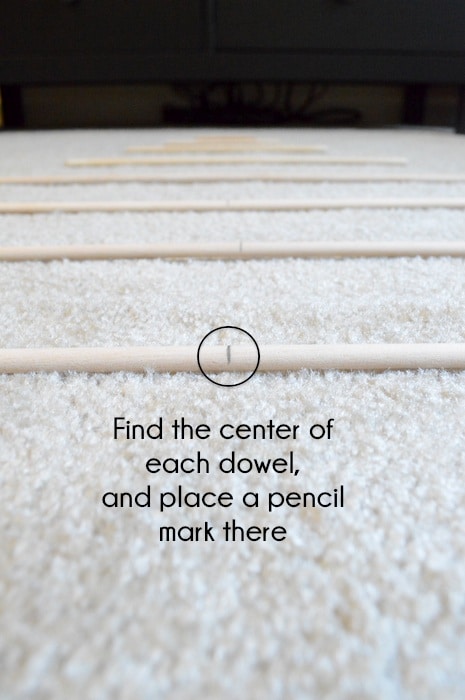
Find the center of each dowel and place a pencil mark there. This will help you center all of the dowels, making the christmas tree shape.
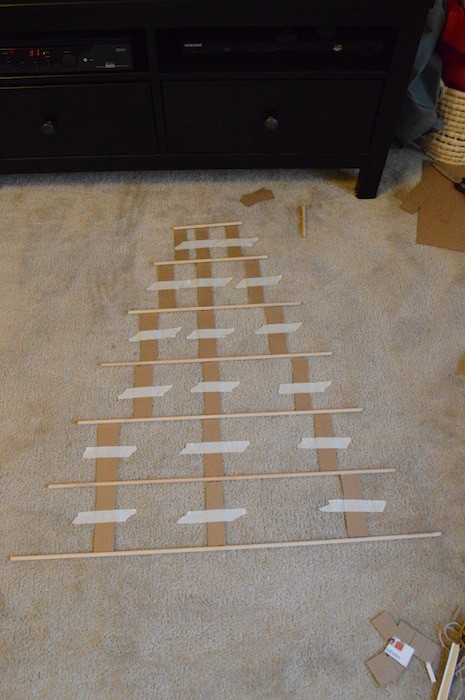
Find a way to keep all of the dowels centered and spaced apart their appropriate distances, while securing the twine with hot glue. I decided to cut out cardboard “spacers” and tape them to the floor, so if my dowels moved, I could easily line them up with my spacers without having to readjust each dowel.
You will want to put something down on your carpet or table so you aren’t getting hot glue all over that while securing the twine.
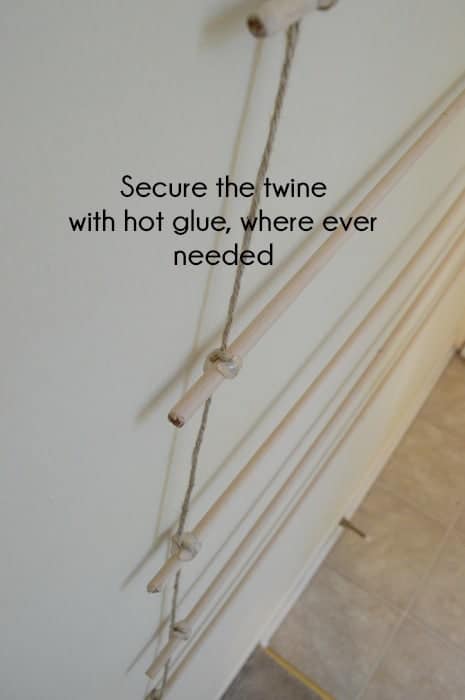
I wrapped the twine around each end of the dowel to ensure that the twine would stay on.
Let the wooden tree dry, and once it’s ready, hang it on the wall with 2 nails.
Add the lights and whatever else you would like. I did use clear tape to secure the lights to the dowels.

May your holiday season be merry and bright!


Beth, I absolutely love this! Thank you so much for joining us and sharing at Best of the Weekend! Pinning and sharing! Thank you so much for being at the party and wishing you and your family the happiest of holidays. Enjoy a wonderful weekend!
Thank you Cindy, happy holidays to you too!
Very cute!!
I would like to make this but can’t figure out how much room is between layers of dowels.
Oh MY. Now I see what I missed.Comes from getting up to early Sorry…. Great Idea.
Haha, sometimes I have sleepy eyes too!
This is such a fun idea, especially for someone dealing with a small space. I featured it tonight at the Project Inspire{d} link party!
Thank you friend!
Fun idea. We’d love you to share this great project on our Awesome Things Tuesday party.
https://jessicabooth.blogspot.com/2013/12/awesome-things-tuesday_31.html
–Jessica @ Preserving Life’s Moments
I love this tree and the idea of making it bigger. My question though is how would you make it bigger?
Hi Mandy!
You’d have to use larger and longer dowels I would assume, finding those may be difficult, I am unsure!
I have been able to find 48″ dowels and some longer but the longer ones are over an inch thick. I am loving this tree and with a 1 yr old at home I am thinking this would be a great alternative without worrying about him pulling a tree over. How did you determine what length to make the dowels and how far to space them? I am sorry to be asking so many questions I am just curious so I can try and make one. TIA
Hi Mandy! I played around with the dowels on the floor until the tree looked right. There wasn’t a lot of specific calculation that went into it, however I did want the dowels evenly spaced apart and to gradually decrease in length, but for the most part I eyeballed it. Good luck!
Cool tree! Thanks for the idea!!!
You are welcome, can’t wait to hang mine up soon!
I love this idea. I am going to use driftwood though from my woods out back instead of the dowels. It will be almost the same thing, just a slight variation. Thank you for sharing this wonderful idea.