
This post may contain affiliate links. Please read our disclosure policy.
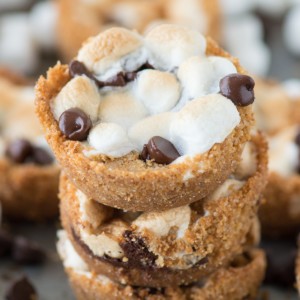
5 ingredient indoor S’mores Cups! Make these in a regular muffin pan. Like a cross between s’mores cookies and s’mores cupcakes!

I have made these several times and everyone always loves them! Thanks for sharing your recipe!
-Jennifer
Before the evolution of Pinterest it seemed like there was only one thing to do with graham crackers, marshmallows and chocolate – make s’mores!
But now there is like 1,001 things to do with those 3 ingredients and a lot of the recipes now don’t actually call for a fire pit. We’re learning to cook up s’mores in different ways!

Indoor S’More Recipe
For this recipe we’re sticking to the three key ingredients and adding a little butter and sugar for the sake of baking chemistry! Without the butter and sugar the graham cracker crumbs wouldn’t stick together and would essentially be crumbs :)
If you’re looking for an indoor s’more recipe that is easy and fast to make AND can feed a crowd – scroll down and get that recipe girl!
I had a little trouble naming this recipe – they are basically s’mores made in a muffin pan.
S’more muffin pan cups, s’more muffin tops …. s’more bites would be the most logical name, however we already have a recipe on the site called that!

So drumroll……….. s’mores cups!
These s’mores cups are made in a regular sized muffin pan and it’s all about layering.

How to Make S’mores Cups
Step 1 – add graham cracker crumbs in each well, pressing them down firmly into the pan. I like to use a 1/2 cup or something similar to help me compact the crumbs. Bake that first layer for 5 minutes.
Step 2 – add mini marshmallows and chocolate chips. Measuring is not crucial! Add as many or as few as you’d like. Then add another layer of graham cracker crumbs on top of the marshmallows and chocolate chips. Use a cup to press the crumbs down firmly. Bake for 4 minutes.

Step 3 – add more marshmallows and chocolate chips and turn the oven to broil to toast the marshmallows until golden.
step 4 – allow the s’mores cups to cool for 15 minutes before removing them from the pan. I found it easiest to use a small metal offset spatula around the outside of each s’mores cup to loosen any melted on marshmallow. I then used a spoon to remove the cups from the pan.

Warning! These S’mores Cups Are Messy!
Once you have the s’mores cups removed from the muffin pan you could heat them up in the oven on a baking sheet before serving or serve them at room temperature. Warning! They are messy and crumbly but delicious!

Tap stars to rate!
S’mores Cups
Ingredients
- 2 cups (226g) graham cracker crumbs
- ½ cup (113g) butter, melted, 1 stick
- ½ cup (99g) sugar
- chocolate chips
- mini marshmallows
Instructions
- Preheat the oven to 350º F. Lightly spray a regular sized muffin pan with non-stick cooking spray. In a medium sized mixing bowl, combine the graham cracker crumbs, melted butter and sugar. Stir until well mixed and crumbs resemble wet sand. Place 1 & 1/2 to 2 tablespoons of graham cracker crumbs in each muffin well. Press them down firmly into the pan. I like to use a 1/2 cup or something similar to help me compact the crumbs. Bake that first layer for 5 minutes.2 cups (226g) graham cracker crumbs, 1/2 cup (113g) butter, 1/2 cup (99g) sugar
- Remove the pan from the oven and add add mini marshmallows and chocolate chips to each muffin well. Measuring is not crucial! Add as many or as few as you’d like. Then add another layer of graham cracker crumbs (1 & 1/2 to 2 tablespoons again) on top of the marshmallows and chocolate chips. Use a cup to press the crumbs down firmly. Bake for 4 minutes.chocolate chips, mini marshmallows
- Remove the pan from the oven and add more mini marshmallows and chocolate chips. Place them pan back in the oven, turn the oven to broil to toast the marshmallows until golden, 2-3 minutes. Leave the oven door open partially so you can see how toasty the marshmallows are getting.
- Remove the pan from the oven and allow the s’mores cups to cool for 15 minutes before removing them from the pan. I found it easiest to use a small metal offset spatula around the outside of each s’mores cup to loosen any melted on marshmallow. I then used a spoon to remove the cups from the pan. Once you have the s’mores cups removed from the muffin pan you could heat them up in the oven on a baking sheet before serving or serve them at room temperature. Warning! They are messy and crumbly but delicious!


Just wanted to let you know that I have made these several times and everyone always loves them! I do tweak the recipe by doing 1/4 c light brown sugar and 1/4 c sugar. I also add a couple of pinches of salt to the mix. Thanks for sharing your recipe! Oh, and I love how easy it is to print your recipe to share with others!
Can you also use the mini cupcake pan? To make them a smaller serving?
Just wanted to say,
I have made these several times. they are always a hit and are ALWAYS firm and never crumbly. The trick is to remember to pack it then the 5 minute pre bake . Thanks for the recipe.
These are AMAZING! I used a little extra butter in the graham crust and smooshed each graham layer down really well with a 1/4 cup measuring cup, and they held together really well. It also gives you more room to put lots of marshmallow and chocolate! Once they cooled completely, I stacked them in a square plastic container and sealed it tight. They don’t stick together or fall apart like some baked goods with crumbly or gooey ingredients. I plan on making a double batch to take to work!
These were delicious!! They took way longer than 15 minutes for them to set in the muffin tin, though. After 2 hours or so, I was able to take them out without having them fall apart.
These are delicious! Only note is that they need way longer than 15 minutes to set before taking them out. Once I let them sit for 2-3 hours, they’re usually good to go to bring to a party in tupperware.
Has anyone tried freezing these? If so, how long do they stay good? I want to make a bunch for a friend’s wedding and was hoping to make them a little in advance.
Hi Melanie! I haven’t tried it myself – I’m a little worried that the graham cracker crust won’t hold up great if multiple cups are stacked or squished.
I have a graham cracker pie crust, how can I make a S’Mores Pie out of this? Basically it’s the same concept as making them in cupcake tins, right?
Would you have a recipe for that?
Thanks,
Judi
Hi Judi! I have a recipe for no bake s’mores cheesecakes cups that you could easily make into a large pie! https://thefirstyearblog.com/no-bake-smores-cheesecake-cups/
I made these yesterday for a small dinner party. I read all the previous comments and was sure to follow the directions. I added a bit more butter (4 tbsp) and really jammed the grahams down with the measuring cup. I made them way ahead of time so they sat for a few hours. They were absolutely amazing!! No crumbling and easy to remove when you slip a knife around the sides. I served them with a scoop of vanilla ice cream and they were a HUGE hit.
These have become my go-to dessert recipe for ‘fun’ occasions & they’re always a hit! I even got asked to make them for a wedding reception! In fact I’m getting ready to make them right now for our Friends Xmas in July/BBQ Campout tomorrow!