This post may contain affiliate links. Please read our disclosure policy.
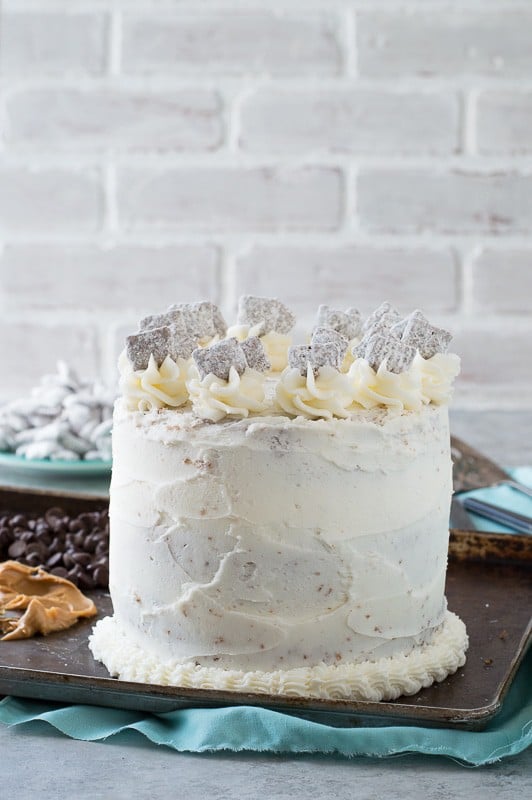
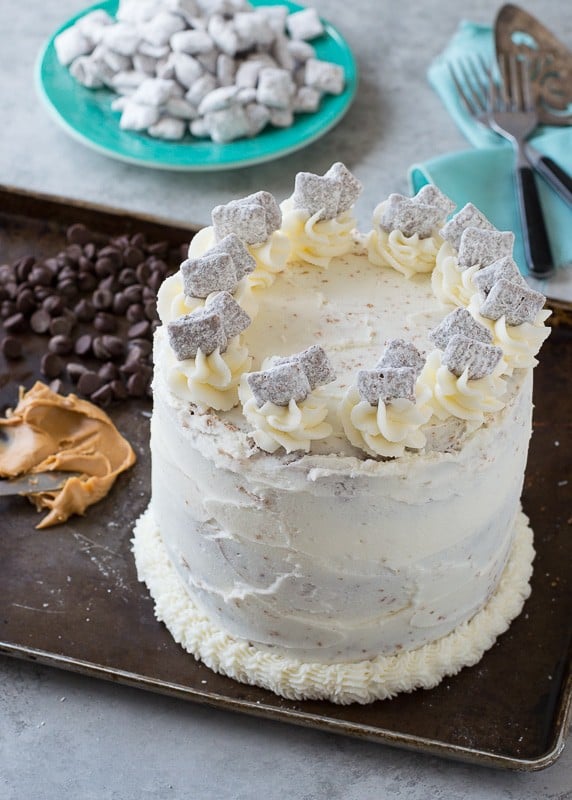
This might be the best cake in the whole entire history of cakes! I mean.. it’s a puppy chow cake!!! And it’s not just a cake that tastes like puppy chow. This cake is loaded with actual puppy chow pieces!
Occasionally people will ask how I come up with recipe ideas and there are 2 main things I use – a giant notebook to write down ideas and my husband. I am almost 100% an external processor so I like brainstorming ideas with Ryan. And a lot of the time, I already have ideas in my head but I want to see what Ryan’s reaction will be, and that kind of helps me determine if other people would like that recipe too.
I have a weird creative brain that likes coming up with the most ridiculous ideas and Ryan’s not a big fan of the ridiculous, so some of my ideas don’t ever make it to fruition, like my idea for a pop tart cake. I’m not sure if Ryan is right about this one, I think people might like a pop tart cake! But we were 100% in agreement when I started talking about making a puppy chow cake. Actually it went something like this..
Beth: I think I am going to make puppy chow
Ryan: You mean muddy buddies..
*the battle ensues over what to call this type of snack*
Beth: OH! I should make a puppy chow cake
Ryan: That’s a great idea. But it would be a muddy buddy cake.
This cake has 5 components. The chocolate cake, the peanut butter cake, the puppy chow, the buttercream, and than assembling the whole thing. That seems like a lot of steps, but it’s not daunting.
Focus on baking the cakes first, and allow them to cool completely. You can even bake them a few days ahead of time and have them wrapped in plastic waiting in the fridge. While the cakes are baking, or anytime really, make the puppy chow, which is very easy.
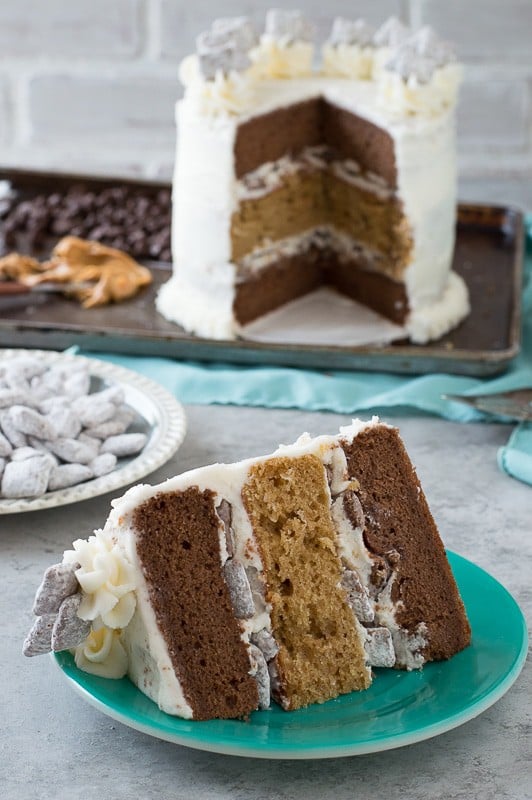
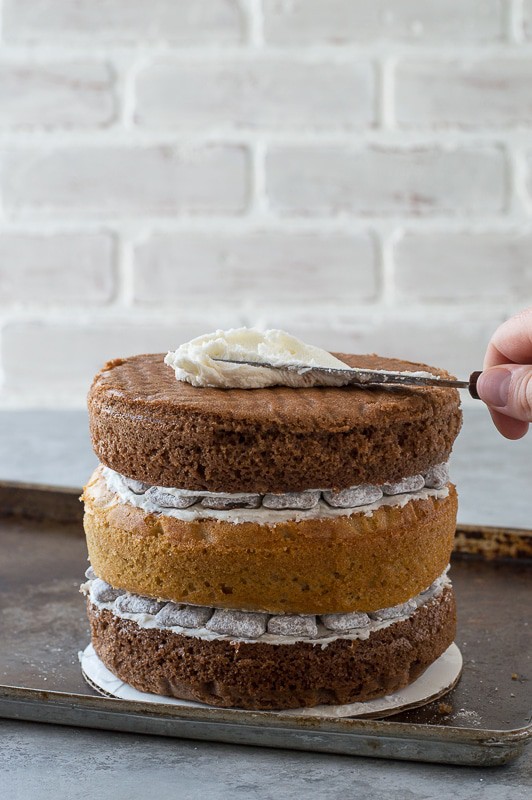
3 things down, 2 to go. Prepare the buttercream right before you plan to assemble the cake. And assembling the cake is simple! The pattern will be cake, buttercream, puppy chow, cake, buttercream, puppy chow, cake.
Look at all that goodness when you slice into it, mmm!!!
Tap stars to rate!
Puppy Chow Cake
Ingredients
Peanut Butter Cake
- ½ cup + 1 tbsp flour
- ¼ tsp baking soda
- ½ tsp baking powder
- ¼ tsp salt
- 2 ½ tbsp peanut butter
- 2 tbsp vegetable oil
- ¼ cup brown sugar
- ¼ cup buttermilk
- 1 large egg
- ¼ tsp vanilla
Chocolate Cake
- ½ cup cocoa powder
- 1 cup flour
- 1 tsp baking powder
- ½ tsp baking soda
- ¼ tsp salt
- 1 stick butter, room temperature (1/2 cup)
- ¾ cup sugar
- 2 large eggs
- 1 tsp vanilla
- ⅓ cup sour cream
- 2 tbsp melted chocolate, cooled
Puppy Chow
- 12.8 oz rice chex
- 1 ½ cups semi sweet chocolate chips
- ¾ cup peanut butter
- ½ cup butter
- 4-5 cups powdered sugar
Buttercream
- 2 sticks butter, softened (1 cup)
- 1 cup vegetable shortening
- 1 tsp vanilla
- 7-10 cups powdered sugar

Instructions
Peanut Butter Cake
- Preheat the oven to 350ºF.
- Using butter grease the bottom and sides of one 6 inch round cake pan or springform pan and line the bottom with a round piece of parchment paper. To ensure even baking, place a bake even strip around each pan. You can make your own homemade bake even strip by cutting a towel or shirt to fit the size of your pan. Get the fabric really wet, then squeeze out the dripping water but do not squeeze it too dry. Secure the fabric around the pan with a safety pin.
- In a bowl combine the flour, baking soda, baking powder, and salt.
- In a separate bowl, combine the peanut butter, oil, and brown sugar, beat together using an electric mixer. Add in the egg and vanilla, beat again.
- Add the flour mixture and buttermilk, alternating between the two and mixing by hand until everything is incorporated.
- Pour the batter in the pan.
- Bake for 22-26 minutes or until a toothpick inserted in the center comes out clean.
- Once the cake is done baking, allow it to cool in the pan on a cooling rack for 10 minutes. After 10 minutes, carefully remove the cake from the pan. If using a springform pan, remove the sides and bottom. Allow the cake to cool completely on a cooling rack. Once cool, remove the parchment paper round from the bottom of the cake. If you need to level the top of your cake, do so now using either a cake lever or knife.
- If you’ll be assembling the cake later, wrap the cake layers really good in plastic wrap and place them in the refrigerator, which is good for up to one week.
Chocolate Cake
- Preheat the oven to 350º F.
- Using butter grease the bottom and sides of two 6 inch round cake pans or springform pans and line the bottoms with a round piece of parchment paper. To ensure even baking, place a bake even strip around each pan. You can make your own homemade bake even strip by cutting a towel or shirt to fit the size of your pan. Get the fabric really wet, then squeeze out the dripping water but do not squeeze it too dry. Secure the fabric around the pan with a safety pin.
- In a small mixing bowl, combine the cocoa powder, flour, baking powder, baking soda and salt. Gently mix using a spoon.
- In a larger mixing bowl, combine the butter and sugar, beat using an electric mixer until fluffy. Add in the eggs and vanilla, lightly beat.
- Add in the sour cream and melted chocolate, mix by hand using a spatula.
- Add half of the flour mixture to the wet ingredients, do not dump it in, rather take spoonfuls of the flour mixture and gently shake it over the wet ingredients. Fold in the mixture until no flour remains. Repeat with the other half of the flour, folding it in and scraping the sides and bottom of the bowl to incorporate everything.
- Evenly divide the batter between the 2 pans, with about 1 & 1/3 cups in each pan.
- Bake for 25-27 minutes or until a toothpick inserted in the center comes out clean.
- Once the cake is done baking, allow it to cool in the pan on a cooling rack for 10 minutes. After 10 minutes, carefully remove the cake from the pan. If using a springform pan, remove the sides and bottom. Allow the cake to cool completely on a cooling rack. Once cool, remove the parchment paper round from the bottom of the cake. If you need to level the top of your cake, do so now using either a cake lever or knife.
- If you’ll be assembling the cake later, wrap the cake layers really good in plastic wrap and place them in the refrigerator, which is good for up to one week.
Puppy Chow
- Empty the whole box of cereal into a very large bowl.
- In a saucepan over low heat, combine the chocolate chips, peanut butter, and butter. Stir occasionally until the mixture is melted.
- Pour the melted mixture over the cereal, and gently mix to coat all of the cereal.
- Transfer the chocolate coated cereal to a clean garbage bag and add in 4 cups of powdered sugar. Twist the garbage bag close and shake it really good until the cereal is coated. Add more powdered sugar if needed.
Buttercream
- In a mixing bowl, combine the butter and vegetable shortening, beat using an electric mixer until fluffy. Add in the vanilla extract. Begin to add the powdered sugar, about 2-3 cups at a time, mixing by hand. Continue adding powdered sugar until the frosting no longer looks wet and tastes good to you. Then beat the frosting with the electric mixer one last time to make sure the powdered sugar is really incorporated.
Assembling the cake
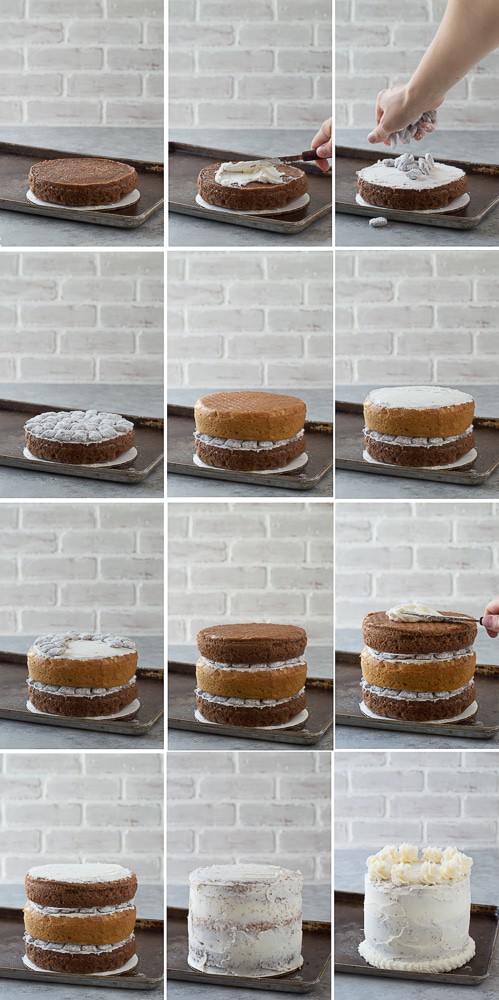
- Spread a small amount of buttercream on a 6 inch round cardboard circle. Place your first layer of chocolate cake on top of the cardboard. Put buttercream on top of the first layer and spread it as even as possible with an offset spatula. Decide how much or how little frosting you want in-between each layer.
- In a single layer, arrange puppy chow on top of the first chocolate layer.
- Place the peanut butter layer on next and spread on buttercream. Then arrange more puppy chow.
- Place the second chocolate layer on top of the others and spread on buttercream.
- Cover the entire cake in a crumb coat of buttercream.
- Place the entire cake in the freezer for fridge for 20 minutes to harden the crumb coat.
- Begin to add the second layer of frosting, starting with the top of the cake and working your way down to the sides. Try to get the buttercream as even as possible around the cake.
- Fill a piping bag fit with a wilton 2D tip with buttercream. Add a border around the bottom of the cake and pipe swirls on top of the cake. Top each buttercream swirl with a few puppy chow pieces.
- Serve and enjoy.



You’re becoming the queen of cakes! Love this, Beth! Pinned!
Aww, thanks for pinning Melanie!
I love everything about this cake!! I got on a really bad puppy chow kick on my flight to London back in February…I’d have to take it easy on this, otherwise, there’d be none to share. :)
Bringing puppy chow on a flight sounds like a great idea!!
This is genius!! Looks so darn good too! I have to agree with your hubby. I like to call them Muddy Buddies. Sorry can we still be friends? This cake is going on my to make list!! :) Pinned!!
Of course we can still be friends :)
It’s a MEGA layer cake! Amazing Beth! We are both getting our layer caking on this week! I have never had ‘puppy show’ before but I reckon I’d love it. Your cake skills are impressive!
Girl, you need to make puppy chow STAT!!!
My husband and I have the same argument over what to call it, but I’m pretty sure we would both agree that neither one of us could resist this cake!
Great choice, hehe :)
Girl, you are a GENIUS!
Hahaa, okay.. GENUIS!
This is brilliant Beth, I love the crunchy layer between the cake!
That could be the best part!
This is one EPIC cake, girl! Love all the layer cakes you are rocking lately! Puppy chow in the layers too? Absolutely genius and totally trumps all the cakes in the land! Pinned!
Awww, thanks for pinning Kelly!
This is too cool Beth! What a great idea for a cake!
I had never heard of puppy chow. I was thinking “dogs can’t eat chocolate and what person would want to eat dog food?”
Puppy chow is amazing!! :)