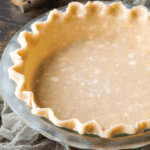
Pie Crust (Gluten Free)
After spending 4 weeks in the kitchen perfecting the perfect gluten-free pie crust recipe, I'm sharing it with you! Plus, I'm sharing all my best tips and things I did wrong along the way, so you can make easy gluten-free pie crust the first time!
Servings: 2 pie crusts
Equipment
- Pizza Cutter
- Rolling Pin
Ingredients
- 2 ½ cups (300g) Gluten Free All-purpose flour
- 1 tsp salt
- 1 Tbsp granulated sugar
- 6 Tbsp (86g) cold unsalted butter
- ⅔ cup (129g) vegetable shortening chilled
- ½ cup (118ml) ice cold water I typically only use 4-5 tablespoons
Instructions
- Chill the Butter and Shortening: Start by cutting the butter and shortening into small cubes. Place in a container or on a plate and put in the fridge to chill for at least 30 minutes. I recommend using shortening sticks so it's easier to cut into pieces. If using a tub of shortening, you can portion the ⅔ cup into about tablespoon size pieces.6 Tbsp (86g) cold unsalted butter, ⅔ cup (129g) vegetable shortening
- Combine Dry Ingredients: In the food processor, add the 2 1/2 cups of all-purpose flour, 1 teaspoon of salt, and 1 tablespoon of granulated sugar. Pulse a few times to combine the dry ingredients.2 ½ cups (300g) Gluten Free All-purpose flour, 1 tsp salt, 1 Tbsp granulated sugar
- Add Butter and Shortening: Add the 6 tablespoons of cold unsalted butter cubes and the chilled vegetable shortening chunks into the food processor. Pulse until the mixture resembles coarse crumbs with some pea-sized pieces of butter and shortening remaining. This should take about 10-15 one-second pulses.
- Add Ice Water: drizzle in the ice-cold water, start with 4 tablespoons, continue processing until the dough begins to clump together. You can test the dough by pinching it; if it holds together, it's ready. If it's too dry, add more water, 1 tablespoon at a time, and pulse briefly until the dough reaches the right consistency.½ cup (118ml) ice cold water
- Form Dough: Turn off the food processor and carefully remove the dough from the bowl. Place it onto a clean surface, such as a large piece of plastic wrap.
- Shape into Discs: Divide the dough into two equal portions. Shape each portion into a flat disc. This makes it easier to roll out later. Wrap each disc tightly in plastic wrap and refrigerate for at least 60 minutes or until firm. You can refrigerate for up to 4 days. You can also freeze one of the discs for future use if you're only making a single-crust pie.
- Prepare Your Work Surface: Ensure your countertop or pie mat is clean and dry. Lightly dust it with all-purpose flour to prevent sticking.
- Take Out Chilled Dough: Remove one of the chilled dough discs from the refrigerator and let it sit at room temperature for a few minutes. This will make it easier to roll.
- Begin Rolling: Place the dough disc on the floured surface and use your rolling pin to gently press it down in the center. Start rolling from the center outward. Apply even pressure as you roll, working in all directions to maintain a roughly circular shape. If the dough cracks or splits during the rolling process, use your fingers to gently pinch it back together.
- Rotate the Dough: After each roll, rotate the dough a quarter turn. This helps ensure an even thickness and round shape, and prevents the dough from sticking to the surface. Continue rolling and rotating until the dough is about 6 inches in diameter.
- Flip and Dust with Flour: Gently lift the dough from the surface using your hands, and flip it over. This prevents sticking and ensures even rolling. If the dough feels sticky, lightly dust it with more flour.
- Continue Rolling: Resume rolling from the center outward, rotating the dough as needed. Aim for an even thickness and gradually work your way to your desired size, typically 11-12 inches in diameter for a standard pie dish.
- Use a Pizza Cutter (Optional): For a perfectly round shape, consider using a pizza cutter. Place the cutter's wheel at the edge of the dough, and cut around the perimeter to trim it into a precise circle. This also helps you visualize the exact size needed for your pie pan.
- Sprinkle with Flour: To prevent the dough from sticking to itself when rolled onto the rolling pin, sprinkle a little more flour over the surface of the dough.
- Roll onto Rolling Pin: Carefully lift one edge of the dough and gently roll it onto your rolling pin. Start from one edge and continue rolling until the entire circle is wrapped around the rolling pin.
- Transfer to Pie Dish: Position the dough-covered rolling pin over your pie dish with the edge of the dough hanging over the side. Gently unroll the dough from the rolling pin into the pie dish, ensuring it covers the bottom and sides evenly.
- Trim Excess Dough: Trim any excessive overhang from the dough, leaving about 1/2 to 1 inch of overhang all around the pie dish. You can use scissors or a knife to do this.
- Fold Under the Overhang: Start by folding the excess dough under itself. This creates a thick, double layer of dough around the edge of the pie dish. It also helps to reinforce the edge and create a more substantial crust.
- Flute the Edges: Using your thumb and pointer finger on one hand and your pointer finger on the other hand, pinch the folded edge of the dough together. Hold your fingers perpendicular to the edge of the crust. Continue pinching at regular intervals along the edge. As you pinch, press the dough between your fingers gently. You can create various crimp patterns, such as small points or scallops, depending on your preference.
- Final Touches: After you've crimped the entire edge, take a moment to go back and adjust any areas that might need a bit more attention. Make sure the edge is sealed securely.
- Chill or Bake as Directed: Depending on your pie recipe, you may need to chill the pie crust or proceed directly to baking. Follow the specific instructions for your pie filling and baking time and temperature.
Nutrition
Calories: 1428kcal | Carbohydrates: 115g | Protein: 16g | Fat: 108g | Saturated Fat: 39g | Polyunsaturated Fat: 21g | Monounsaturated Fat: 38g | Trans Fat: 10g | Cholesterol: 90mg | Sodium: 1170mg | Potassium: 10mg | Fiber: 15g | Sugar: 11g | Vitamin A: 1050IU | Calcium: 112mg | Iron: 6mg